Table of Contents
Introduction
Apache Tomcat is an open source implementation of Java Server pages ,Java Servlet and Java Websocket Technologies developed by Apache Software foundation. It is most widely used to deploy JSP and Java Servlet applications.Step #1: Install and verify java version
Tomcat requires Java JDK to be function, we can either install Open JDK or Oracle JAVA JDK. In this installation we have preinstalled Oracle Java 8, if you are not installed follow below link to install. How to Download and Install Oracle Java 8 On Ubuntu 18.04/16.04 LTSjava -versionOutput:
java version "1.8.0_211"
Java(TM) SE Runtime Environment (build 1.8.0_211-b12)
Java HotSpot(TM) 64-Bit Server VM (build 25.211-b12, mixed mode)
Step #2: Creating directory
First , we are creating directory before downloading and extracting tomcat 8 setup, Enter below command to create directorysudo mkdir -p /opt/tomcat
Step #3: Creating tomcat user and group
We have to run tomcat with it’s own group and user without root privileges to run tomcat service. Enter below command to create group.sudo groupadd tomcatOutput:
sent invalidate(passwd) request, exiting

sent invalidate(group) request, exiting

sent invalidate(group) request, exiting
Enter below command to create user in tomcat group with /opt/tomcat directory permission .
sudo useradd -s /bin/false -g tomcat -d /opt/tomcat tomcatOutput:
sent invalidate(passwd) request, exiting

sent invalidate(group) request, exiting

sent invalidate(passwd) request, exiting

sent invalidate(group) request, existing
Step #4: Download and Install Tomcat 8 on Ubuntu 18.04/16.04 LTS
Download the latest binary release version from tomcat 8 download page and configure it manually. In this article we are configuring tomcat 8.5.54 version and we are using wget and unzip commands to download and extract the setup, if you don’t have installed on your system, enter below command to install.sudo apt install unzip wgetChange to /tmp directory and Download the setup using below command.
cd /tmp
sudo wget https://www-us.apache.org/dist/tomcat/tomcat-8/v8.5.54/bin/apache-tomcat-8.5.54.zip
Output:
https://www-us.apache.org/dist/tomcat/tomcat-8/v8.5.54/bin/apache-tomcat-8.5.54.zip
Resolving www-us.apache.org (www-us.apache.org)... 40.79.78.1
Connecting to www-us.apache.org (www-us.apache.org)|40.79.78.1|:443... connected.
HTTP request sent, awaiting response... 302 Found
Location: https://downloads.apache.org/tomcat/tomcat-8/v8.5.54/bin/apache-tomcat-8.5.54.zip [following]
--2020-04-20 13:25:53--  https://downloads.apache.org/tomcat/tomcat-8/v8.5.54/bin/apache-tomcat-8.5.54.zip
Resolving downloads.apache.org (downloads.apache.org)... 88.99.95.219, 2a01:4f8:10a:201a::2
Connecting to downloads.apache.org (downloads.apache.org)|88.99.95.219|:443... connected.
HTTP request sent, awaiting response... 200 OK
Length: 10845259 (10M) [application/zip]
Saving to: ‘apache-tomcat-8.5.54.zip’

apache-tomcat-8.5.54.zip                  100%[=====================================================================================>]  10.34M  8.12MB/s    in 1.3s

2020-04-20 13:25:55 (8.12 MB/s) - ‘apache-tomcat-8.5.54.zip’ saved [10845259/10845259]
Once download is complete, you will see output like above. Unzip/extract and move to /opt/tomcat/ directory.
unzip apache-tomcat-*.zip

sudo mv apache-tomcat-8.5.54/*   /opt/tomcat/
To have control on over versions and updates, we will create symbolic link latest which will point tomcat installation directory. when newer version comes and when you want to upgrade then you have to change symlink to new latest verision.
sudo ln -s /opt/tomcat /opt/tomcat/latestchange the directory ownership permission to user and group tomcat.
sudo chown -R tomcat: /opt/tomcatMake all scripts in the bin location executable.
sudo sh -c 'chmod +x /opt/tomcat/latest/bin/*.sh'
Step #5: Configure Environment variables
echo "export CATALINA_HOME="/opt/tomcat"" >> ~/.bashrc
source ~/.bashrc
Step #6: Create Systemd unit file
To run Tomcat as a service we will create a new tomcat.service unit file in the /etc/systemd/system/ directory with the following contents:sudo nano /etc/systemd/system/tomcat.service
/etc/systemd/system/tomcat.service
[Unit]

Description=Tomcat 8.5 servlet container

After=network.target

[Service]

Type=forking

User=tomcat

Group=tomcat

Environment="JAVA_HOME=/usr/lib/jvm/default-java"

Environment="JAVA_OPTS=-Djava.security.egd=file:///dev/urandom"

Environment="CATALINA_BASE=/opt/tomcat/latest"

Environment="CATALINA_HOME=/opt/tomcat/latest"

Environment="CATALINA_PID=/opt/tomcat/latest/temp/tomcat.pid"

Environment="CATALINA_OPTS=-Xms512M -Xmx1024M -server -XX:+UseParallelGC"

ExecStart=/opt/tomcat/latest/bin/startup.sh

ExecStop=/opt/tomcat/latest/bin/shutdown.sh

[Install]

WantedBy=multi-user.target
Modify the value of JAVA_HOME value,If the path of your Java installation is different.
Notify systemd that we created a new unit file and start the Tomcat service by executing:
sudo systemctl daemon-reload

sudo systemctl start tomcat
You can check the service status with the below command:
sudo systemctl status tomcatOutput:
tomcat.service - Tomcat 8.5 servlet container

 Loaded: loaded (/etc/systemd/system/tomcat.service; disabled; vendor preset: enabled)

   Active: active (running) since Wed 2019-08-21 05:58:36 UTC; 11s ago

  Process: 88136 ExecStart=/opt/tomcat/latest/bin/startup.sh (code=exited, status=0/SUCCESS)

 Main PID: 88156 (java)

    Tasks: 50

   Memory: 143.4M

      CPU: 3.701s

   CGroup: /system.slice/tomcat.service

           └─88156 /usr/lib/jvm/default-java/bin/java -Djava.util.logging.config.file=/opt/tomcat/latest/conf/logging.properties -Djava.util.logging.manager=org.apache.juli.ClassLoaderL
and if there are no errors you can enable the Tomcat service to be automatically started at system startup:
sudo systemctl enable tomcatOutput:
Created symlink from /etc/systemd/system/multi-
user.target.wants/tomcat.service to /etc/systemd/system/tomcat.service.
Step #7: Adjust the Firewall
To allow traffic on port 8080 enter the below command:sudo ufw allow 8080/tcp
Step #8: Test the Installation
Open your browser and type: http://localhost_or_IP Address:8080 If installation is successful, you will see tomcat default page like below,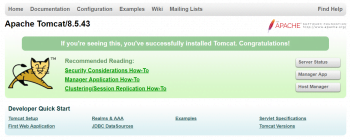
Step #9: Start, Restart and Stop tomcat in ubuntu
Below are commands to start,restart and stop tomcat service in ubuntu,sudo systemctl start tomcat sudo systemctl restart tomcat sudo systemctl stop tomcatTo learn more about Tomcat 8 features. Please refer official documentation.
Awesome Brother
Love u brother
U nailed it one of the best blog to install tomcat
I must say, you are sharing valuable tips around Ubuntu.
I see many companies are using Ubuntu right now. And plenty of regular users too, who are tight with the budget and can’t afford Windows. I used to do so too.
But, haven’t gone that deeper into Ubuntu OS. Though, I see it’s undervalued being free. OR, Maybe that’s the reason. Thanks, Shiv!
Thanks Mohammed for your comment. I believe in sharing knowledge.
Excellent article! Very detailed presentation.
Thanks for comment.
Excellent, it worked. Thank you.
thanks for your feedback.