In this tutorial I am going to explain what are Kubernetes Replication Controllers and Replica Sets and will demonstrate how they work within a Kubernetes cluster.

There are two main types of Replications in Kubernetes -> ReplicaSets and Replication Controller. But before even starting exploring these concepts the first question in my mind arises is why I need the replication at first place? So, Lets start digging deeper and understand the reason.
Table of Contents
Why we need replication?
A container or pod may crash because of multiple reasons. The main purpose of using Replication is Reliability, Load Balancing, and Scaling. It ensures that the pre-defined pods always exists.
To understand this in an easier manner lets take an example ->
Lets assume we are running our application on a single pod. What if for some reason our application crashes and the pod fails. Users will no longer be able to access our application.
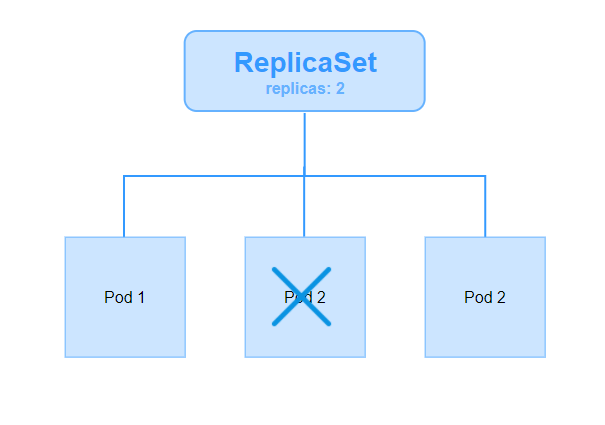
To prevent users from losing access to our application we would like to have more than one instances of our application running at the same time. That way if one pod fails we still have our application running on the other one. The replication controller helps us run multiple instances of a single pod in the Kubernetes cluster. Thus providing high availability.
So does that mean you can’t use a replication controller if you plan to have a single pod! No, You can use it. Even if you have a single pod the replication controller can help by automatically bringing up a new pod when the existing one fails. Thus the replication controller ensures that the specified number of pods are running at all times.
Another reason we need a replication controller is to create multiple pods to share the load across them. Simple scenario is if we have a single pod serving a set of users, when the number of users increase we deploy additional pod to balance the load across the two pods if the demand further increases and if we were to run out of resources on the first node we could deploy additional pods across the other nodes in the cluster.
The replication controller spans across multiple nodes in the cluster. It helps us balance the load across multiple pods on different nodes as well as scale our application when the demand increases.
It’s important to note that there are two similar terms replication controller and ReplicaSet
What is Replication Controller in Kubernetes ?
A Replication Controller ensures that a specified number of pod replicas are running at any given time. In other words, a Replication Controller makes sure that a pod or a homogeneous set of pods is always up and available.
What is ReplicaSet’s in Kubernetes ?
A ReplicaSet’s purpose is to maintain a stable set of replica Pods running at any given time. As such, it is often used to guarantee the availability of a specified number of identical Pods. The ReplicaSets are also known as next generation replication controller.
ReplicaSets checks whether the target pod is already managed by another controller as well (like a Deployment or another ReplicaSet).
Difference between Kubernetes Replication Controllers and Replica Sets
Replication Controller and Replica Set do almost the same thing. Both of them ensure that a specified number of pod replicas are running at any given time.
The difference comes with the usage of selectors to replicate pods. Replica Set use Set-Based selectors which gives more flexibility while replication controllers use Equity-Based selectors.
ReplicationController eg:
app = front-end
This will select all the resources with key equal to app and value equal to front-end as it supports Equity-Based selectors.
Three type of operators used in set based equality based selectors are –> = , == , !=. The first two represent equality (and are simply synonyms), while the latter represents inequality.
For example, if we provide the following selectors:
env = staging
tier != front-end
Here, we’ll select all resources with key equal to env and value equal to staging. The latter selects all resources with key equal to tier and value distinct from front-end, and all resources with no labels with the tier key.
ReplicaSet eg:
tier in (front-end, back-end)
This will select all the resources with key equal to app and value equal to front-end or back-end as it supports Set-Based selectors.
Three type of operators used in set-based selectors are –> in , notin, exists(only the key identifier).
For example, if we provide the following selectors:
env in (prod, qa, dev, staging)
tier notin (front-end, back-end) webapp
Here, in the first selector will selects all resources with key equal to environment and value equal to production or qa or staging or dev.
The second example selects all resources with key equal to tier and values other than front-end and back-end, and all resources with no labels with the tier key. The third example selects all resources including a label with key webapp; no values are checked.
Creating a Replication Controller
Now I will demonstrate how we can create Replication Controller using the yaml manifest file.
apiVersion: v1
kind: ReplicationController
metadata:
  name: fosstechnix-httpd-rc-demo
spec:
  replicas: 3
  selector:
    app: httpd
    tier: qa
  template:
    metadata:
      name: httpd
      labels:
        app: httpd
        tier: qa
    spec:
      containers:
      - name: httpd-container
        image: httpd
        imagePullPolicy: IfNotPresent
        ports:
        - containerPort: 80
Above is the manifest file which will create the defined Replication Controller and the Pods that it manages when submitted to Kubernetes cluster.
root@kmaster-ft:~/replication# kubectl apply -f rc.yml
replicationcontroller/fosstechnix-httpd-rc-demo created
Verify the above resource creation:
root@kmaster-ft:~/replication# kubectl get replicationcontrollers fosstechnix-httpd-rc-demo
NAME                        DESIRED   CURRENT   READY   AGE
fosstechnix-httpd-rc-demo   3         3         3       12s
Describe the Replication Controller we created
root@kmaster-ft:~/replication# kubectl describe replicationcontrollers fosstechnix-httpd-rc-demo
Name:         fosstechnix-httpd-rc-demo
Namespace:    default
Selector:     app=httpd,tier=qa
Labels:       app=httpd
              tier=qa
Annotations:  <none>
Replicas:     3 current / 3 desired
Pods Status:  3 Running / 0 Waiting / 0 Succeeded / 0 Failed
Pod Template:
  Labels:  app=httpd
           tier=qa
  Containers:
   httpd-container:
    Image:        httpd
    Port:         80/TCP
    Host Port:    0/TCP
    Environment:  <none>
    Mounts:       <none>
  Volumes:        <none>
Events:
  Type    Reason            Age   From                    Message
  ----    ------            ----  ----                    -------
  Normal  SuccessfulCreate  24s   replication-controller  Created pod: fosstechnix-httpd-rc-demo-twrd2
  Normal  SuccessfulCreate  24s   replication-controller  Created pod: fosstechnix-httpd-rc-demo-xdnwd
  Normal  SuccessfulCreate  24s   replication-controller  Created pod: fosstechnix-httpd-rc-demo-d9v24
Verify the pods running:
root@kmaster-ft:~/replication# kubectl get pods
NAME                              READY   STATUS    RESTARTS   AGE
fosstechnix-httpd-rc-demo-d9v24   1/1     Running   0          40s
fosstechnix-httpd-rc-demo-twrd2   1/1     Running   0          40s
fosstechnix-httpd-rc-demo-xdnwd   1/1     Running   0          40s
Let’s verify the Replication Controller functionality by deleting a running pod controlled by replication controller manually and the replication controller will automatically spawn a new pod to meet the desired state. Here’s an example:
root@kmaster-ft:~/replication# kubectl delete pod fosstechnix-httpd-rc-demo-d9v24
pod "fosstechnix-httpd-rc-demo-d9v24" deleted
Verify the status of running pods :
root@kmaster-ft:~/replication# kubectl get pods
NAME                              READY   STATUS    RESTARTS   AGE
fosstechnix-httpd-rc-demo-brfj7   1/1     Running   0          11s
fosstechnix-httpd-rc-demo-twrd2   1/1     Running   0          65s
fosstechnix-httpd-rc-demo-xdnwd   1/1     Running   0          65s
The new pod (fosstechnix-httpd-rc-demo-brfj7) has been created with a different pod name to maintain the replica count we have specified.
Within the specification file if we didn’t put the selector, the replication controller will automatically configure it with the labels of pod, as the pod labels must match the replication controller selectors, otherwise the pods will move out of the scope of replication controller.
Scaling up a Replication Controller
root@kmaster-ft:~/replication# kubectl scale replicationcontroller --replicas=5 fosstechnix-httpd-rc-demo
replicationcontroller/fosstechnix-httpd-rc-demo scaled
Verify the pods running now:
root@kmaster-ft:~/replication# kubectl get pods
NAME                              READY   STATUS    RESTARTS   AGE
fosstechnix-httpd-rc-demo-brfj7   1/1     Running   0          64s
fosstechnix-httpd-rc-demo-kbv8f   1/1     Running   0          20s
fosstechnix-httpd-rc-demo-s4t42   1/1     Running   0          20s
fosstechnix-httpd-rc-demo-twrd2   1/1     Running   0          118s
fosstechnix-httpd-rc-demo-xdnwd   1/1     Running   0          118s
Two new pods have been added.
Deleting Replication Controller
root@kmaster-ft:~/replication# kubectl delete replicationcontrollers fosstechnix-httpd-rc-demo
replicationcontroller "fosstechnix-httpd-rc-demo" deleted
Creating a ReplicaSet
Time to demonstrate the creation of Replicaset using the yaml manifest file. To be able to create new pods if necessary, the ReplicaSet definition includes a template part containing the definition for new pods.
root@kmaster-ft:~/replication# cat rs.yml
apiVersion: apps/v1
kind: ReplicaSet
metadata:
  name: fosstechnix-httpd-rs-demo
spec:
  replicas: 3
  selector:
    matchLabels:
      env: qa
    matchExpressions:
    - { key: tier, operator: In, values: [front-end] }
  template:
    metadata:
      name: httpd
      labels:
        env: qa
        tier: front-end
    spec:
      containers:
      - name: httpd-container
        image: httpd
        imagePullPolicy: IfNotPresent
        ports:
        - containerPort: 80
Above is the manifest file which will create the defined ReplicaSet and the Pods that it manages when submitted to Kubernetes cluster.
NOTE: Make sure you do not use a label that is already in use by another controller. Otherwise, another ReplicaSet or Controller may acquire the pod(s) first. Also notice that the labels defined in the pod template cannot be different than those defined in the matchLabels part.
root@kmaster-ft:~/replication# kubectl apply -f rs.yml
replicaset.apps/fosstechnix-httpd-rs-demo created
Describe the ReplicaSet we created
root@kmaster-ft:~/replication# kubectl describe replicasets.apps fosstechnix-httpd-rs-demo
Name:         fosstechnix-httpd-rs-demo
Namespace:    default
Selector:     env=qa,tier in (front-end)
Labels:       <none>
Annotations:  <none>
Replicas:     3 current / 3 desired
Pods Status:  3 Running / 0 Waiting / 0 Succeeded / 0 Failed
Pod Template:
  Labels:  env=qa
           tier=front-end
  Containers:
   httpd-container:
    Image:        httpd
    Port:         80/TCP
    Host Port:    0/TCP
    Environment:  <none>
    Mounts:       <none>
  Volumes:        <none>
Events:
  Type    Reason            Age   From                   Message
  ----    ------            ----  ----                   -------
  Normal  SuccessfulCreate  98s   replicaset-controller  Created pod: fosstechnix-httpd-rs-demo-qnjfk
  Normal  SuccessfulCreate  98s   replicaset-controller  Created pod: fosstechnix-httpd-rs-demo-d266w
  Normal  SuccessfulCreate  98s   replicaset-controller  Created pod: fosstechnix-httpd-rs-demo-29chz
Verify the running pods:
root@kmaster-ft:~/replication# kubectl get pods
NAME                              READY   STATUS    RESTARTS   AGE
fosstechnix-httpd-rs-demo-29chz   1/1     Running   0          2m
fosstechnix-httpd-rs-demo-d266w   1/1     Running   0          2m
fosstechnix-httpd-rs-demo-qnjfk   1/1     Running   0          2m
Scaling up a ReplicaSet
root@kmaster-ft:~/replication# kubectl scale replicaset --replicas=5 fosstechnix-httpd-rs-demo
replicaset.apps/fosstechnix-httpd-rs-demo scaled
Verify the running pods:
root@kmaster-ft:~/replication# kubectl get pods
NAME                              READY   STATUS    RESTARTS   AGE
fosstechnix-httpd-rs-demo-29chz   1/1     Running   0          4m11s
fosstechnix-httpd-rs-demo-6xfkj   1/1     Running   0          24s
fosstechnix-httpd-rs-demo-d266w   1/1     Running   0          4m11s
fosstechnix-httpd-rs-demo-gjxb7   1/1     Running   0          24s
fosstechnix-httpd-rs-demo-qnjfk   1/1     Running   0          4m11s
Configure Auto Scaling on a ReplicaSet
We can configure autoscaling for ReplicaSets to scale upto the maximum number of pods defined according to the CPU load that the node is having.
Run the following command to enable autoscaling for our ReplicaSet :
root@kmaster-ft:~/replication# kubectl autoscale replicaset --max=5 fosstechnix-httpd-rs-demo
horizontalpodautoscaler.autoscaling/fosstechnix-httpd-rs-demo autoscaled
Find out the the owner of running pods
In your production environment where you may have thousands of pods running, you may want to verify that a particular pod is actually managed by this ReplicaSet or not. By querying the pod, you can get this info:
root@kmaster-ft:~/replication# kubectl get pods fosstechnix-httpd-rs-demo-29chz -o yaml | grep -A 5 owner
  ownerReferences:
  - apiVersion: apps/v1
    blockOwnerDeletion: true
    controller: true
    kind: ReplicaSet
    name: fosstechnix-httpd-rs-demo
Deleting a ReplicaSet
A ReplicaSet can be deleted by issuing a kubectl command like the following:
root@kmaster-ft:~/replication# kubectl delete replicasets.apps fosstechnix-httpd-rs-demo
replicaset.apps "fosstechnix-httpd-rs-demo" deleted
The above command will delete the ReplicaSet and all the managed pods.
But lets say you just want to delete the ReplicaSet resource, not the pods it manages. Run the following command:
root@kmaster-ft:~/replication# kubectl delete replicasets.apps fosstechnix-httpd-rs-demo --cascade=false
replicaset.apps "fosstechnix-httpd-rs-demo" deleted
Verify if the pods are still running or not:
root@kmaster-ft:~/replication# kubectl get pods
NAME                              READY   STATUS    RESTARTS   AGE
fosstechnix-httpd-rs-demo-9qzh7   1/1     Running   0          6m5s
fosstechnix-httpd-rs-demo-c7rh6   1/1     Running   0          6m5s
fosstechnix-httpd-rs-demo-gcd45   1/1     Running   0          6m5s
Verify if the ReplicaSet is deleted:
root@kmaster-ft:~/replication# kubectl get replicasets.apps
No resources found in default namespace.
NOTE:
One should never create a bare pod with a label that matches the selector of a ReplicaSet controller unless its template matches the pod definition. Because once you create it the ReplicaSet controller will automatically adopt it. And if the newly created bare pod’s specifications are different then the controller is programmed to use (for eg. container image is different) then you will have consequences of losing data.
The recommended method is to always use a controller like a ReplicaSet or a Deployment to create and maintain your pods.
That’s all for this particular topic.
Hope you like the tutorial. Please let us know your feedback in the response section.
Related Articles:
Kubernetes Tutorial for Beginners [10 Practical Articles]
Reference: