In this article, we explore the integration of ConfigMap, a key Kubernetes resource for managing configuration data, within a Helm chart. The Helm chart includes deployment, service, and ingress manifests, and our goal is to enhance the flexibility and customization of our deployment using ConfigMap | Kubernetes Configmap with Helm Chart.
Table of Contents
Prerequisites
- AWS Account with Ubuntu 22.04 LTS EC2 Instance
- Minikube and kubectl Installed
Install Minikube and kubectl by following the official documentation for your operating system:
Install Minikube on Ubuntu 22.04 LTS
- Helm Installed:
Install Helm by following the official documentation:
How to use configmap in Kubernetes with Helm Chart
We begin by creating a dedicated configmap.yaml file within the Helm chart’s “templates” folder. This ConfigMap contains HTML content that serves as a custom index page for an Nginx deployment. Subsequently, we modify the deployment manifest to incorporate this ConfigMap as a volume, ensuring the dynamic injection of configuration data into the Nginx container.
As part of the Helm chart upgrade process, we witness the seamless transition from the default Nginx welcome page to our custom content sourced from the ConfigMap. Additionally, we delve into the use of Go template syntax within the configmap.yaml file, enabling parameterization and enhanced template rendering.
Create a helm chart
Firstly, let’s create a Helm chart
helm create demo
open the chart
cd demo
run the following command to see the files in it.
ls
exit the directory
cdnow let’s deploy the chart
helm install mychart demo
now lets see the pod deployment
kubectl get pods
get the services
kubectl get svc
Use port-forward to forward the local port to service.
kubectl port-forward --address 0.0.0.0 svc/mychart-demo 8888:80
Check browser. Then you’ll see Nginx welcome page.
To access the application on Browser write the ip address:port number in url.
ip address is the public ip address of your Minikube EC2 instance created on AWS and port number which is 8888 which we have used in forwarding mychart-demo pod.

Create Configmap in Helm Chart
Firstly, we will create a configMap.yaml file in templates folder with the configuration given below.
Enter the demo and templates directory
cd demo/templates
create a configMap.yaml here in templates directory.
nano configMap.yaml
now add the following content into it.
apiVersion: v1
kind: ConfigMap
metadata:
  name: nginx-configmap
data:
  index.html:
    <h1>Welcome to the Helm !!!</h1>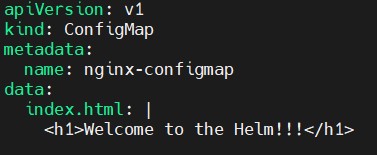
And mount this configMap volume to deployment
nano deployment.yaml
    volumeMounts:
      - name: nginx
        mountPath: /usr/share/nginx/html
volumes:
  - name: nginx
    configMap:
      name: nginx-configmap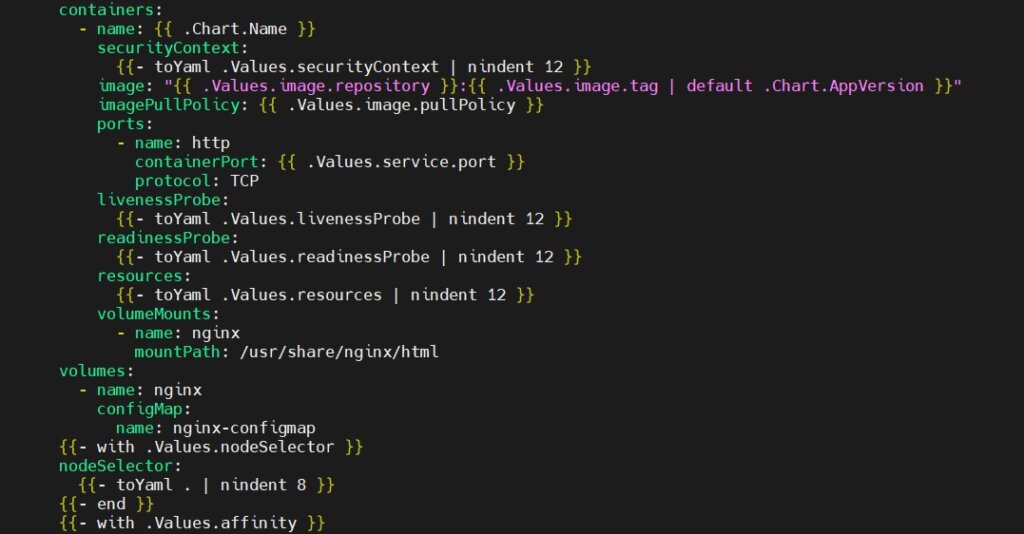
exit the directories
cdThen upgrade the chart
helm upgrade mychart demo
Use port-forward to forward the local port to service.
kubectl port-forward --address 0.0.0.0 svc/mychart-demo 8888:80
And check browser again, you can see the welcome page was changed to our custom page.

Using Go Template syntax
Now again open the demo and templates directory
cd demo/templates
open the configMap.yaml
nano configMap.yaml
change the index.html
apiVersion: v1
kind: ConfigMap
metadata:
  name: nginx-configmap
data:
  index.html: {{ .Values.pageContent }}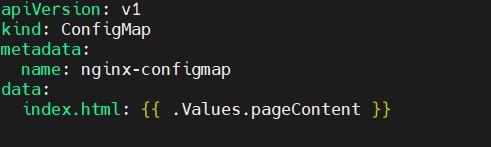
Now this time, Helm will render the message from the values.yaml, so let’s add the parameter in values.yaml file.
first exit the templates directory.
cd ..
open the values.yaml file
nano values.yaml
add the following content into it.
pageContent: |
  <h1> Helm Template using Go syntax </h1>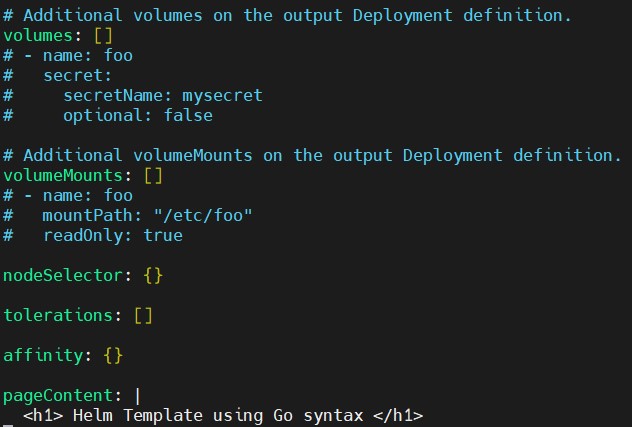
exit the directory
cdUpgrade it and check it out with browser
helm upgrade mychart demo
Use port-forward to forward the local port to service.
kubectl port-forward --address 0.0.0.0 svc/mychart-demo 8888:80
And check browser again,

Accessing file inside templates
Now again open the demo and templates directory
cd demoCreate a static directory and open it.
mkdir staticcd static
inside it create a index.html file and the following content into it
nano index.html
<h1> Helm is accessing files ! </h1>
exit the static directory
cd ..open the templates directory
cd templatesModify configMap.yaml.
nano configMap.yamlapiVersion: v1
kind: ConfigMap
metadata:
name: nginx-configmap
data:
{{- (.Files.Glob "static/*").AsConfig | nindent 2 }}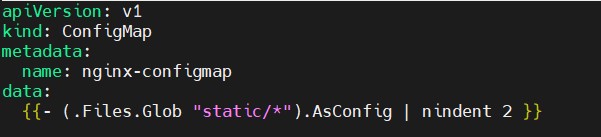
exit the directory
cdUpgrade it
helm upgrade mychart demo
use kubectl port forward
kubectl port-forward --address 0.0.0.0 svc/mychart-demo 8888:80check it out with browser again.

You can view the revisions created of your helm chart
helm history mychart 
Let’s try to rollback the chart to the first revision.
helm rollback mychart 1
Then you’ll see Nginx welcome page come back and add another revision into the history as well.

helm history mychart 
Conclusion:
In summary, this comprehensive guide takes you through the steps of creating a Helm chart, integrating configMap for enhanced configuration management, utilizing Go template syntax, accessing files within templates, and managing chart revisions efficiently.
Reference: