In this article, We are going to perform How to Download and Install Oracle JAVA 11 on Ubuntu 18.04/16.04 LTS Manually or any other cloud platform like Amazon Ec2, Azure VM, Google Cloud Compute,etc. with preinstalled Ubuntu OS.
Table of Contents
Introduction
Java is a set of software and specifications developed at Sun Microsystems. There are two tyes of Java Platforms are JDK (Java Development Kit) and JRE (Java Runtime Environment). Both are helpful for deploying applications on servers and debugging, JVM monitoring,developing.
Oracle Java 8 has ended support in January 2019, You should upgrade to latest version.
Prerequisites
- Ubuntu Server 16.04/18.04 LTS
- SSH access with sudo privileges
To check Ubuntu version:
$ uname -a
OR
$ cat /etc/os-release
Output:
$ cat /etc/os-release

NAME="Ubuntu"
VERSION="16.04.5 LTS (Xenial Xerus)"
ID=ubuntu
ID_LIKE=debian
PRETTY_NAME="Ubuntu 16.04.5 LTS"
VERSION_ID="16.04"
HOME_URL="https://www.ubuntu.com/"
SUPPORT_URL="https://help.ubuntu.com/"
BUG_REPORT_URL="https://bugs.launchpad.net/ubuntu/"
VERSION_CODENAME=xenial
UBUNTU_CODENAME=xenial
Follow the below steps to Install Oracle Java 11 on Ubuntu 18.04/16.04 LTS Manually using command line.
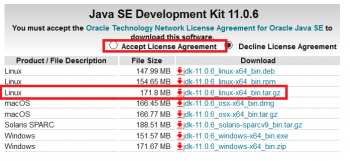
Step 1: Download Oracle Java 11
Generally Oracle will not allow to download directly without accepting their licences. We have to create one account in Oracle java website by your personal or official mail. After accepting licence download the application from browser to local machine.
This link takes you to the Oracle home website Oracel Java SRE.
Once you opened above link goto “Java SE Development Kit 11.0.6” section, click on “Accept License Agreement” Radio button and download “jdk-11.0.6_linux-x64_bin.tar.gz” setup for ubuntu.
After downloading into local machine, using SCP/SFTP/FTP transfer the file from local machine to Ubuntu server.
Step 2: Copy downloaded Setup and Extract
Create a directory /opt/jdk
$ sudo mkdir -p /opt/jdk
Copy the tar file from the directory copied from local machine to server to /opt/jdk folder and execute below command:
$ sudo cp -rf /home/fosstechnix/jdk-11.0.6_linux-x64_bin.tar.gz /opt/jdk
$ cd /opt/jdk/
$ sudo sudo tar -zxf jdk-11.0.6_linux-x64_bin.tar.gz
Now unarchived the file and check the content by long-list:
# ls
Output:
$ ls

jdk-11.0.6 jdk-11.0.6_linux-x64_bin.tar.gz
Step 3: Install Oracle Java 11 on Ubuntu with Alternatives
$ sudo update-alternatives --install /usr/bin/java java /opt/jdk/jdk-11.0.6/bin/java 100
update-alternatives: using /opt/jdk/jdk-11.0.6/bin/java to provide /usr/bin/java (java) in auto mode
Note : Its not particularly o/p if you have installed open jdk before
Step 4: Verify Update Alternatives
$ sudo update-alternatives --display java
java - auto mode
  link best version is /opt/jdk/jdk-11.0.6/bin/java
  link currently points to /opt/jdk/jdk-11.0.6/bin/java
  link java is /usr/bin/java
/opt/jdk/jdk-11.0.6/bin/java - priority 100
$ sudo update-alternatives --config java
 There is only one alternative in link group java (providing /usr/bin/java): /opt/jdk/jdk-11.0.6/bin/java
Nothing to configure.
Step 5: Setting the JAVA_HOME Environment Variables
$ sudo nano /etc/environment
JAVA_HOME=/opt/jdk/jdk-11.0.6
$ source /etc/environment
$ echo $JAVA_HOME
/opt/jdk/jdk-11.0.6
$ sudo apt-get update
Step 6: Verify Java Version
$ java -version
java version "11.0.6" 2020-01-14 LTS
Java(TM) SE Runtime Environment 18.9 (build 11.0.6+8-LTS)
Java HotSpot(TM) 64-Bit Server VM 18.9 (build 11.0.6+8-LTS, mixed mode)
Conclusion
In this article, We have downloaded Oracle Java 8 from official site, installed using command line, configured JAVA_HOME ,checked to switch java version and checked installed java version using command line.
How to Download and Install Oracle Java 8 on CentOS 7
How to Download and Install Oracle JAVA 8 on Ubuntu 18.04/16.04 LTS