In this article we are going to cover How to Create GitOps Workflow with ArgoCD and GitHub Actions.
Table of Contents
Prerequisites:
- AWS Account(Ubuntu EC2 configured)
- Install Git
- Install Docker
- Install Minikube
- Install kubectl
- Install Helm
- Install ArgoCD
Step #1:Install ArgoCD on Minikube
Follow these steps to install Argo CD
We are using driver as docker
minikube start --driver=docker
Just like other Kubernetes tools, ArgoCD requires a namespace with its name. Therefore, we will create a namespace for argocd.
kubectl create ns argocd
ArgoCD can be installed using its manifests. First, you’ll need to download these manifests and apply them to your Minikube cluster.
kubectl apply -n argocd -f https://raw.githubusercontent.com/argoproj/argo-cd/stable/manifests/install.yaml
Step #2:Install Helm on Minikube
Helm simplifies deploying and managing applications on Kubernetes. Let’s configure Helm and add the necessary repositories:
Install Helm
curl -fsSL -o get_helm.sh https://raw.githubusercontent.com/helm/helm/main/scripts/get-helm-3
chmod 700 get_helm.sh
./get_helm.sh
Add the official Helm repository:
helm repo add stable https://charts.helm.sh/stable
Update the Helm repositories:
helm repo update
Step #3:Create Dockerfile for Go App
Lets create dockerfile using below command:
sudo nano Dockerfile
# Use a lightweight base image
FROM golang:1.21 as builder

# Set the working directory
WORKDIR /app

# Copy your Go source code to the container
COPY . .

# Build your Go application
RUN CGO_ENABLED=0 GOOS=linux go build -o server

# Use a minimal base image for the final image
FROM alpine:latest

# Set the working directory
WORKDIR /app

# Copy the binary from the builder stage
COPY --from=builder /app/server .

# Expose the port your application will run on
EXPOSE 8081

# Start your Go application
CMD ["./server"]
Lets create Go Application -main.go file using below command:
sudo nano main.go
package main

import (
	"fmt"
	"net/http"
)

func helloHandler(w http.ResponseWriter, r *http.Request) {
	// Write the response to the client
	fmt.Fprint(w, "Hello, World!")
}

func main() {
	// Register the handler function for the root ("/") route
	http.HandleFunc("/", helloHandler)

	// Start the HTTP server on port 8080
	if err := http.ListenAndServe(":8081", nil); err != nil {
		fmt.Printf("Server error: %v\n", err)
	}
}
Step #4:Create Helm Chart for Go application and modify helm chart file
Initialize a new Helm chart:
helm create chart
This will create a new directory named chart with the basic structure of a Helm chart.
Modify the Helm chart files according to our application’s requirements.
Update chart/templates/deployment.yaml: Replace the content of the file with the following code:
sudo nano deployment.yaml
apiVersion: apps/v1
kind: Deployment
metadata:
  name: go-app
spec:
  replicas: 2
  selector:
    matchLabels:
      app: go-app # Add this label
  template:
    metadata:
      labels:
        app: go-app
    spec:
      containers:
        - name: go-app
          image: "{{ .Values.image.repository }}:{{ .Values.image.tag }}"
          ports:
            - containerPort: 8081
sudo nano service.yaml
apiVersion: v1
kind: Service
metadata:
  name: go-app
spec:
  selector:
    app: go-app
  ports:
    - protocol: TCP
      port: 8081
      targetPort: 8081 # Match the port where your Go application is running
sudo nano values.yaml
image:
  repository: devopshint/go-app
  tag: f04b9b3f230b1e4c5eb2bc0da7b14f93809560ad
sudo nano chart.yaml
apiVersion: v2
name: go-app
description: A Go Application
type: application
version: 0.1.0
appVersion: 1.0.0
Step #5:Create ArgoCD workflow to deploy application in ArgoCD
create new folder apps and create new file in apps folder go-app-deploy-minikube.yaml
sudo nano go-app-deploy-minikube.yaml
apiVersion: argoproj.io/v1alpha1
kind: Application
metadata:
  name: 'go-app'
spec:
  destination:
    name: 'in-cluster'
    namespace: 'default'
  source:
    path: 'chart'
    repoURL: 'https://github.com/devopshint/gitops-workflow-deploy-goapp-minikube-using-argocd'
    targetRevision: HEAD
    helm:
      valueFiles:
      - values.yaml
  project: 'default'
  syncPolicy:
    syncOptions:
      - CreateNamespace=false
Step #6:Push Go App code and Dockerfile to GitHub Repo
- Create new repo in GitHub
- Click on the “New” button to create a new repository.
- Provide a name for your repository.
- Optionally, add a description and choose the repository visibility settings.
- Click on the “Create repository” button to create the repository.
Initialize Git and link the repository:
- Open a terminal or command prompt.
- Navigate to the root directory of your application.
- Commit and push the application code
Stage the changes by running the following command:
git add .
Commit the changes with a meaningful message by running the following command:
git commit -m "Initial commit"
Push the code to the remote repository by running the following command:
git push -u origin main
Step #7:Access the Argo CD UI
Run the following command to port forward the Argo CD UI to your local machine:
kubectl port-forward svc/argocd-server -n argocd --address 0.0.0.0 8080:443
Open your browser and navigate to http://localhost:8080 to access the Argo CD UI.
Retrieve the Argo CD admin password by running the following command:
kubectl -n argocd get secret argocd-initial-admin-secret -o jsonpath="{.data.password}" | base64 -d
Step #8:GitHub Actions workflow to build Docker Image and push to DockerHub
- In your GitHub repository, create the directory
.github/workflows - Create a new file named
cd.yamland open it for editing.
name: Argo CD GitOps CI/CD
on:
  push:
    branches:
    - main

jobs:
  build:
    name: Build and Push the image
    runs-on: ubuntu-latest

    steps:
    - name: Check out code
      uses: actions/checkout@v2

    - name: Login to Docker Hub
      uses: docker/login-action@v3
      with:
        username: ${{ secrets.DOCKERHUB_USERNAME }}
        password: ${{ secrets.DOCKERHUB_TOKEN }}

    - name: Build and push
      uses: docker/build-push-action@v5
      with:
        push: true
        tags: devopshint/go-app:${{ github.sha }} , devopshint/go-app:latest

  update:
    name: Update Helm Manifests
    runs-on: ubuntu-latest
    needs: build

    steps:
    - name: Check out code
      uses: actions/checkout@v2

    - name: Update Image Tag Values
      run: |
        chart_dir="chart"
        new_image_tag=${{ github.sha }}

        # Update the values.yaml file with the new image tag
        sed -i "s/^  tag: .*/  tag: $new_image_tag/" "$chart_dir/values.yaml"

    - name: Commit the changes made
      run: |
        git config --global user.name 'devopshint'
        git config --global user.email '[email protected]'
        git commit -am "updating image tag"
        git push
Configure Docker Hub and GitHub secrets
- In your GitHub repository, go to the “Settings” tab.
- In the left sidebar, click on “Secrets”.
- Click on the “New repository secret” button.
- Add the following secrets:
- Name:
DOCKER_USERNAME, Value: [Your Docker Hub username] - Name:
DOCKER_KEY, Value: [Your Docker Hub access token or password] - Click on the “Add secret” button to save the secrets.
Update GitHub Actions permissions:
- In your GitHub repository, go to the “Settings” tab.
- In the left sidebar, click on “Actions”.
- Under the “Permissions” section, make sure that the following permissions are enabled:
- Write, Read, Run workflows, Manage workflows
- If any permissions are not enabled, click on the “Enable” button next to each permission to grant access.
Step #9:Deploy Go Application on Minikube using GitOps Workflow
- Click on the “Applications” tab in the top navigation bar.
- Click on the “New Application” button.
- then click “Edit as YAML”
- Paste the below yaml file
apiVersion: argoproj.io/v1alpha1
kind: Application
metadata:
  name: 'go-app'
spec:
  destination:
    name: 'in-cluster'
    namespace: 'default'
  source:
    path: 'chart'
    repoURL: 'https://github.com/devopshint/gitops-workflow-deploy-goapp-minikube-using-argocd'
    targetRevision: HEAD
    helm:
      valueFiles:
      - values.yaml
  project: 'default'
  syncPolicy:
    syncOptions:
      - CreateNamespace=false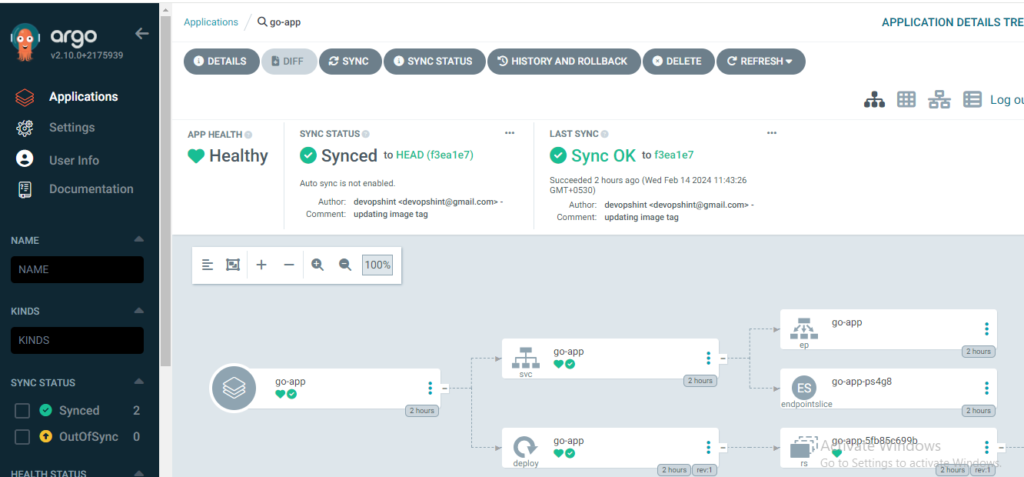
Lets Forward the port to access our image in browser
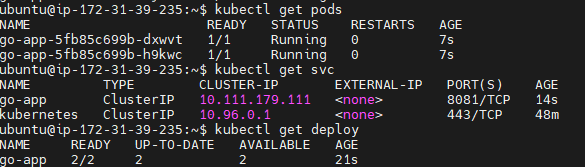
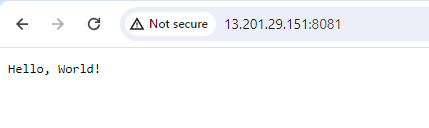
kubectl port-forward svc/go-app --address 0.0.0.0 8081:8081
Access Go application on browser using Minikube IP and port Number
Conclusion:
In this article we have covered How to Create GitOps Workflow with ArgoCD and GitHub Actions.
Related Articles:
Deploy NodeJS App Helm Chart on Minikube using GitHub Actions and ArgoCD