In this article, we’ll explore how to leverage Terraform to automate the creation of Amazon EKS clusters | How to Create Amazon EKS Cluster Using Terraform. enabling efficient deployment and management of Kubernetes workloads on AWS infrastructure.
Table of Contents
What is Terraform?
- It is an open-source IaaC (Infrastructure as a code) software tool where you define and create resources using providers in the declarative configuration language example JSON.
- With Terraform, You can package and reuse the code in the form of modules.
- It supports a number of cloud infrastructure providers such as AWS, Azure, GCP, IBM Cloud, OCI, etc.
What is Amazon EKS?

Amazon EKS (Elastic Kubernetes Service) is a managed Kubernetes service provided by Amazon Web Services (AWS). It simplifies the process of deploying, managing, and scaling containerized applications using Kubernetes on AWS infrastructure.
With Amazon EKS, users can leverage the power of Kubernetes without the complexity of managing the underlying infrastructure. EKS handles tasks such as cluster provisioning, upgrades, and scaling, allowing developers to focus on building and deploying applications.
Example: Imagine a software development team wants to deploy a microservices-based application using containers. Instead of managing the Kubernetes cluster themselves, they can use Amazon EKS. They define their application’s architecture, specify resource requirements, and deploy it to the EKS cluster. Amazon EKS takes care of provisioning and managing the Kubernetes control plane, worker nodes, networking, and other infrastructure components. This allows the team to focus on developing their application while benefiting from the scalability, reliability, and flexibility of Kubernetes on AWS.
Prerequisites
Before you start creating, you’ll need the following:
- an AWS account;
- identity and access management (IAM) credentials and programmatic access;
- AWS credentials that are set up locally with aws configure;
- a code or text editor, like VS Code;
- install and Set Up kubectl on Windows.
Once you have finished with the prerequisites, it is time to start writing the code to create an EKS cluster.
Steps to set up Amazon EKS Cluster using Terraform
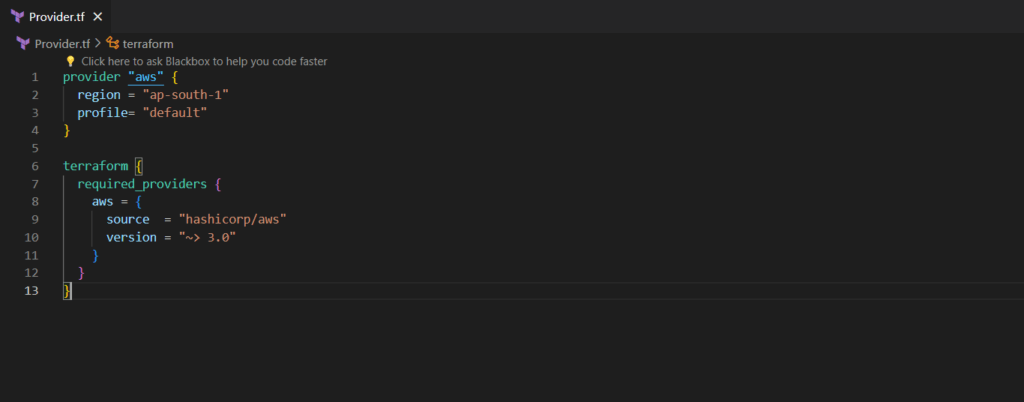
Step#1:Create AWS provider.tf file
The provider.tf file in Terraform is a configuration file that specifies the cloud provider and its corresponding plugin that Terraform will use to manage resources in that provider.
provider.tf
provider "aws" {
  region = "ap-south-1"
  profile= "default"
}

terraform {
  required_providers {
    aws = {
      source  = "hashicorp/aws"
      version = "~> 3.0"
    }
  }
}
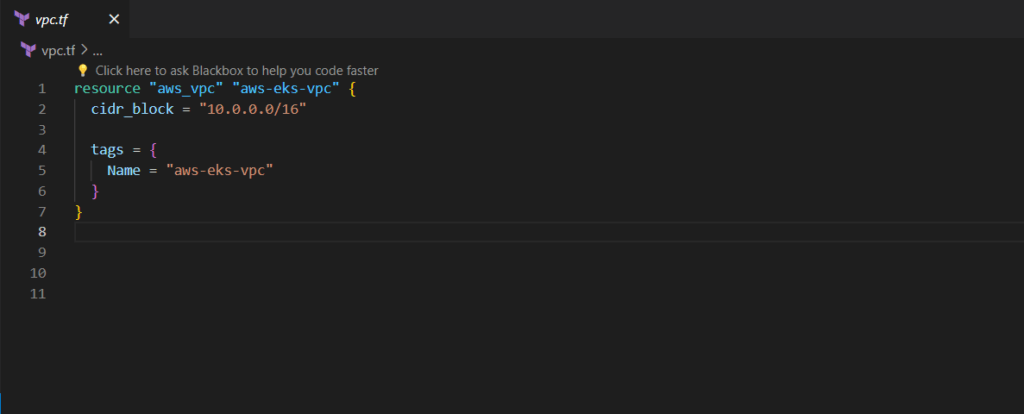
Step#2:Create a virtual private cloud in AWS using Terraform
The next step is to create a virtual private cloud in AWS using the aws_vpc resource. There is one required field that you need to provide, which is the size of your network. 10.0.0.0/16 will give you approximately 65 thousand IP addresses.
Let’s name it vpc.tf
vpc.tf
resource "aws_vpc" "aws-eks-vpc" {
  cidr_block = "10.0.0.0/16"

  tags = {
    Name = "aws-eks-vpc"
  }
}
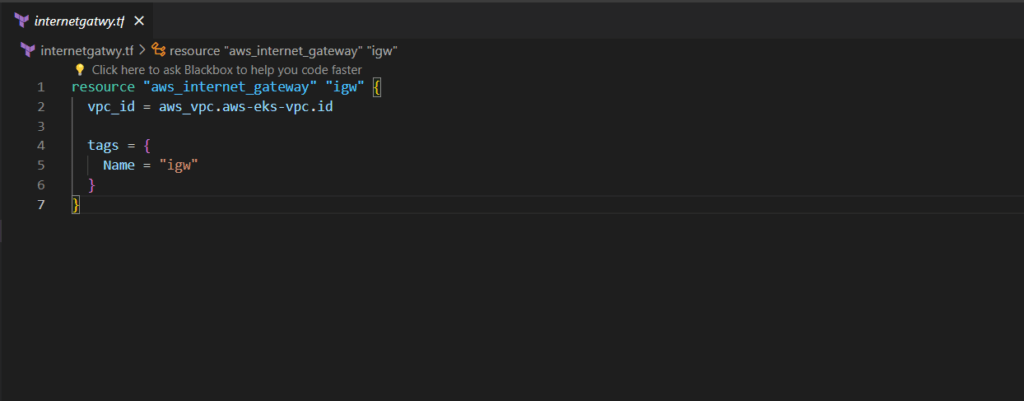
Step#3:Create Internet Gateway in AWS using Terraform
In order to enable internet connectivity for your services, it’s essential to incorporate an internet gateway within your VPC infrastructure. This internet gateway must be attached to the VPC we’ve recently established, serving as the default route for public subnets.
Save this configuration file as internetgatwy.tf
internetgatwy.tf
resource "aws_internet_gateway" "igw" {
  vpc_id = aws_vpc.aws-eks-vpc.id

  tags = {
    Name = "igw"
  }
}
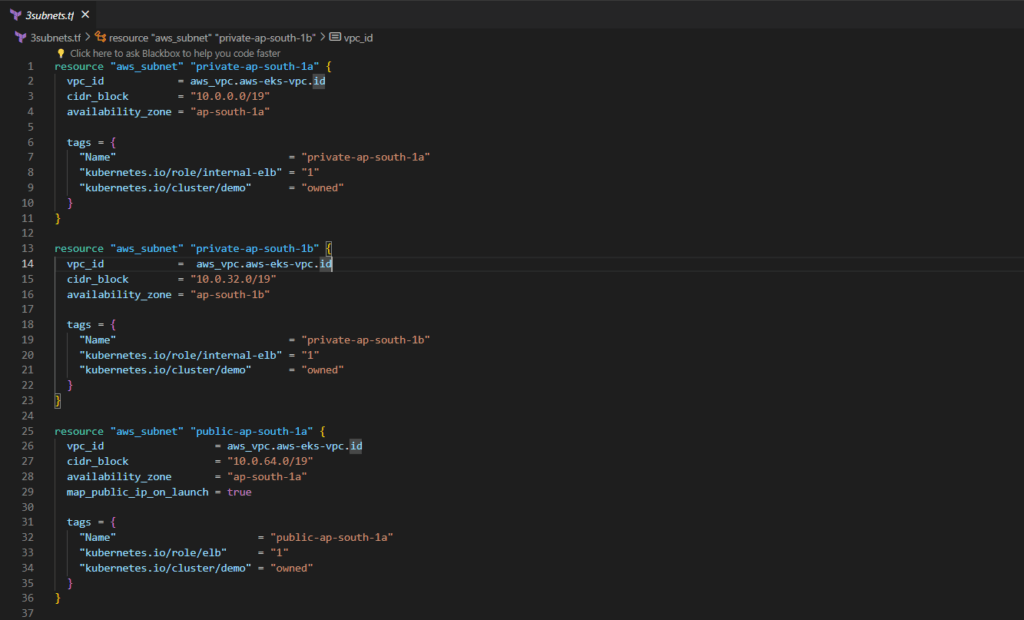
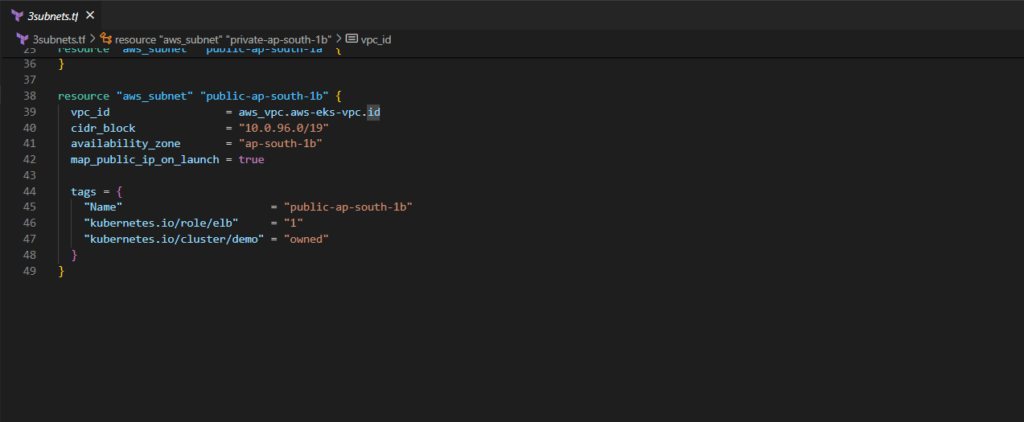
Step#4:Create private and public subnets in AWS using Terraform
Next, we proceed to create four subnets, adhering to EKS guidelines. We are required to establish two public and two private subnets across distinct availability zones.
Save this subnet configuration file as subnets.tf
subnets.tf
resource "aws_subnet" "private-ap-south-1a" {
  vpc_id            = aws_vpc.aws-eks-vpc.id
  cidr_block        = "10.0.0.0/19"
  availability_zone = "ap-south-1a"

  tags = {
    "Name"                            = "private-ap-south-1a"
    "kubernetes.io/role/internal-elb" = "1"
    "kubernetes.io/cluster/demo"      = "owned"
  }
}

resource "aws_subnet" "private-ap-south-1b" {
  vpc_id            =  aws_vpc.aws-eks-vpc.id
  cidr_block        = "10.0.32.0/19"
  availability_zone = "ap-south-1b"

  tags = {
    "Name"                            = "private-ap-south-1b"
    "kubernetes.io/role/internal-elb" = "1"
    "kubernetes.io/cluster/demo"      = "owned"
  }
}

resource "aws_subnet" "public-ap-south-1a" {
  vpc_id                  = aws_vpc.aws-eks-vpc.id
  cidr_block              = "10.0.64.0/19"
  availability_zone       = "ap-south-1a"
  map_public_ip_on_launch = true

  tags = {
    "Name"                       = "public-ap-south-1a"
    "kubernetes.io/role/elb"     = "1"
    "kubernetes.io/cluster/demo" = "owned"
  }
}

resource "aws_subnet" "public-ap-south-1b" {
  vpc_id                  = aws_vpc.aws-eks-vpc.id
  cidr_block              = "10.0.96.0/19"
  availability_zone       = "ap-south-1b"
  map_public_ip_on_launch = true

  tags = {
    "Name"                       = "public-ap-south-1b"
    "kubernetes.io/role/elb"     = "1"
    "kubernetes.io/cluster/demo" = "owned"
  }
}
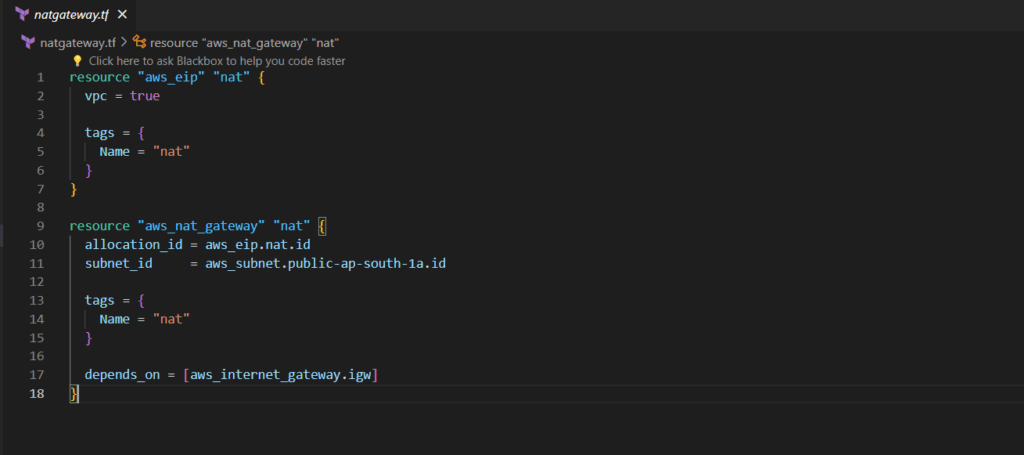
Step#5:Create NAT Gateway in AWS using Terraform
Let’s now set up a NAT gateway essential for private subnet connectivity to the internet. To begin, we allocate a public IP address. Subsequently, we utilize it within the aws_nat_gateway resource, placing it within the designated public subnet, which must have an internet gateway as its default route.
Save this configuration file as natgateway.tf
natgateway.tf
resource "aws_eip" "nat" {
  vpc = true

  tags = {
    Name = "nat"
  }
}

resource "aws_nat_gateway" "nat" {
  allocation_id = aws_eip.nat.id
  subnet_id     = aws_subnet.public-ap-south-1a.id

  tags = {
    Name = "nat"
  }

  depends_on = [aws_internet_gateway.igw]
}
Step#6:Create routing tables and associate subnets in Aws using Terraform
By now, we have created subnets, internet gateway, and nat gateway. It’s time to create routing tables and associate subnets with them.
Save this configuration file as routes.tf
routes.tf
resource "aws_route_table" "private" {
  vpc_id = aws_vpc.aws-eks-vpc.id

  route = [
    {
      cidr_block                 = "0.0.0.0/0"
      nat_gateway_id             = aws_nat_gateway.nat.id
      carrier_gateway_id         = ""
      destination_prefix_list_id = ""
      egress_only_gateway_id     = ""
      gateway_id                 = ""
      instance_id                = ""
      ipv6_cidr_block            = ""
      local_gateway_id           = ""
      network_interface_id       = ""
      transit_gateway_id         = ""
      vpc_endpoint_id            = ""
      vpc_peering_connection_id  = ""
    },
  ]

  tags = {
    Name = "private"
  }
}

resource "aws_route_table" "public" {
  vpc_id = aws_vpc.aws-eks-vpc.id

  route = [
    {
      cidr_block                 = "0.0.0.0/0"
      gateway_id                 = aws_internet_gateway.igw.id
      nat_gateway_id             = ""
      carrier_gateway_id         = ""
      destination_prefix_list_id = ""
      egress_only_gateway_id     = ""
      instance_id                = ""
      ipv6_cidr_block            = ""
      local_gateway_id           = ""
      network_interface_id       = ""
      transit_gateway_id         = ""
      vpc_endpoint_id            = ""
      vpc_peering_connection_id  = ""
    },
  ]

  tags = {
    Name = "public"
  }
}

resource "aws_route_table_association" "private-ap-south-1a" {
  subnet_id      = aws_subnet.private-ap-south-1a.id
  route_table_id = aws_route_table.private.id
}

resource "aws_route_table_association" "private-ap-south-1b" {
  subnet_id      = aws_subnet.private-ap-south-1b.id
  route_table_id = aws_route_table.private.id
}

resource "aws_route_table_association" "public-ap-south-1a" {
  subnet_id      = aws_subnet.public-ap-south-1a.id
  route_table_id = aws_route_table.public.id
}

resource "aws_route_table_association" "public-ap-south-1b" {
  subnet_id      = aws_subnet.public-ap-south-1b.id
  route_table_id = aws_route_table.public.id
}
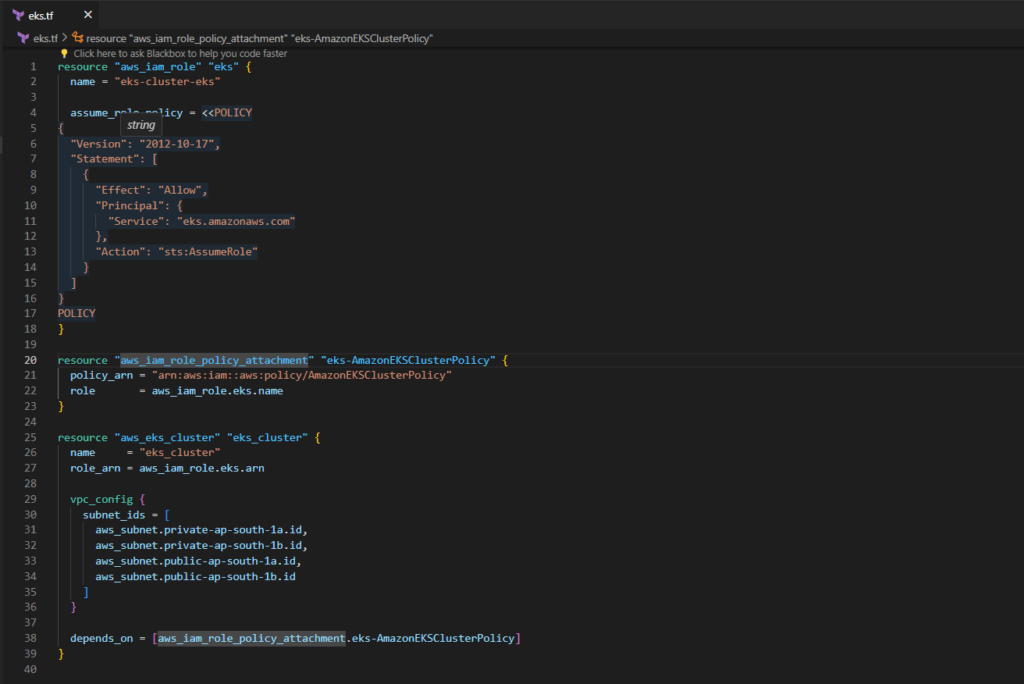
Step#7:Create Amazon EKS cluster using Terraform
Before setting up Amazon EKS clusters, establish an IAM role named “eks.tf” with the AmazonEKSClusterPolicy to enable Kubernetes clusters to manage AWS resources autonomously.
eks.tf
resource "aws_iam_role" "eks" {
  name = "eks-cluster-eks"

  assume_role_policy = <<POLICY
{
  "Version": "2012-10-17",
  "Statement": [
    {
      "Effect": "Allow",
      "Principal": {
        "Service": "eks.amazonaws.com"
      },
      "Action": "sts:AssumeRole"
    }
  ]
}
POLICY
}

resource "aws_iam_role_policy_attachment" "eks-AmazonEKSClusterPolicy" {
  policy_arn = "arn:aws:iam::aws:policy/AmazonEKSClusterPolicy"
  role       = aws_iam_role.eks.name
}

resource "aws_eks_cluster" "eks_cluster" {
  name     = "eks_cluster"
  role_arn = aws_iam_role.eks.arn

  vpc_config {
    subnet_ids = [
      aws_subnet.private-ap-south-1a.id,
      aws_subnet.private-ap-south-1b.id,
      aws_subnet.public-ap-south-1a.id,
      aws_subnet.public-ap-south-1b.id
    ]
  }

  depends_on = [aws_iam_role_policy_attachment.eks-AmazonEKSClusterPolicy]
}
Step#8:Create a single instance group for Kubernetes
Next, we’ll establish a single instance group for Kubernetes, which, like the EKS cluster, necessitates an IAM role.
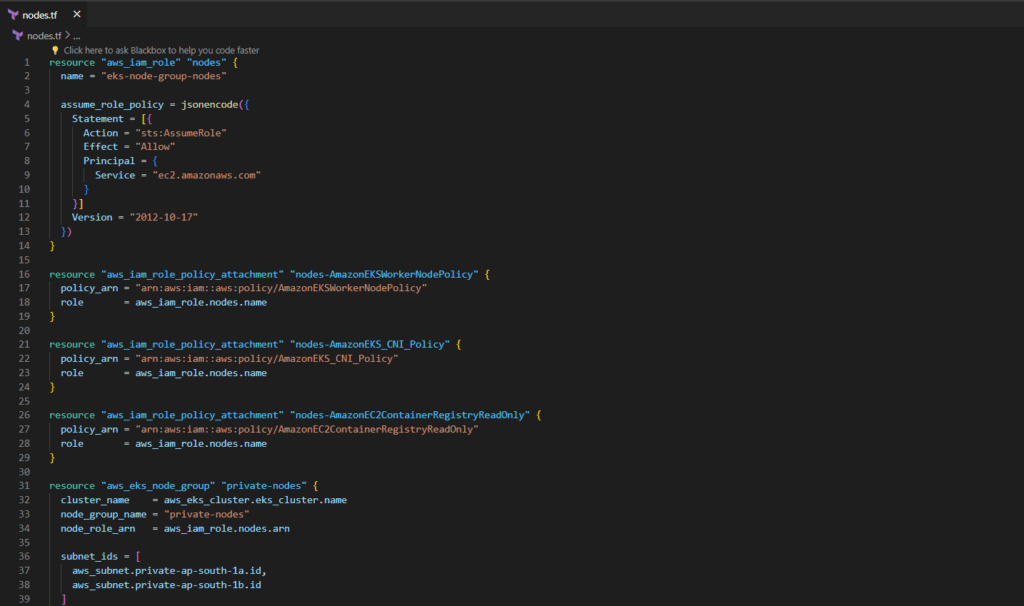
Save this configuration file as nodes.tf
nodes.tf
resource "aws_iam_role" "nodes" {
name = "eks-node-group-nodes"
assume_role_policy = jsonencode({
Statement = [{
Action = "sts:AssumeRole"
Effect = "Allow"
Principal = {
Service = "ec2.amazonaws.com"
}
}]
Version = "2012-10-17"
})
}
resource "aws_iam_role_policy_attachment" "nodes-AmazonEKSWorkerNodePolicy" {
policy_arn = "arn:aws:iam::aws:policy/AmazonEKSWorkerNodePolicy"
role = aws_iam_role.nodes.name
}
resource "aws_iam_role_policy_attachment" "nodes-AmazonEKS_CNI_Policy" {
policy_arn = "arn:aws:iam::aws:policy/AmazonEKS_CNI_Policy"
role = aws_iam_role.nodes.name
}
resource "aws_iam_role_policy_attachment" "nodes-AmazonEC2ContainerRegistryReadOnly" {
policy_arn = "arn:aws:iam::aws:policy/AmazonEC2ContainerRegistryReadOnly"
role = aws_iam_role.nodes.name
}
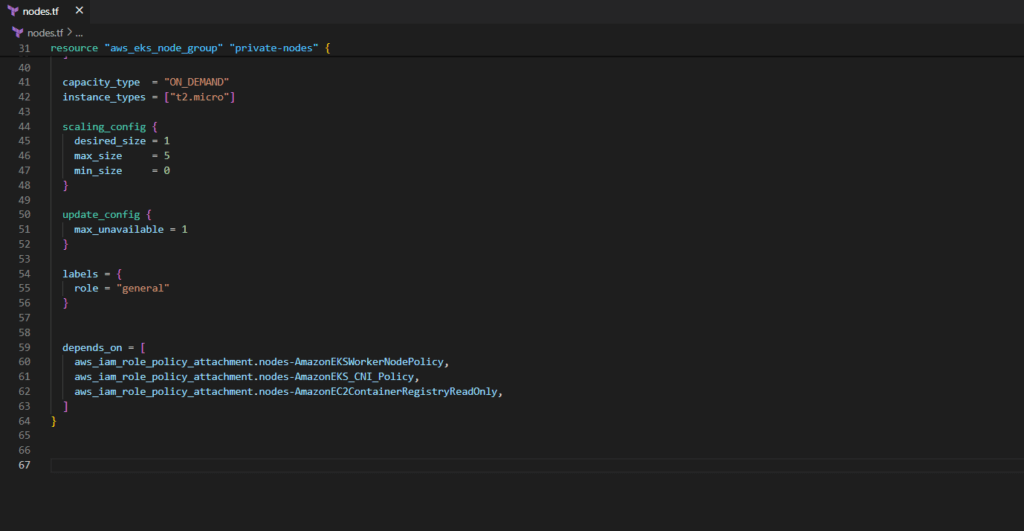
resource "aws_eks_node_group" "private-nodes" {
cluster_name = aws_eks_cluster.eks_cluster.name
node_group_name = "private-nodes"
node_role_arn = aws_iam_role.nodes.arn
subnet_ids = [
aws_subnet.private-ap-south-1a.id,
aws_subnet.private-ap-south-1b.id
]
capacity_type = "ON_DEMAND"
instance_types = ["t2.micro"]
scaling_config {
desired_size = 1
max_size = 5
min_size = 0
}
update_config {
max_unavailable = 1
}
labels = {
role = "general"
}
depends_on = [
aws_iam_role_policy_attachment.nodes-AmazonEKSWorkerNodePolicy,
aws_iam_role_policy_attachment.nodes-AmazonEKS_CNI_Policy,
aws_iam_role_policy_attachment.nodes-AmazonEC2ContainerRegistryReadOnly,
]
}
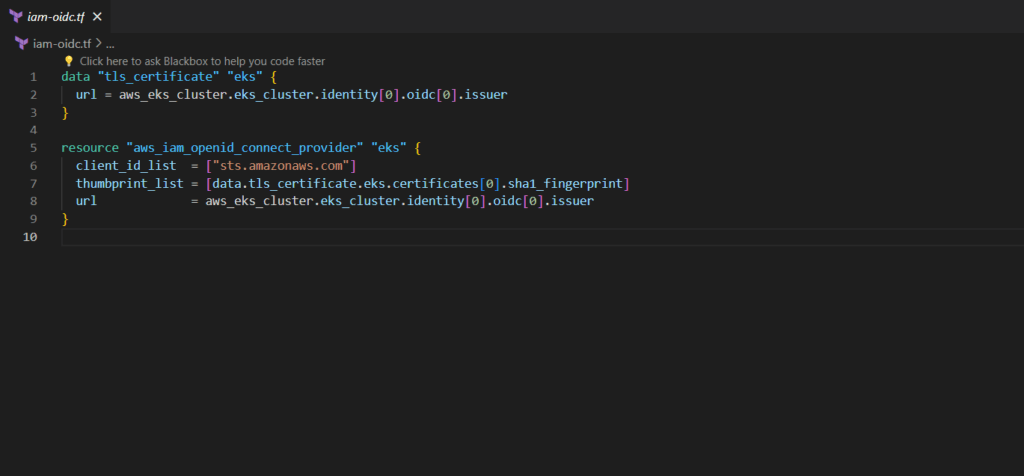
Step#9:Create IAM OIDC provider EKS using Terraform
To manage permissions for your applications that you deploy in Kubernetes. You can either attach policies to Kubernetes nodes directly. In that case, every pod will get the same access to AWS resources. Or you can create OpenID connect provider, which will allow granting IAM permissions based on the service account used by the pod.
File name is iam-oidc.tf
iam-oidc.tf
data "tls_certificate" "eks" {
  url = aws_eks_cluster.eks_cluster.identity[0].oidc[0].issuer
}

resource "aws_iam_openid_connect_provider" "eks" {
  client_id_list  = ["sts.amazonaws.com"]
  thumbprint_list = [data.tls_certificate.eks.certificates[0].sha1_fingerprint]
  url             = aws_eks_cluster.eks_cluster.identity[0].oidc[0].issuer
}
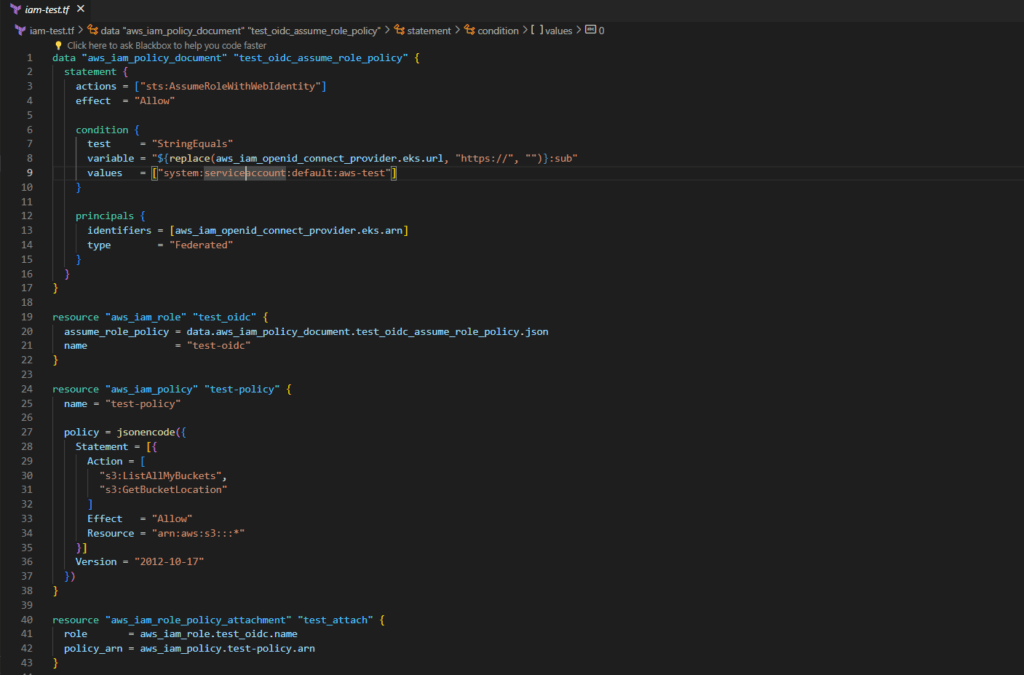
Step#10:Testing the provider first before deploying
I highly recommend testing the provider first before deploying the autoscaller. It can save you a lot of time.
File name is iam-test.tf
iam-test.tf
data "aws_iam_policy_document" "test_oidc_assume_role_policy" {
  statement {
    actions = ["sts:AssumeRoleWithWebIdentity"]
    effect  = "Allow"

    condition {
      test     = "StringEquals"
      variable = "${replace(aws_iam_openid_connect_provider.eks.url, "https://", "")}:sub"
      values   = ["system:serviceaccount:default:aws-test"]
    }

    principals {
      identifiers = [aws_iam_openid_connect_provider.eks.arn]
      type        = "Federated"
    }
  }
}

resource "aws_iam_role" "test_oidc" {
  assume_role_policy = data.aws_iam_policy_document.test_oidc_assume_role_policy.json
  name               = "test-oidc"
}

resource "aws_iam_policy" "test-policy" {
  name = "test-policy"

  policy = jsonencode({
    Statement = [{
      Action = [
        "s3:ListAllMyBuckets",
        "s3:GetBucketLocation"
      ]
      Effect   = "Allow"
      Resource = "arn:aws:s3:::*"
    }]
    Version = "2012-10-17"
  })
}

resource "aws_iam_role_policy_attachment" "test_attach" {
  role       = aws_iam_role.test_oidc.name
  policy_arn = aws_iam_policy.test-policy.arn
}

output "test_policy_arn" {
  value = aws_iam_role.test_oidc.arn
}
Step#11:Enhance Your Kubernetes Cluster with Add-ons
Customize and optimize your Kubernetes cluster by incorporating essential add-ons through Terraform.
File name is addons.tf
addons.tf
# Define CoreDNS addon
resource "aws_eks_addon" "coredns" {
  cluster_name = aws_eks_cluster.eks_cluster.name
  addon_name   = "coredns"
}

# Define kube-proxy addon
resource "aws_eks_addon" "kube_proxy" {
  cluster_name = aws_eks_cluster.eks_cluster.name
  addon_name   = "kube-proxy"
}

# Define Amazon VPC CNI addon
resource "aws_eks_addon" "vpc_cni" {
  cluster_name = aws_eks_cluster.eks_cluster.name
  addon_name   = "vpc-cni"
}
Step#12:Create AWS EKS Cluster using Terraform
- terraform init
The terraform init the command is used to initialize a new or existing Terraform configuration. This command downloads the required provider plugins and sets up the backend for storing state.
- terraform plan
The terraform plan the command is used to create an execution plan for the Terraform configuration. This command shows what resources Terraform will create, modify, or delete when applied.
- terraform apply
The terraform apply the command is used to apply the Terraform configuration and create or modify resources in the target environment.
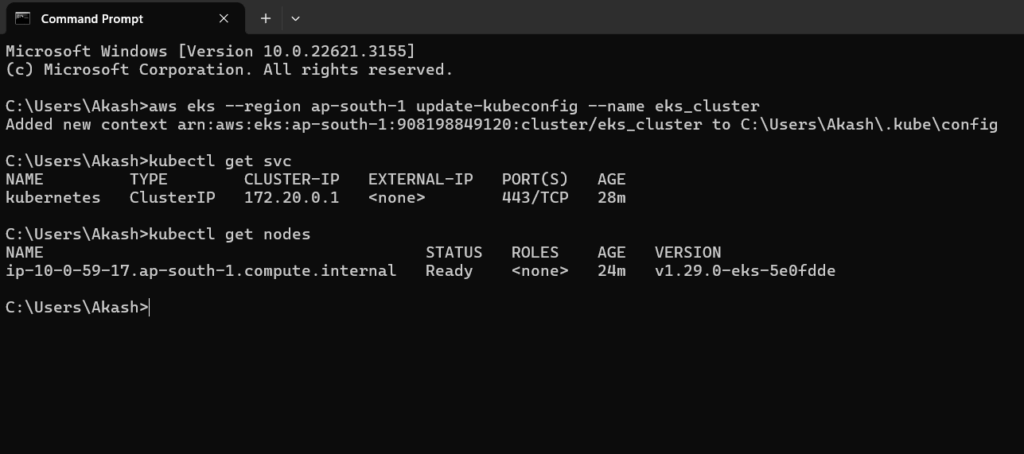
- To export Kubernetes context you can use aws eks … command; just replace region and name of the cluster:
aws eks --region ap-south-1 update-kubeconfig --name eks_cluster
- To check connection to EKS cluster run the following command:
kubectl get svc
Conclusion:
In conclusion, using Terraform to create Amazon EKS clusters streamlines infrastructure provisioning, fostering efficient deployment and management of Kubernetes workloads on AWS. Leveraging Terraform’s capabilities, users can establish consistent and scalable Kubernetes environments tailored to their specific needs, ensuring reliability and flexibility in their cloud deployments.
Reference:-
For reference visit the official website .
Any queries pls contact us @Fosstechnix.com.
Related Articles: