In this article, we are going to demonstrate how to install MySQL 5.7 on Ubuntu 16.04 using command line.
IntroductionMySQL is the world’s most popular open source relational database management system. It is widely used with web server like apache2,Nginx,IIS,etc.
MySQL has client/Server architecture , supports InnoDB storage engine,can be installed on various operating system like Ubuntu,Debian,CentOS,Windows.,etc.Table of Contents
Step 1: Add MySQL APT Repository in Ubuntu
Ubuntu comes with default package repositories. So,if we want to add/install latest repositories then we have to add/install package repositories.
Below are commands to add/download latest MySQL APT repository using command line,
$ sudo wget https://dev.mysql.com/get/mysql-apt-config_0.8.15-1_all.deb
Output
https://dev.mysql.com/get/mysql-apt-config_0.8.15-1_all.deb

Resolving dev.mysql.com (dev.mysql.com)... 137.254.60.11

Connecting to dev.mysql.com (dev.mysql.com)|137.254.60.11|:443... connected.
HTTP request sent, awaiting response... 302 Found

Location: https://repo.mysql.com//mysql-apt-config_0.8.15-1_all.deb [following]

--2020-03-31 02:54:04--  https://repo.mysql.com//mysql-apt-config_0.8.15-1_all.deb

Resolving repo.mysql.com (repo.mysql.com)... 23.203.41.20

Connecting to repo.mysql.com (repo.mysql.com)|23.203.41.20|:443... connected.

HTTP request sent, awaiting response... 200 OK

Length: 35532 (35K) [application/x-debian-package]

Saving to: ‘mysql-apt-config_0.8.15-1_all.deb’

mysql-apt-config_0.8.15-1_all.deb
    100%[=================================================================
===============>]  34.70K  --.-KB/s    in 0.01s

2020-03-31 02:54:04 (3.09 MB/s) - ‘mysql-apt-config_0.8.15-1_all.deb’ saved

[35532/35532]
then, below command is to install above downloaded apt repository,
$ sudo dpkg -i mysql-apt-config_0.8.15-1_all.deb
when we run above command like below prompt will open, click on Ok.

Step 2: Update MySQL Repository
Update apt repository
$ sudo apt-get update
Error: W: GPG error: http://repo.mysql.com/apt/ubuntu xenial InRelease: The following signatures were invalid: KEYEXPIRED 1550412832 KEYEXPIRED 1550412832 KEYEXPIRED 1550412832
W: The repository ‘https://repo.mysql.com/apt/ubuntu xenial InRelease’ is not signed.While updating apt packages if you are getting KEYEXPIRED message. Use below command to check expired key lists,
$ sudo apt-key list | grep -A 1 expired
Output:
pub 1024D/5072E1F5 2003-02-03 [expired: 2019-02-17]To Renew the expired key,
uid MySQL Release Engineering <[email protected]>
$ sudo apt-key adv --keyserver keys.gnupg.net --recv-keys 5072E1F5
Output:
Executing: /tmp/tmp.XwFcFWU4xU/gpg.1.sh --keyserver

keys.gnupg.net

--recv-keys

5072E1F5

gpg: requesting key 5072E1F5 from hkp server keys.gnupg.net

gpg: key 5072E1F5: "MySQL Release Engineering <[email protected]>" 28 new signatures

gpg: Total number processed: 1

gpg:         new signatures: 28
Update the System repositories.
$ sudo apt-get update
Step 3: Install MySQL 5.7 on Ubuntu
Install MySQL 5.7 using below commands,
$ sudo apt-get install mysql-server
Now, Installation process will prompt default password for root user and again same password.


Step 4: Secure MySQL Installation
MySQL Server comes with a script mysql_secure_installation this can do multiple security related operations,
Run the below script on command prompt, asks below options.
$ mysql_secure_installation

Securing the MySQL server deployment.

Enter password for user root:

Would you like to setup VALIDATE PASSWORD plugin?

Press y|Y for Yes, any other key for No: No

Change the password for root ? ((Press y|Y for Yes, any other key for No) : No

Remove anonymous users? (Press y|Y for Yes, any other key for No) : y

Disallow root login remotely? (Press y|Y for Yes, any other key for No) : y

Remove test database and access to it? (Press y|Y for Yes, any other key for No)  : y

Reload privilege tables now? (Press y|Y for Yes, any other key for No) : y

 Success.
 All done!
Step 5: Login to MySQL
Now, Login to MySQL 5.7 Server using below command and use password to login entered during installation.
$ mysql -u root -p
Step 6: Create MySQL Remote User
First, Login to MySQL Server with root user using command line, Below is command is to create user , here i am creating user “fosstechnix“.
mysql> CREATE USER 'fosstechnix'@'%' IDENTIFIED BY 'fosstechnix@123';
Next, assign the privileges to database with below command , here i am assigning all databases privileges to user fosstechnix,
If you want to assign privileges to specific database replace ” .” with database name.
mysql> GRANT ALL PRIVILEGES ON * . * TO 'fosstechnix'@'%';
OR
if you want to allow “fosstechnix” user to give privileges to other user.
mysql> GRANT ALL PRIVILEGES ON *.* TO 'fosstechnix'@'%' WITH GRANT OPTION;
To take effect reload the privileges using below command,
mysql> FLUSH PRIVILEGES;
Step 7: How to Enable MySQL Remote Access in Ubuntu 16.04
By default, In MySQL database server remote access is disabled for security reason.
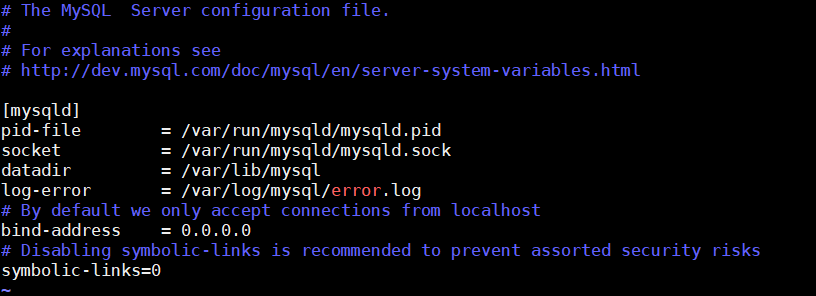
To enable remote connections of MySQL Server, we have to change bind-address in MySQL configuration file.
Open the /etc/mysql/mysql.conf.d/mysqld.cnf file
sudo vim /etc/mysql/mysql.conf.d/mysqld.cnf
Below the [mysqld] section find the Line,
[mysqld]
bind-address  = 127.0.0.1
And replace it to
bind-address = 0.0.0.0
Output:

Restart the MySQL Server to take effect.
$ sudo systemctl restart mysql.service
Step 8: Start/Restart/Stop MySQL Server Using Command Line
Below are commands to start/restart/stop MySQL 5.7 on Ubuntu 16.04
$ sudo systemctl start mysql.service

$ sudo systemctl restart mysql.service

$ sudo systemctl stop mysql.service

Wow, the tutorial was explanatory and crisp. Although, I am not a SQL guy, but I have used Ubuntu for almost an year in past. It took me sometime to understand Ubuntu as almost everything was too technical. Adding sudo 🙂
But, I used to love it using Ubuntu. Great platform for free.
Thanks Shivdas!
but how do we install 5.7 and NOT 8 ?
Please follow above steps.
I’m sorry but following those steps leads to a mysql 8.0 install, not a 5.7
you have to select MySQL 5.7 instead 8.0.