In this article we will learn how to Setup NGINX Reverse Proxy & Load Balancing on Ubuntu 24.04. NGINX is a powerful web server that can be used for hosting websites, handling SSL encryption, reverse proxy and managing traffic efficiently. In this guide, we will install NGINX on an AWS EC2 instance, create a custom web page using HTML and CSS, secure it with an SSL certificate, and set up a reverse proxy and load balancing. This will ensure our website is secure, scalable, and optimized for performance.
Table of Contents
Prerequisites
- AWS Account with Ubuntu 24.04 LTS EC2 Instance.
- Domain name pointing to your server (in this guide, we use devopshint.xyz and nginx.DevOpsHint.xyz).
Step #1:Install NGINX on AWS EC2
Before installing any software, ensure your package lists are up-to-date.
sudo apt update
Install the Nginx web server using the following command.
sudo apt install nginx -y
After installation, check the status of the Nginx service to ensure it’s running.
sudo systemctl status nginx
Open a web browser and access the nginx using http://<EC2-PUBLIC-IP>. You should see the default NGINX welcome page.

Step #2:Create a Custom Web Page
Navigate to the NGINX default web directory and check the existing files.
cd /usr/share/nginx/html/
ls
Now, edit HTML file.
sudo vi index.html
Inside the file, add the following HTML content.
<html>
             <body>
                            <h1> Welcome to nginx </h1>
             </body>
</html>

This creates a basic webpage with an H1 heading saying “Welcome to nginx”.
Now, access the page again in your browser http://<EC2-PUBLIC-IP>.

You should now see the custom web page instead of the default NGINX page.
Step #3:Create Custom NGINX Configuration
Navigate to the NGINX configuration directory. /etc/nginx/ this directory contains all configuration files for NGINX.
cd
ccd /etc/nginx/
Check available files. This lists all configuration files in the /etc/nginx/ directory.
ls
Before making changes, create a backup of the nginx.conf file.
sudo cp nginx.conf nginx.conf_bkp
Remove the original configuration file.
sudo rm nginx.conf
Create a new configuration file.
sudo vi nginx.conf
Add the following configuration.
events{}

http{
    server{
        listen 80;
        root /usr/share/nginx/html/;
    }
}
Test the new configuration.
sudo nginx -t
Reload NGINX to apply changes. It applies the changes without stopping the server.
sudo systemctl reload nginx
Now, access the webpage again.
http://<EC2-PUBLIC-IP>
Step #4:Create a New Directory for another Website in Nginx
Navigate to the web directory.
cd
cd /usr/share/nginx/html/
Create a new directory called demo and navigate to it.
sudo mkdir demo
Create a new index.html file inside the demo folder.
sudo vi index.html
Add the following HTML content.
<html>
              <body>
                              <h1> Welcome to Our Website </h1>
              </body>
</html>

Now, check if the new page is accessible by running
http://<EC2-PUBLIC-IP>/demoThis should display the message “Welcome to Our Website”.

Step #5:Change the Default NGINX Port
Navigate back to the NGINX configuration directory and edit the NGINX configuration file.
cd
cd /etc/nginx
sudo vi nginx.conf
Modify it as follows. Here we are changing NGINX to listen on port 8080 instead of 80.
events{}

http{
    server{
        listen 8080;
        root /usr/share/nginx/html/;
    }
}
Check if the configuration is correct and Reload NGINX.
sudo nginx -t
sudo systemctl reload nginx
Since we changed the port, reloading the web page on port 80 will give an error.

Now, access the updated web page.
https://<EC2-PUBLIC-IP>:8080
For the demo page,
https://<EC2-PUBLIC-IP>:8080/demo
Step #6:Creating a Virtual Host in Nginx with Custom Website
Navigate to the web directory. Create a new folder called website and navigate to it.
cd /usr/share/nginx/html
sudo mkdir website
cd website
Create an index.html file.
sudo vi index.html
Add the following HTML content.
<!DOCTYPE html>
<html lang="en">
<head>
<meta charset="UTF-8">
<meta name="viewport" content="width=device-width, initial-scale=1.0">
<title>Innovative Solutions Hub</title>
<link rel="stylesheet" href="styles.css">
</head>
<body>
<div class="main-container">
<header class="main-header">
<h1>Innovative Solutions for Modern Businesses</h1>
<p>Empowering growth through creativity and technology</p>
</header>
<nav class="navigation">
<a href="#about">About</a>
<a href="#services">Services</a>
<a href="#contact">Contact</a>
</nav>
<main>
<section id="about" class="info-section">
<h2>About Our Team</h2>
<p>We are passionate about delivering unique and forward-thinking solutions to elevate your business potential. With years of experience, we bring expertise and innovation to every project.</p>
</section>
<section id="services" class="info-section">
<h2>What We Offer</h2>
<div class="services-list">
<div class="service-item">
<h3>Digital Transformation</h3>
<p>Helping businesses leverage cutting-edge technology to stay ahead in their industry.</p>
</div>
<div class="service-item">
<h3>Custom Software</h3>
<p>Tailored applications designed to meet your specific business needs.</p>
</div>
<div class="service-item">
<h3>Data Analytics</h3>
<p>Uncover insights and make data-driven decisions with advanced analytics.</p>
</div>
</div>
</section>
<section id="contact" class="info-section">
<h2>Get in Touch</h2>
<p>Email us at: <a href="mailto:[email protected]">[email protected]</a></p>
<p>Call us at: +1-800-555-0199</p>
<p>Follow us on:
<a href="#">LinkedIn</a> |
<a href="#">Twitter</a> |
<a href="#">Facebook</a>
</p>
</section>
</main>
<footer class="site-footer">
<p>© 2025 Innovative Solutions Hub. Crafted with care and expertise.</p>
</footer>
</div>
</body>
</html>

Now, create a CSS file for styling.
sudo vi styles.css
body {
    font-family: 'Verdana', sans-serif;
    margin: 0;
    padding: 0;
    background: linear-gradient(to bottom, #6a11cb, #2575fc);
    color: #333;
}

.main-container {
    max-width: 900px;
    margin: 20px auto;
    padding: 20px;
    background: #fff;
    border-radius: 15px;
    box-shadow: 0 4px 12px rgba(0, 0, 0, 0.2);
}

.main-header {
    text-align: center;
    padding-bottom: 15px;
    border-bottom: 2px solid #ccc;
}

.main-header h1 {
    font-size: 2.8rem;
    color: #2575fc;
    margin-bottom: 10px;
}

.main-header p {
    font-size: 1.2rem;
    color: #555;
}

.navigation {
    text-align: center;
    margin: 20px 0;
}

.navigation a {
    margin: 0 15px;
    font-size: 1rem;
    color: #2575fc;
    text-decoration: none;
    font-weight: bold;
}

.navigation a:hover {
    text-decoration: underline;
}

.info-section {
    margin: 20px 0;
    padding: 20px;
    background: #f9f9f9;
    border-radius: 12px;
    box-shadow: 0 4px 8px rgba(0, 0, 0, 0.1);
}

.info-section h2 {
    font-size: 2rem;
    color: #6a11cb;
    margin-bottom: 15px;
}

.info-section p {
    font-size: 1rem;
    color: #444;
    line-height: 1.6;
}

.services-list {
    display: flex;
    gap: 15px;
    flex-wrap: wrap;
    justify-content: center;
}

.service-item {
    flex: 1 1 calc(30% - 10px);
    background: #fff;
    border: 1px solid #ddd;
    border-radius: 10px;
    padding: 15px;
    box-shadow: 0 2px 6px rgba(0, 0, 0, 0.1);
}

.service-item h3 {
    font-size: 1.5rem;
    color: #2575fc;
    margin-bottom: 10px;
}

.service-item p {
    font-size: 0.95rem;
    color: #555;
}

.site-footer {
    text-align: center;
    margin-top: 20px;
    padding: 10px;
    background: #f9f9f9;
    color: #555;
    border-radius: 12px;
    font-size: 0.9rem;
    box-shadow: 0 2px 6px rgba(0, 0, 0, 0.1);
}

.site-footer a {
    color: #6a11cb;
    text-decoration: none;
    font-weight: bold;
}

Move to the NGINX configuration directory and edit the nginx.conf file.
cd /etc/nginx
Modify the file to include two servers.
events{}

http{
    include mime.types;

    server{
        listen 8080;
        root /usr/share/nginx/html/;
    }

    # Website configuration
    server{
        listen 80;
        root /usr/share/nginx/html/website/;
    }
}
- Server 1 (port 8080): Serves files from
/usr/share/nginx/html/ - Server 2 (port 80): Serves files from
/usr/share/nginx/html/website/
Test the configuration and reload NGINX to apply changes.
sudo nginx -t
sudo systemctl reload nginx
Now, access the webpage again.
http://<EC2-PUBLIC-IP>
We already have a domain in GoDaddy so first got to GoDaddy.
Go to your account, here “DevOps” and select My Products.
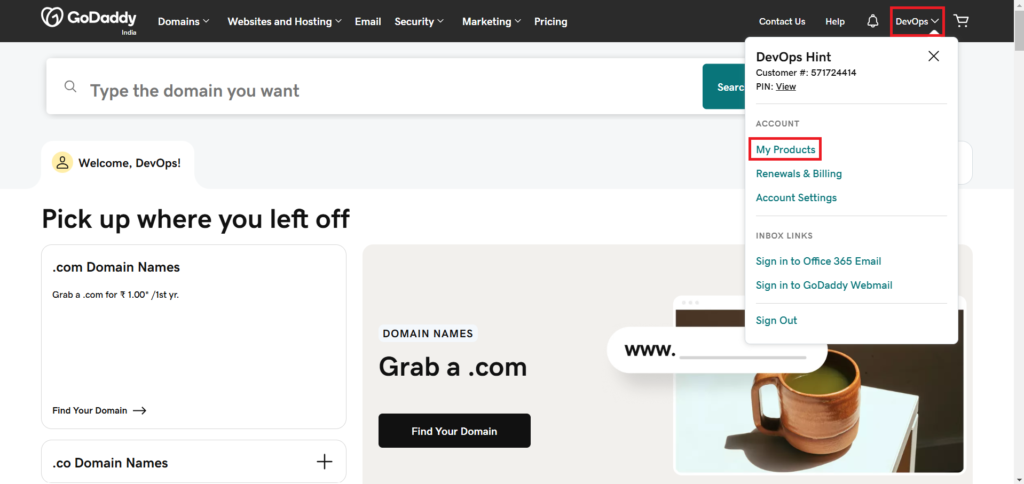
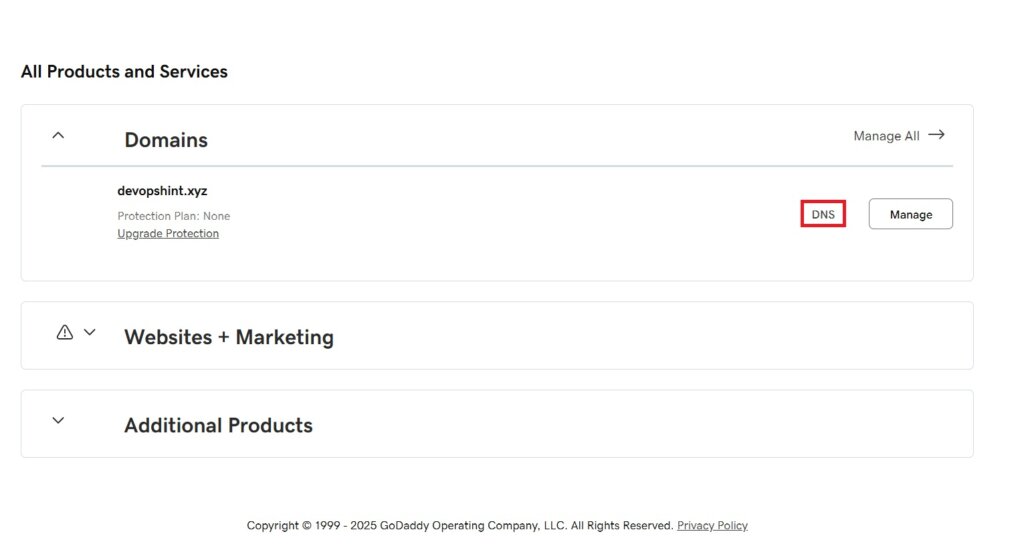
You can see our domain devopshint.xyz below, go to DNS to add the records in it.
In your domain provider’s dashboard, create a DNS A record. Click on Add New Record.
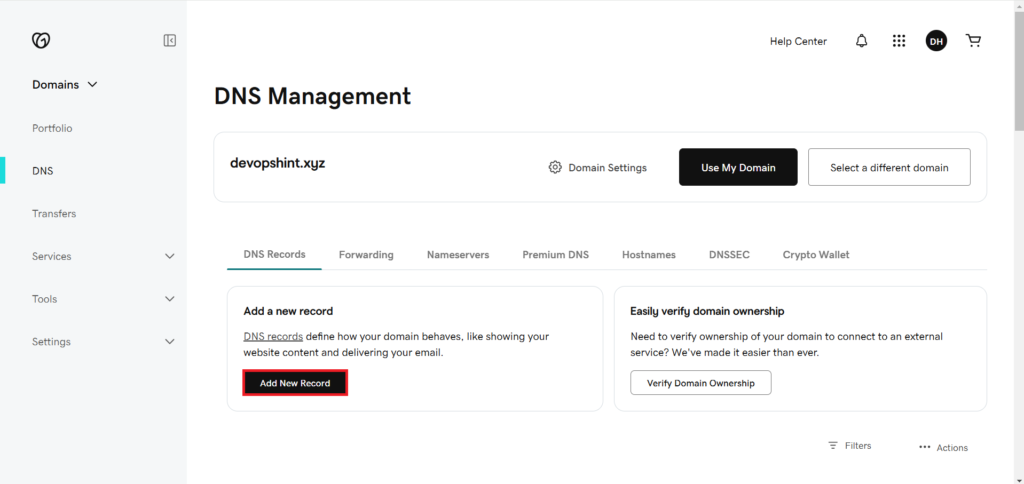
- Type: A
- Name: @
- Value: Your EC2 instance’s public IP address. You must have Elastic IP associated with your EC2 instance.
- TTL: 1 Hour
Save it.

- Type: A
- Name: nginx
- Value: Your EC2 instance’s public IP address. You must have Elastic IP associated with your EC2 instance.
- TTL: 1 Hour
Save it.

Once the domain is mapped, edit the NGINX configuration.
sudo vi /etc/nginx/nginx.conf
Modify it as follows.
events{}

http{
    include mime.types;

    server{
        listen 8080;
        root /usr/share/nginx/html/;
    }

    # Website with domain
    server{
        listen 80;
        server_name devopshint.xyz nginx.devopshint.xyz;
        root /usr/share/nginx/html/website/;

        access_log /var/log/nginx/devopshint.xyz.access.log;
        error_log /var/log/nginx/devopshint.xyz.error.log;
    }
}
Test the configuration and reload NGINX to apply changes.
sudo nginx -t
sudo systemctl reload nginx
Now, access:
http://devopshint.xyzhttp://nginx.devopshint.xyz
Both should now serve the website.


Step #7:Securing the Website with Certbot in Nginx
Exit the directories and back to the root directory.
cd
Install Certbot for SSL management.
sudo apt install python-certbot-nginx -y
Stop NGINX before generating SSL certificates.
sudo systemctl stop nginx
Edit the configuration file.
sudo vi /etc/nginx/nginx.conf
Update the configuration to include SSL settings.
events{}

http{
    include mime.types;

    server{
        listen 8080;
        root /usr/share/nginx/html/;
    }

    # Secure website
    server{
        listen 443 ssl http2;
        server_name devopshint.xyz nginx.devopshint.xyz;
        root /usr/share/nginx/html/website/;

        access_log /var/log/nginx/devopshint.xyz.access.log;
        error_log /var/log/nginx/devopshint.xyz.error.log;

        ssl_certificate /etc/letsencrypt/live/devopshint.xyz/fullchain.pem;
        ssl_certificate_key /etc/letsencrypt/live/devopshint.xyz/privkey.pem;

        ssl_protocols TLSv1.2 TLSv1.3;
    }
}
- listen 443 ssl http2; → Enables HTTPS with HTTP/2 support.
- ssl_certificate & ssl_certificate_key → Paths to SSL certificates.
- ssl_protocols TLSv1.2 TLSv1.3; → Enables secure TLS versions.
Test the configuration.
sudo nginx -t
Start and reload NGINX.
sudo systemctl start nginx
sudo systemctl reload nginx
Now, access:
https://nginx.devopshint.xyz
Your website is now secure with HTTPS.

Step #8:Configure NGINX as a Reverse Proxy
Launch a new EC2 instance named Web1.

Update the system packages.
sudo apt update
Install Apache.
sudo apt install -y apache2
Ensure Apache is running.
sudo systemctl status apache2
Remove the default web page.
sudo rm /var/www/html/index.html
Create a custom web page.
sudo vi /var/www/html/index.html
Add the following content.
<html>
              <body>
                             <h1>This is demo Website</h1>
              </body>
</html>

Access the web page by using public IP of Web1 (http://<Web1-PUBLIC-IP>).

Go back into your NGINX instance and edit the configuration to include reverse proxy.
sudo vi /etc/nginx/nginx.conf
Modify it to include a reverse proxy for Web1.
events{}

http{
    include mime.types;

    server{
        listen 8080;

        location / {
            proxy_pass http://<Web1-PUBLIC-IP>/;
        }
    }

    # Website with SSL
    server{
        listen 443 ssl http2;
        server_name devopshint.xyz nginx.devopshint.xyz;
        root /usr/share/nginx/html/website/;

        access_log /var/log/nginx/devopshint.xyz.access.log;
        error_log /var/log/nginx/devopshint.xyz.error.log;

        ssl_certificate /etc/letsencrypt/live/devopshint.xyz/fullchain.pem;
        ssl_certificate_key /etc/letsencrypt/live/devopshint.xyz/privkey.pem;

        ssl_protocols TLSv1.2 TLSv1.3;
    }
}
Start and reload NGINX.
sudo systemctl start nginx
sudo systemctl reload nginx
Now, access the following url to see the reverse proxy working:
http://<NGINX-PUBLIC-IP>:8080. It should serve Web1’s content.

Step #9:Implement Load Balancing in NGINX
Launch a new EC2 instance named Web2.

Update the system packages.
sudo apt update
Install Apache.
sudo apt install -y apache2
Ensure Apache is running.
sudo systemctl status apache2
Remove the default web page.
sudo rm /var/www/html/index.html
Create a custom web page.
sudo vi /var/www/html/index.html
Add the following content.
<html>
              <body>
                             <h1>This is demo Website too</h1>
              </body>
</html>

Access the web page by using public IP of Web2 (http://<Web2-PUBLIC-IP>).

Go back into your NGINX instance and edit the configuration.
sudo vi /etc/nginx/nginx.conf
Modify it to load balance traffic between Web1 & Web2.
events{}

http{
    include mime.types;

    upstream web_servers {
        server <Web1-PUBLIC-IP>:80;
        server <Web2-PUBLIC-IP>:80;
    }

    server{
        listen 8080;

        location / {
            proxy_pass http://web_servers/;
        }
    }

    # Website with SSL
    server{
        listen 443 ssl http2;
        server_name devopshint.xyz nginx.devopshint.xyz;
        root /usr/share/nginx/html/website/;
        access_log /var/log/nginx/devopshint.xyz.access.log;
        error_log /var/log/nginx/devopshint.xyz.error.log;
        ssl_certificate /etc/letsencrypt/live/devopshint.xyz/fullchain.pem;
        ssl_certificate_key /etc/letsencrypt/live/devopshint.xyz/privkey.pem;
        ssl_protocols TLSv1.2 TLSv1.3;
    }
}
Start and reload NGINX.
sudo systemctl start nginx
sudo systemctl reload nginx
Now, access:
http://<NGINX-PUBLIC-IP>:8080
Refresh multiple times and see:
- Web1’s content: “This is demo Website”
- Web2’s content: “This is demo Website too”


Conclusion:
By following this guide, you have successfully installed NGINX, created a custom web page, secured it with SSL, and optimized traffic flow using reverse proxy and load balancing. This setup ensures a secure, scalable, and high-performance web application, ready for production use. With this guide, you’ve successfully set up NGINX on for SSL termination, reverse proxying, and load balancing. Now, your website can handle traffic efficiently while maintaining security and reliability.
Related Articles:
Secure Nginx with Certbot and Let’s Encrypt on Ubuntu 24.04 LTS
Install Elastic Stack on Amazon Linux 2
Reference: