In this article we will learn How to Develop Custom CLI Application Using Python. Command-line applications are lightweight, fast, and incredibly useful for automating everyday tasks. In this practical, we’ll build a simple yet practical password vault CLI app using Python. This application allows users to securely store, retrieve, update, and delete passwords from the terminal. It utilizes basic encryption to protect sensitive data and demonstrates key concepts such as file handling, argument parsing, and modular programming. By following this hands-on approach, you’ll gain a solid understanding of building and deploying Python CLI tools on a Linux environment.
Table of Contents
Prerequisites
- AWS Account with Ubuntu 24.04 LTS EC2 Instance.
- Basic understanding of Python and AWS Console.
Step #1:Set Up the Project Environment
Update your packages.
sudo apt update
Install the necessary tools. We’ll use python3, pip, and venv (virtual environments) to isolate our project dependencies.
sudo apt install -y python3 python3-pip python3-venv
Now create a dedicated directory for your project and navigate to it.
mkdir ~/password-vault-cli
cd ~/password-vault-cli
Initialize a virtual environment inside it.
python3 -m venv venv
source venv/bin/activate
Step #2:Create the CLI Application Script
We’ll now create a Python script named vault.py that implements the full logic of the CLI password manager.
nano vault.pyThe (venv) prefix indicates you’re now working within the isolated environment.

Paste the following code.
#!/usr/bin/env python3
# Import standard Python libraries
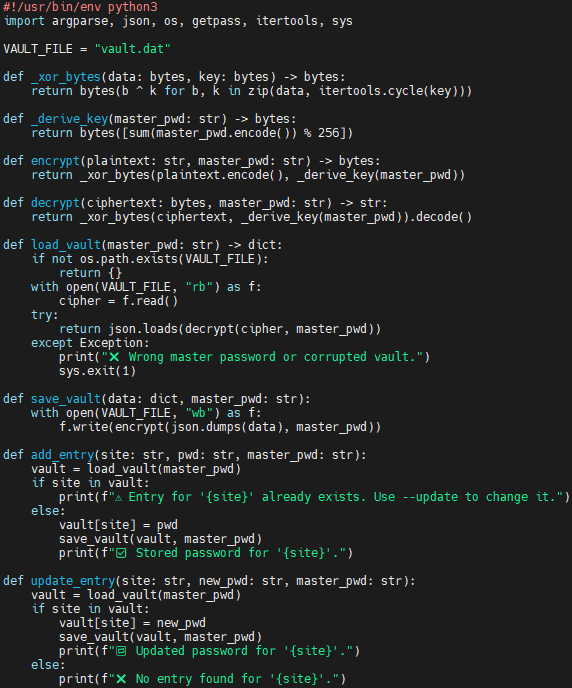
import argparse, json, os, getpass, itertools, sys
# File where encrypted vault data will be stored
VAULT_FILE = "vault.dat"
# === Encryption Utilities ===
# Performs XOR between data bytes and repeated key bytes
def _xor_bytes(data: bytes, key: bytes) -> bytes:
return bytes(b ^ k for b, k in zip(data, itertools.cycle(key)))
# Derives a simple one-byte key from the master password (for XOR encryption)
def _derive_key(master_pwd: str) -> bytes:
return bytes([sum(master_pwd.encode()) % 256])
# Encrypts plaintext using derived XOR key
def encrypt(plaintext: str, master_pwd: str) -> bytes:
return _xor_bytes(plaintext.encode(), _derive_key(master_pwd))
# Decrypts ciphertext using derived XOR key
def decrypt(ciphertext: bytes, master_pwd: str) -> str:
return _xor_bytes(ciphertext, _derive_key(master_pwd)).decode()
# === Vault Load/Save ===
# Loads and decrypts the vault (returns a dictionary of site-password pairs)
def load_vault(master_pwd: str) -> dict:
if not os.path.exists(VAULT_FILE):
return {} # Return empty if file doesn’t exist
with open(VAULT_FILE, "rb") as f:
cipher = f.read()
try:
return json.loads(decrypt(cipher, master_pwd))
except Exception:
print("❌ Wrong master password or corrupted vault.")
sys.exit(1)
# Encrypts and saves the vault dictionary to disk
def save_vault(data: dict, master_pwd: str):
with open(VAULT_FILE, "wb") as f:
f.write(encrypt(json.dumps(data), master_pwd))
# === Vault Operations ===
# Adds a new site-password pair to the vault
def add_entry(site: str, pwd: str, master_pwd: str):
vault = load_vault(master_pwd)
if site in vault:
print(f"⚠️ Entry for '{site}' already exists. Use --update to change it.")
else:
vault[site] = pwd
save_vault(vault, master_pwd)
print(f"✅ Stored password for '{site}'.")
# Updates an existing password entry for a site
def update_entry(site: str, new_pwd: str, master_pwd: str):
vault = load_vault(master_pwd)
if site in vault:
vault[site] = new_pwd
save_vault(vault, master_pwd)
print(f"🔁 Updated password for '{site}'.")
else:
print(f"❌ No entry found for '{site}'.")
# Removes a site entry from the vault
def remove_entry(site: str, master_pwd: str):
vault = load_vault(master_pwd)
if site in vault:
del vault[site]
save_vault(vault, master_pwd)
print(f"🗑️ Removed entry for '{site}'.")
else:
print(f"❌ No entry found for '{site}'.")
# Retrieves and prints the password for a specific site
def get_entry(site: str, master_pwd: str):
vault = load_vault(master_pwd)
if site in vault:
print(f"{site} ➜ {vault[site]}")
else:
print("❌ Site not found.")
# Lists all stored site names (but not passwords)
def list_sites(master_pwd: str):
vault = load_vault(master_pwd)
if vault:
print("Stored sites:")
for s in vault.keys():
print(" •", s)
else:
print("🔒 Vault is empty.")
# Shows all stored site-password pairs
def show_all(master_pwd: str):
vault = load_vault(master_pwd)
if vault:
print("🔐 Stored passwords:")
for site, pwd in vault.items():
print(f" • {site} ➜ {pwd}")
else:
print("Vault is empty.")
# === Entry Point & CLI ===
def main():
# Set up command-line argument parser
p = argparse.ArgumentParser(description="Simple Password Vault CLI")
# Define possible arguments (flags)
p.add_argument("-a", "--add", nargs=2, metavar=("SITE", "PASSWORD"),
help="Add a password for SITE")
p.add_argument("-u", "--update", nargs=2, metavar=("SITE", "NEW_PASSWORD"),
help="Update password for SITE")
p.add_argument("-r", "--remove", metavar="SITE", help="Remove password for SITE")
p.add_argument("-g", "--get", metavar="SITE", help="Retrieve password for SITE")
p.add_argument("-l", "--list", action="store_true", help="List all stored sites")
p.add_argument("--show", action="store_true", help="Show all sites with passwords")
# Parse arguments
args = p.parse_args()
# If no valid flag is given, show help and exit
if not any([args.add, args.get, args.list, args.update, args.remove, args.show]):
p.print_help()
return
# Prompt for master password (input is hidden)
master_pwd = getpass.getpass("Master password: ")
# Dispatch to the correct function based on user input
if args.add:
site, pwd = args.add
add_entry(site, pwd, master_pwd)
elif args.update:
site, pwd = args.update
update_entry(site, pwd, master_pwd)
elif args.remove:
remove_entry(args.remove, master_pwd)
elif args.get:
get_entry(args.get, master_pwd)
elif args.list:
list_sites(master_pwd)
elif args.show:
show_all(master_pwd)
# Run the main function if script is executed directly
if __name__ == "__main__":
main()

Explanation of the code:
- Imports & constant
- Pulls in standard libraries (
argparse,json,os,getpass,itertools,sys) and setsVAULT_FILE = "vault.dat"as the encrypted data store.
- Pulls in standard libraries (
- Tiny XOR cipher
_derive_key()turns the master password into a single‑byte key._xor_bytes()repeatedly XORs that key over the data;encrypt()anddecrypt()wrap this to handle strings → bytes and back.- ⚠️ Simple, educational encryption only—not production‑grade security.
- Vault persistence
load_vault()readsvault.dat, decrypts it with the master password, and returns a Python dict ({site: password}), or an empty dict if the file is missing.save_vault()re‑encrypts the dict and writes it back to disk.
- CRUD operations
add_entry(),update_entry(),remove_entry(),get_entry(),list_sites(), andshow_all()each callload_vault(), modify or display the dict, then (when needed) callsave_vault().
- Command‑line interface
argparsedefines flags:-a/--add,-u/--update,-r/--remove,-g/--get,-l/--list,--show.- If no flag is given the script prints the help message.
- Main workflow
- Prompts once for the master password (
getpass.getpass) so it isn’t echoed. - Dispatches to the correct helper based on the flag supplied.
- The script entry point (
if __name__ == "__main__": main()) lets you run it directly with./vault.py …orpython3 vault.py ….
- Prompts once for the master password (
Run the following command to make script executable.
chmod +x vault.py
Step #3:Test the CLI Application
Now let’s test the application using various commands.
Displays all supported options.
./vault.py --help
Add passwords for different websites.
./vault.py -a example.com S3cr3tP@ssprompts for master password (create one on first use)

./vault.py -a github.com token123Use the master password created in previous step.

List all stored site names.
./vault.py -l
Retrieve password for a specific site.
./vault.py -g github.com
Show all sites and passwords.
./vault.py --show
Update an existing password.
./vault.py --update example.com NewPass456
Now retrieve password for example.com. You can see the update new password.
./vault.py -g example.com
Remove a site entry.
./vault.py --remove github.com
Now again list all stored site names.
./vault.py --list
View Encrypted Vault Data. You can view the encrypted contents of the vault file using hexdump.
hexdump -C vault.dat | head
You’ll see that the contents are XOR-encrypted and not readable in plain text.
Conclusion:
You’ve just built a fully functional password vault CLI application using Python from scratch. This project introduced essential development practices such as command-line argument parsing, basic encryption logic, and secure file storage. Although this version uses a simple XOR cipher, it lays the groundwork for building more secure and advanced tools. As a next step, you can enhance it with strong encryption libraries, clipboard integration, or even a graphical interface. CLI apps like this are a great starting point for real-world Python development.
Related Articles:
Secure SFTP Setup Using AWS Transfer Family
Reference: