In this article, We are going to perform GitLab CI CD Pipeline for php, Python,Drupal Application with SonarQube in 6 Easy Steps
GitLab CI CD Pipeline for php, Python,Drupal Application
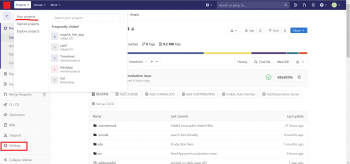
- First Users need to login with GitLab username and password to GitLab account
- Click on your project and select Settings as shown below
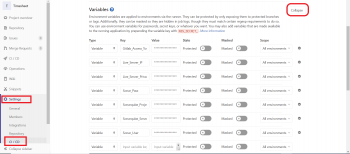
3. Navigating to Settings there is one option CI/CD inside this click on Expand of Variables as shown below
- Add IP addresses, usernames, passwords of servers like Stage, Dev, UAT and Prod environments as a variable
- Add credentials (URL, Username and Password) of SonarQube as a variable
- So we can use these variables in our CI CD yaml files.
4. Write script for sonarqube code scan through the CI CD pipeline and keep it root directory of source code as sonar.sh.
Use sonarqube variables for accessing sonar server.
$ sudo nano sonar.sh
Paste the below lines in it
 #!/bin/bash

      sonar-scanner -X -Dsonar.projectKey=CLAR:Timesheet -Dsonar.sources=. -Dsonar.host.url="$Sonarqube_Server_URL" -Dsonar.login="$Sonarqube_Project_Key" -Dsonar.gitlab.max_major_issues_gate=0 -Dsonar.qualitygate.wait=true -Dsonar.analysis.mode=publish -Dsonar.qualitygate.timeout=900 -Dsonar.scanner.metadataFilePath='analysis.txt'

      export status=$(cat analysis.txt | jq -r '.task.status') #Status as SUCCESS, CANCELED or FAILED

      export analysisId=$(cat analysis.txt | jq -r '.task.analysisId') #Get the analysis Id

      curl -k -u "$Sonarqube_Project_Key":"" http:// Sonarqube_Server_URL:9000/api/qualitygates/project_status?analysisId=$analysisId -o result.txt; #Analysis result like critical, major and minor issues

      export result=$(cat result.txt | jq -r '.projectStatus.status');

      if [ "$result" == "ERROR" ];then

        echo -e "91mSONAR RESULTS FAILED";

        echo "$(cat result.txt | jq -r '.projectStatus.conditions')"; #prints the critical, major and minor violations

        exit 1 #breaks the build for violations

      else

        echo -e "SONAR RESULTS SUCCESSFUL";

        echo "$(cat result.txt | jq -r '.projectStatus.conditions')";

        exit 0

      fi
5. Write yaml for CI CD pipeline and keep it root directory of source code as gitlab-ci.yml
$ sudo nano gitlab-ci.yml
Paste the below lines in it.
stages:
  - test
  - deploy

sonarqube-check:
  stage: test
  when: manual
  script:
    - chmod 755 sonar.sh
    - ./sonar.sh
  allow_failure: false
  only:
       - production

proddeploy:
  stage: deploy
  when: manual
  environment:
    name: Production
    url: "$LIVE_SERVER_IP"
  before_script:
  - 'which ssh-agent || ( apt-get update -y && apt-get install openssh-client -y )'
  - mkdir -p ~/.ssh
  - eval $(ssh-agent -s)
  - '[[ -f /.dockerenv ]] && echo -e "Host *\n\tStrictHostKeyChecking no\n\n" > ~/.ssh/config'
  script:
    - ssh-add <(echo "$LIVE_SSH_PRIVATE_KEY")
    - ssh -o StrictHostKeyChecking=no User@"$LIVE_SERVER_IP" "cd /var/www/html/Project && git fetch --all && git checkout production && git pull origin production && exit"
  only:
    - production
6. Now your CI CD pipeline is ready run. Afterwards whenever developer will be pushed code to Git then your CI CD pipeline will be triggered. If you have set manual trigger for Production, then you need to trigger manually.
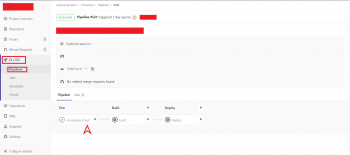
- First Users need to login with their GitLab username and password to GitLab account
- Navigating to CI/CD inside this there is one option Pipelines just click on this option and then click on play button of Job.
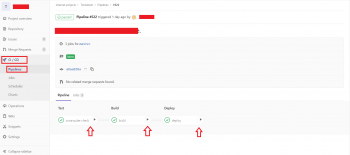
If build successes then you will get result passed as below.
Conclusion
In this article, We have covered GitLab CI CD Pipeline for php, Python,Drupal Application with SonarQube in 6 Easy Steps
Related Articles
How to Install GitLab on Ubuntu 18.04/16.04 LTS
7 Steps for GitLab Runner Registration
Reference
Thanks .sir for great explanation . Very well written