In this article we are going to cover Canary Deployment Using Argo Rollouts on Kubernetes cluster.
Canary is one of the most popular and widely adopted techniques of progressive delivery, advanced approach to blue/green. With a canary deployment, you deploy the new version of the application to a subset of users while the rest continue using the original version.
In canary deployment, where instead of putting entire end-users in danger like in old big-bang deployment, we alternative start releasing our new version of the application to a very small percentage of users and then try to do scrutiny and see if all working as expected and then gradually release it to a larger audience in an Progressive way.

Reference – Argo Project
Table of Contents
Benefits of Argo Rollouts for Canary Deployments
Reduced Risk: Canary deployments allow you to release updates to a small subset of users first. which reduce the impact of potential issues and reduces the risk of widespread outages.
Improved User Experience: Only a small portion of users experience the new changes initially, which reduce the impact of potential bugs or performance issues.
Flexibility and Control: You have the flexibility to control the percentage of users receiving the new version at any time.
Cost-Effective: initially deploying to a small subset of servers, you can optimize resource usage and only scale up once the new version is verified to be stable.
How Canary Deployment works Using Argo Rollouts
Argo Rollouts is a Kubernetes controller that manages ReplicaSets, creating, deleting, and scaling them to deploy containerized applications. The Rollout resource specifies the Replica Sets using a pod template from the Deployment.
Let’s take a look at how it executes a canary deployment:
- A new ReplicaSet is created, and a small percentage of traffic is directed to it.
- The controller gradually increases the percentage of traffic directed to the new ReplicaSet while keeping the remaining users on the older version.
- Developers can test the new ReplicaSet until they determine it’s safe to roll out.
- Once the controller has rolled out the new version, it transfers all traffic to the new ReplicaSet and scales down the old version.
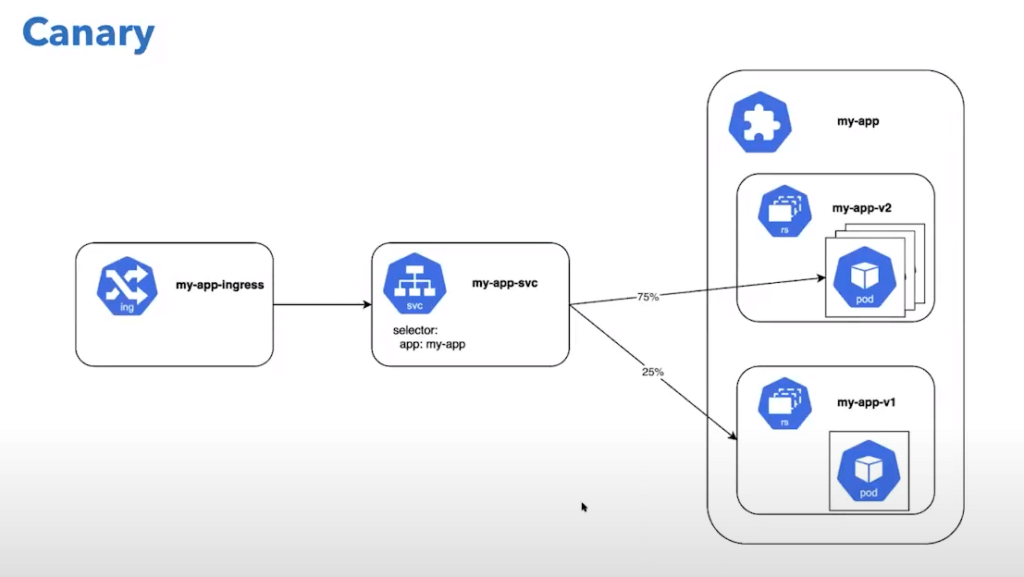
Reference – Image Source
Let’s Start with Hands-on/Practical of Argo Rollouts with Canary Deployments.
Prerequisites
- Pre-Install Ubuntu 24.04 LTS
- Sudo User with admin privileges
- 2 GB RAM or more
- 2 CPU / vCPU or more
- 20 GB free hard disk space or more
- Docker / Virtual Machine Manager – KVM & VirtualBox
- Stable Internet Connection
- Install Minikube and ArgoCD on Ubuntu 24.04 LTS
Install Minikube and ArgoCD on Ubuntu 24.04 LTS
Clone the Argo Rollouts example GitHub repository.
https://github.com/devopshint/argo-rollouts/tree/main/canary-deployment-exampleStep #1:Install Argo Rollouts controller on Minikube
Create the namespace for installation of the Argo Rollouts controller
kubectl create namespace argo-rollouts
kubectl apply -n argo-rollouts -f https://github.com/argoproj/argorollouts/releases/latest/download/install.yaml
Now, you will see the controller and other components have been deployed. Wait for the pods to be in the Running state.
kubectl get all -n argo-rolloutsInstall Argo Rollouts Kubectl plugin with curl for easy interaction with Rollout controller and resources with below command.
curl -LO https://github.com/argoproj/argo-rollouts/releases/latest/download/kubectl-argo-rollouts-linux-amd64
chmod +x ./kubectl-argo-rollouts-linux-amd64
sudo mv ./kubectl-argo-rollouts-linux-amd64 /usr/local/bin/kubectl-argo-rollouts
kubectl argo rollouts version
Argo Rollouts comes with its own GUI as well that you can access with the below command.
kubectl argo rollouts dashboardNow, you can access Argo Rollout console, by accessing http://localhost:3100 on your browser. You would be presented with UI as shown below.

Now, let’s move and deploy our first sample app using the Canary Deployment strategy.
Step #2:Define the Canary Rollout YAML
Create a custom resource definition (CRD) to define your canary deployment rollout strategy.
we will deploy the sample app which contains Rollouts, Service, and Ingress as Kubernetes objects.
Create below yaml’s as shown below rollout.yaml, service.yaml and ingress.yaml or you can follow our GitHub Repository.
rollout.yaml content:
apiVersion: argoproj.io/v1alpha1
kind: Rollout
metadata:
  name: rollouts-demo
spec:
  replicas: 5
  strategy:
    canary:
      steps:
      - setWeight: 20
      - pause: {}
      - setWeight: 40
      - pause: {duration: 10}
      - setWeight: 60
      - pause: {duration: 10}
      - setWeight: 80
      - pause: {duration: 10}
  revisionHistoryLimit: 2
  selector:
    matchLabels:
      app: rollouts-demo
  template:
    metadata:
      labels:
        app: rollouts-demo
    spec:
      containers:
      - name: rollouts-demo
        image: argoproj/rollouts-demo:blue
        ports:
        - name: http
          containerPort: 8080
          protocol: TCP
        resources:
          requests:
            memory: 32Mi
            cpu: 5m
In the above snippet, you tell the rollout controller that you want 20% of the traffic (setWeight: 20) to go to the canary for an indefinite amount of time (pause: {}). You can modify these values to whatever makes sense for your deployment.
service.yaml content:
apiVersion: v1
kind: Service
metadata:
  name: rollouts-demo
spec:
  ports:
  - port: 80
    targetPort: http
    protocol: TCP
    name: http
  selector:
    app: rollouts-demo
ingress.yaml content:
apiVersion: networking.k8s.io/v1
kind: Ingress
metadata:
  name: rollouts-ingress
  annotations:
    kubernetes.io/ingress.class: nginx
spec:
  rules:
  - http:
      paths:
      - path: /
        pathType: Prefix
        backend:
          service:
            name: rollouts-demo
            port:
              number: 80
To apply a configuration to a resource by file or stdin. This means it will create or update the resources defined in the service.yaml file on your Kubernetes cluster.
kubectl apply -f service.yamlTo apply a configuration to a Kubernetes resource defined in the rollout.yaml file. This file typically contains the configuration for a resource managed by Argo Rollouts, such as a Rollout or a Deployment that uses advanced deployment strategies.
kubectl apply -f rollout.yamlTo apply a configuration to an Ingress resource in a Kubernetes cluster. The ingress.yaml file typically contains the configuration for defining how external HTTP/S traffic should be routed to services within the Kubernetes cluster.
kubectl apply -f ingress.yamlList all pods in the default namespace.
kubectl get podsYou will be able to see all the objects been created in the default namespace by running the below commands.
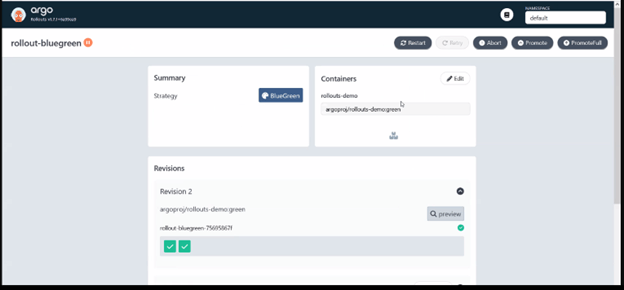
kubectl get allNow, again visit the Argo-Rollouts console. And this time, you could see the sample deployed on the Argo Rollouts console as below.

Run the below kubectl command to expose blue-green service to access on browser.
kubectl port-forward svc/rollouts-demo --address 0.0.0.0 8081:80Now, you can access your sample app, by accessing this http://IP:8081 on your browser. You will able to see the app as shown below.

You can click on this rollouts-demo in the console, and it will present you with its current status as below.
You can see the current status of this rollout by running the below command as well.
kubectl argo rollouts get rollout rollouts-demoOutput:
ubuntu@ip-172-31-42-40:~$ kubectl argo rollouts get rollout rollouts-demo
Name:            rollouts-demo
Namespace:       default
Status:          ✔ Healthy
Strategy:        Canary
  Step:          8/8
  SetWeight:     100
  ActualWeight:  100
Images:          argoproj/rollouts-demo:blue (stable)
Replicas:
  Desired:       5
  Current:       5
  Updated:       5
  Ready:         5
  Available:     5

NAME                                       KIND        STATUS     AGE    INFO
⟳ rollouts-demo                            Rollout     ✔ Healthy  9m44s
└──# revision:1
   └──⧉ rollouts-demo-687d76d795           ReplicaSet  ✔ Healthy  9m44s  stable
      ├──□ rollouts-demo-687d76d795-c4vgz  Pod         ✔ Running  4m26s  ready:1/1
      ├──□ rollouts-demo-687d76d795-cmq6w  Pod         ✔ Running  4m24s  ready:1/1
      ├──□ rollouts-demo-687d76d795-475zh  Pod         ✔ Running  4m23s  ready:1/1
      ├──□ rollouts-demo-687d76d795-n2j8g  Pod         ✔ Running  4m22s  ready:1/1
      └──□ rollouts-demo-687d76d795-7lhrw  Pod         ✔ Running  4m21s  ready:1/1
Now, let’s deploy the Yellow version of the app using canary strategy via command line.
kubectl argo rollouts set image rollouts-demo rollouts-demo=argoproj/rollouts-demo:yellowOutput:
ubuntu@ip-172-31-42-40:~$ kubectl argo rollouts set image rollouts-demo rollouts-demo=argoproj/rollouts-demo:yellow
rollout "rollouts-demo" image updated
You would be able to see a new, i.e yellow version-based pod of our sample app, coming up.
kubectl get podsYou can click on this rollout-blue-green in the console, and it will present you with its current status as below.


If you visit the http://Ip:8081 on your browser, you will see only the majority of blue versions.

You can confirm the same now, by running the command below, which shows, the new version is in paused state.
kubectl argo rollouts get rollout rollouts-demoLet’s promote the yellow version of our app, by executing the below command.
kubectl argo rollouts promote rollouts-demo
Run the following command and you would see it’s scaling the new, i.e yellow version of our app completely.
kubectl argo rollouts get rollout rollouts-demoOutput:
  ubuntu@ip-172-31-42-40:~$ kubectl argo rollouts get rollout rollouts-demo
Name:            rollouts-demo
Namespace:       default
Status:          ✔ Healthy
Strategy:        Canary
  Step:          8/8
  SetWeight:     100
  ActualWeight:  100
Images:          argoproj/rollouts-demo:yellow (stable)
Replicas:
  Desired:       5
  Current:       5
  Updated:       5
  Ready:         5
  Available:     5

NAME                                       KIND        STATUS        AGE  INFO
⟳ rollouts-demo                            Rollout     ✔ Healthy     23m
├──# revision:2
│  └──⧉ rollouts-demo-6cf78c66c5           ReplicaSet  ✔ Healthy     13m  stable
│     ├──□ rollouts-demo-6cf78c66c5-qcssg  Pod         ✔ Running     13m  ready:1/1
│     ├──□ rollouts-demo-6cf78c66c5-x8w9g  Pod         ✔ Running     47s  ready:1/1
│     ├──□ rollouts-demo-6cf78c66c5-p4tq6  Pod         ✔ Running     35s  ready:1/1
│     ├──□ rollouts-demo-6cf78c66c5-6kmg6  Pod         ✔ Running     24s  ready:1/1
│     └──□ rollouts-demo-6cf78c66c5-mchwh  Pod         ✔ Running     13s  ready:1/1
The same can be confirmed by running the below command, which shows the old set of pods i.e old blue version of our app, terminating or already terminated.
kubectl get podsIf you visit the app URL on http://IP:8081 on your browser, you will see only the yellow version is visible right now because we have fully promoted the yellow version of our app.
You can see yello deployment on browser also
Run the below kubectl command to expose service to access on browser
kubectl port-forward svc/rollouts-demo --address 0.0.0.0 8081:80Open browser type , type ip and 8081 port as shown below.

We have successfully completed Canary deployment using Argo Rollouts on Kubernetes.
Conclusion:
In this article, we have covered Canary deployments using Argo Rollouts on Kubernetes.