In this article, we will see how we can Deploy Django Application to AWS (EC2) using Jenkins, GitHub, Docker and DockerHub. We will see what is Jenkins, GitHub, Docker and DockerHub in details and also we will see how we Push & Pull the image to DockerHub.
Deploying an application involves several steps, and I’ll guide you through the process in a simple and detailed manner. Before that we will see in details what is actually a Jenkins (Declarative CI/CD Pipeline), Github, Docker and DockerHub & Why we use it in our production.
Table of Contents
What is Jenkins?
Continuous Integration (CI) and Continuous Deployment (CD) is the most important part of DevOps that is used to integrate various DevOps stages. Jenkins is the most famous Continuous Integration tool, If you’ve ever wondered why Jenkins is so popular and whether it’s easy to learn, you’re in the right place. Let’s dive in and explore the fascinating world of Jenkins!
Jenkins is an open-source automation server widely used for continuous integration (CI) and continuous delivery (CD) processes and written in Java. It allows developers to automate various aspects of the software development lifecycle, including building, testing, and deploying applications. Jenkins is highly extensible through its vast ecosystem of plugins, making it adaptable to a wide range of use cases and technologies.
- Here are a few reasons why Jenkins is so popular:
- Easy to Use: Jenkins might sound complicated, but it’s actually pretty easy to learn. It has a user-friendly interface and lots of helpful guides to get you started.
- Versatility: Jenkins can do a lot of different tasks, from building code to testing it and even deploying it to servers. It’s like having a Swiss Army knife for your software development needs.
- Open-Source: Jenkins is free to use and open-source, which means anyone can contribute to making it better. This also means there’s a huge community of users who can help you out if you get stuck.
- Integration: Jenkins plays well with others. It can connect to lots of other tools and services commonly used in software development, like Git for version control or Slack for team communication.
What is Jenkins Used For?
Jenkins software’s popularity stems from its ability to track and monitor repetitive activities that emerge throughout a project’s development. For example, if your team is working on a project, Jenkins will continuously test your builds and alert you to any mistakes early in the process.
Its top use cases include:
- Deploying code into production: If all of the tests developed for a feature or release branch are green, Jenkins or another CI system may automatically publish code to staging or production.
- Enabling task automation: If a developer is working on several environments, they will need to install or upgrade an item on each of them. If the installation or update requires more than 100 steps to complete, it will be error-prone to do it manually. Instead, you can write down all the steps needed to complete the activity in Jenkins. It will take less time, and you can complete the installation or update without difficulty.
- Reducing the time it takes to review a code: Jenkins is a CI system that may communicate with other DevOps tools and notify users when a merge request is ready to merge. This is typically the case when all tests have been passed and all other conditions have been satisfied.
- Increasing code coverage: Jenkins and other CI servers may verify code to increase test coverage. The results of the tests are presented on the build pipeline, ensuring that team members adhere to the guidelines. Like code review, comprehensive code coverage guarantees that testing is a transparent process for all team members.
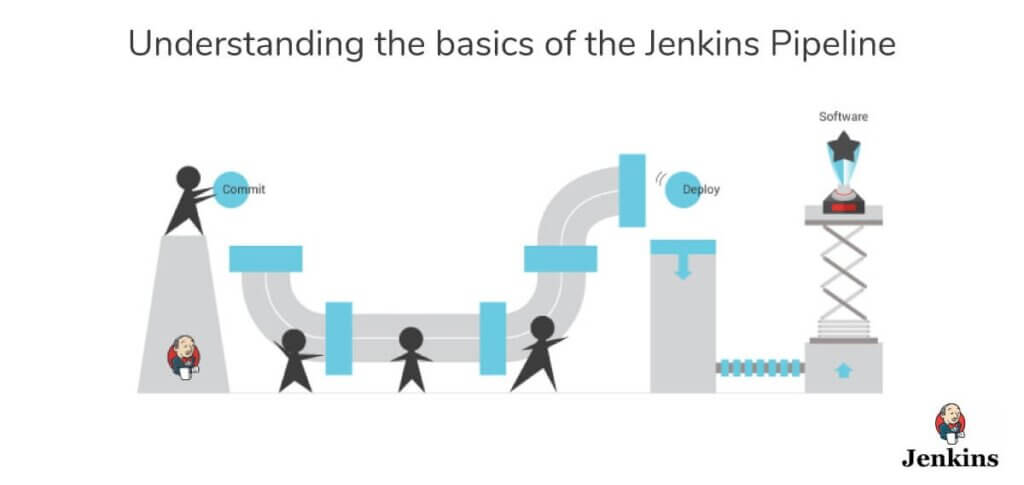
What is Jenkins Pipeline?
A Jenkins Pipeline is a way to define your software delivery process as code, allowing you to express your entire build pipeline as code. It’s a powerful feature in Jenkins that enables you to automate and manage complex CI/CD workflows in a more structured and maintainable manner.
In simpler terms, think of a Jenkins Pipeline as a script that outlines all the steps needed to build, test, and deploy your software. This script lives alongside your code in your version control system, ensuring that your entire software delivery process is versioned, reproducible, and easily sharable among team members. Pipelines are needed to run Jenkins. A pipeline is a set of steps the Jenkins server will execute to complete the CI/CD process’s necessary tasks. In the context of Jenkins, a pipeline refers to a collection of jobs (or events) connected in a specific order. It is a collection of plugins that allow the creation and integration of Continuous Delivery pipelines in Jenkins.
Jenkins Pipelines comprise a powerful technology that includes a set of tools for hosting, monitoring, compiling, and testing code or code modifications across various tools such as:
- Continuous integration server (e.g. Bamboo, Jenkins, TeamCity, CruiseControl, and others)
- Source control software (e.g. SVN, CVS, Mercurial, GIT, ClearCase, Perforce, and others)
- Build tools (e.g. Make, Ant, Ivy, Maven, Gradle, and others)
- Automation testing framework (e.g. Appium, Selenium, UFT, TestComplete, and others)
There are 2 main types of Jenkins Pipeline:
- Declarative Pipeline
- Scripted Pipeline
- Declarative Pipeline:
- In many ways, declarative syntax represents the modern way of defining pipelines. It is robust, clean, and easy to read and write. The declarative coding approach dictates that the user specifies only what they want to do, not how they want to do it. This makes it easier to create declarative pipelines, as compared to scripted pipelines, which follow the imperative coding approach.
- A declarative pipeline starts with a
pipelineblock, defines anagent, and definesstagesthat include executablesteps, as in the three-stage example below.
pipeline {
    agent any

    stages {
        stage(‘Build’) {
            steps {
                echo ‘Building..’
            }
        }
        stage(‘Test’) {
            steps {
                echo ‘Testing..’
            }
        }
        stage(‘Deploy’) {
            steps {
                echo ‘Deploying....’
            }
        }
    }
}
- In a declarative pipeline definition, the entire code is encapsulated within the pipeline block.
pipelineis the mandatory outer block to invoke the Jenkins pipeline plugin.agentdefines where you want to run the pipeline.anysays to use any available agent to run the pipeline or stage. A more specific agent might declare a container to use, for example:
agent {
    docker {
        image ‘maven:3-alpine’
        label ‘my-defined-label’
        args  ‘-v /tmp:/tmp’
    }
}
- A Jenkins Pipeline is composed of stages, which represent distinct phases in your software delivery process.
stagescontain a sequence of one or more stage directives. In the example, the three stages are Build, Test, and Deploy. - Each stage can contain multiple steps, which are individual tasks or actions performed within that stage (e.g., compiling code, running tests, deploying to a server).
stepsdo the actual work. In the example the steps just printed messages. A more useful build step might look like the following:
pipeline {
    agent any

    stages {
        stage(‘Build’) {
            steps {
                sh ‘make’
                archiveArtifacts artifacts: ‘**/target/*.jar’, fingerprint: true
            }
        }
    }
}
- Scripted Pipeline:
- In Jenkins, a Scripted Pipeline is a way to define your software delivery process using a flexible, Groovy-based scripting syntax. It allows for greater customization and control over the pipeline compared to the more structured Declarative Pipeline syntax.
- Scripted pipelines follow the imperative coding approach, in which the developer has complete control over what they want to achieve and how they want to achieve it.
- In Scripted Pipeline, you write your pipeline script using Groovy, a powerful scripting language that runs on the Java Virtual Machine (JVM). The script consists of various Groovy constructs such as variables, loops, conditionals, and function calls to define the stages and steps of your pipeline.
- Similar to Declarative Pipeline, Scripted Pipeline consists of stages and steps. Scripted Pipeline runs within the context of a Jenkins agent (node), where the actual build and deployment actions take place. You can specify the type of agent to use (e.g., Docker container, specific machine) at the beginning of your script using the
nodeblock.
node {
    stage('Build') {
        // Execute build steps (e.g., compile code)
        sh 'mvn clean install'
    }
    stage('Test') {
        // Execute test steps (e.g., run unit tests)
        sh 'mvn test'
    }
    stage('Deploy') {
        // Execute deployment steps (e.g., deploy to a server)
        sh 'deploy.sh'
    }
}
- If we compare both examples, we’ll notice that the structures of the two pipelines are fundamentally different. The scripted pipeline doesn’t have the options directive because it’s not a part of the scripted syntax. We also don’t see a stages block in the scripted pipeline, and instead, individual stages are nested inside the node block.
- However, the Groovy-based syntax poses a learning curve for Jenkins beginners. This was a primary reason the Jenkins team introduced declarative pipelines, a more readable syntax. Scripted pipelines lack several features that are available out-of-the-box in declarative pipelines, including the environment and the options blocks.
Prerequisites
Before proceeding, make sure you have the following prerequisites in place:
- You’ll need an Amazon Web Services (AWS) Account. If you don’t have one, you can sign up for a Free AWS Account.
- Basic knowledge of AWS services and concepts.
- Working GitHub Account.
- Docker and Docker Hub Account and Credentials.
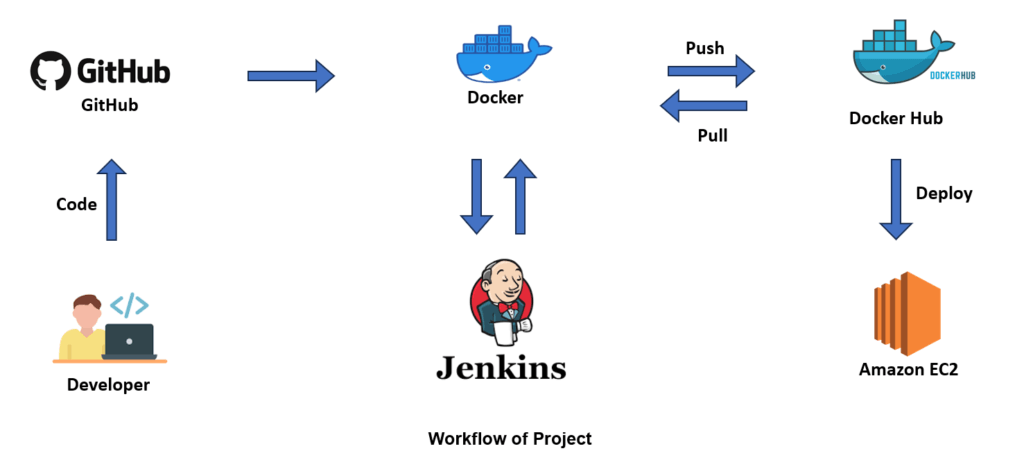
Workflow of our project
How to Deploy Django Application to AWS (EC2) step by step
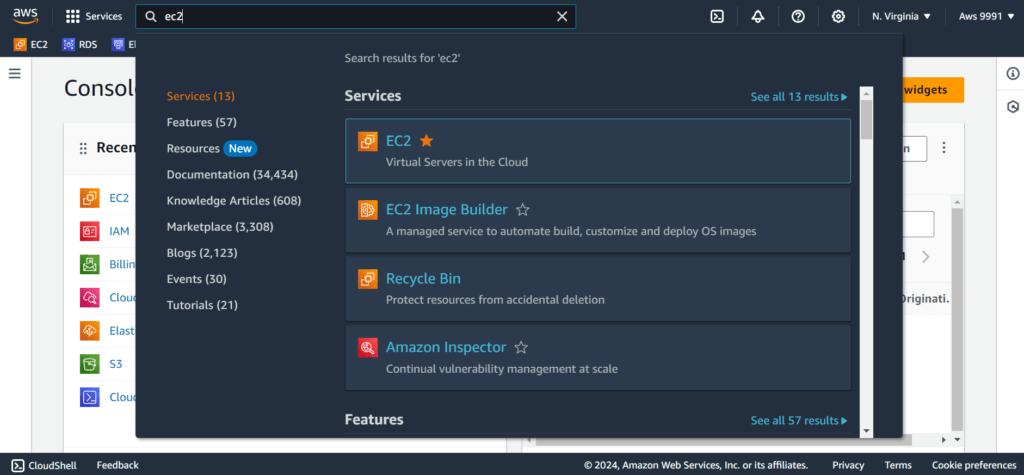
Step 1:- Visit the AWS Console and type “EC2“ into the search bar.
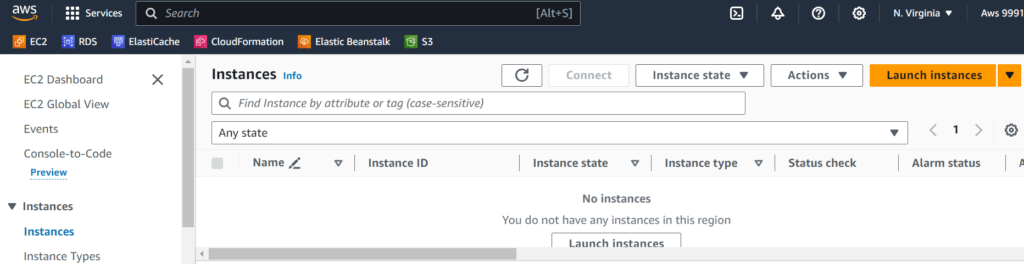
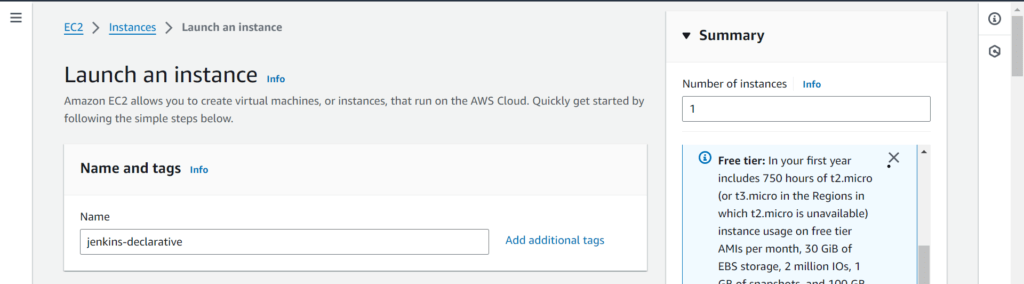
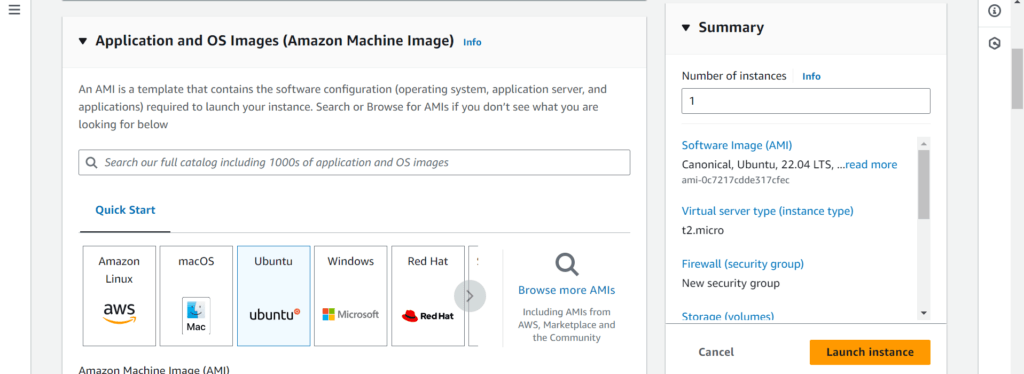
Step 2:- After selecting “EC2” from the search menu, you will be taken to the “EC2” page where you can click “Instances” and then click on “Launch Instances” to launch a simple “Ubuntu” machine image with simple configuration such as name and tags is “jenkins-declarative” (you can change according to your needs), Instance-type is “t2.micro” (free tier) and leave everything is default.

Step 3:- Once you have done with creating an “EC2” you can see the “2/2 checks passed” which means your “EC2” is in working stage. After this connect your “EC2” by your CLI (Command Line Interface) by using the SSH Client.

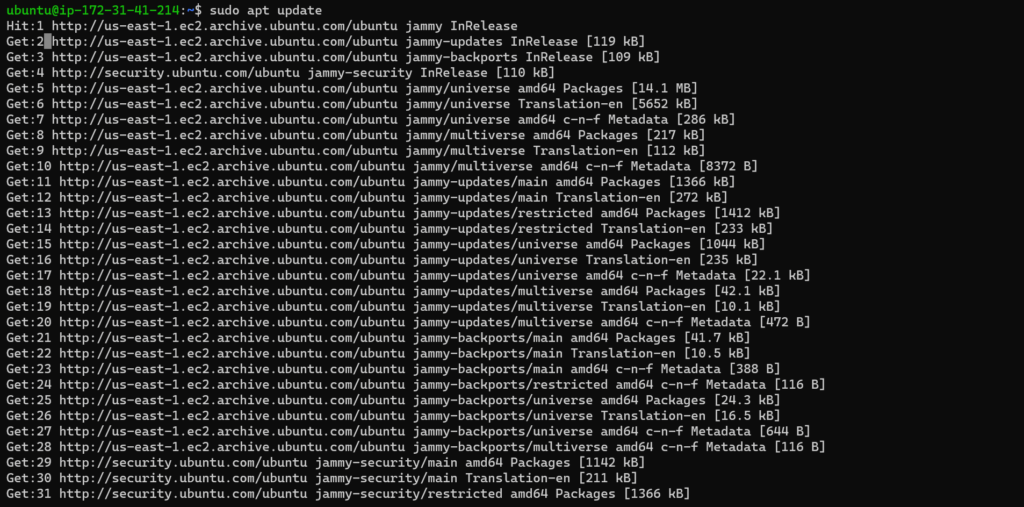
Step 4:- Once you login into the “EC2” then update the server by using below command.
sudo apt update
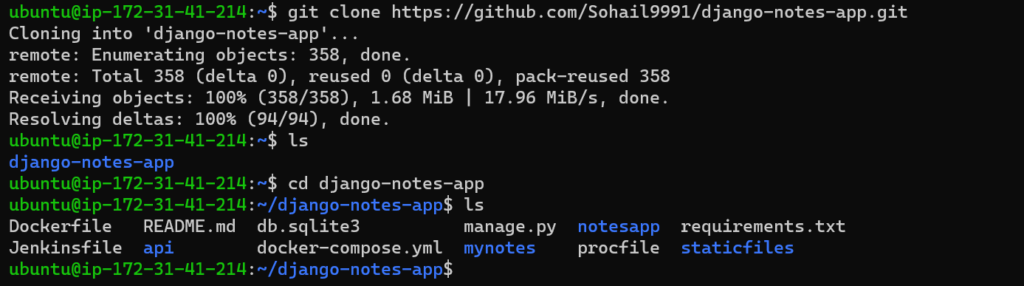
Step 5:- Then first we have to get a code from “GitHub Repository”. So I’ve already created one repo in my GitHub Account from where you can fetch the code, go the repositories section click on the project then click on code where you will find the Link and URL. Copy this link and paste it in CLI. You can use below command.
git clone https://github.com/Sohail9991/django-notes-app.git
You can also verify it by using “ls” command. After that use “cd” command to move into your app directory, that means your code is successfully clone.
ls
cd django-notes-app
ls
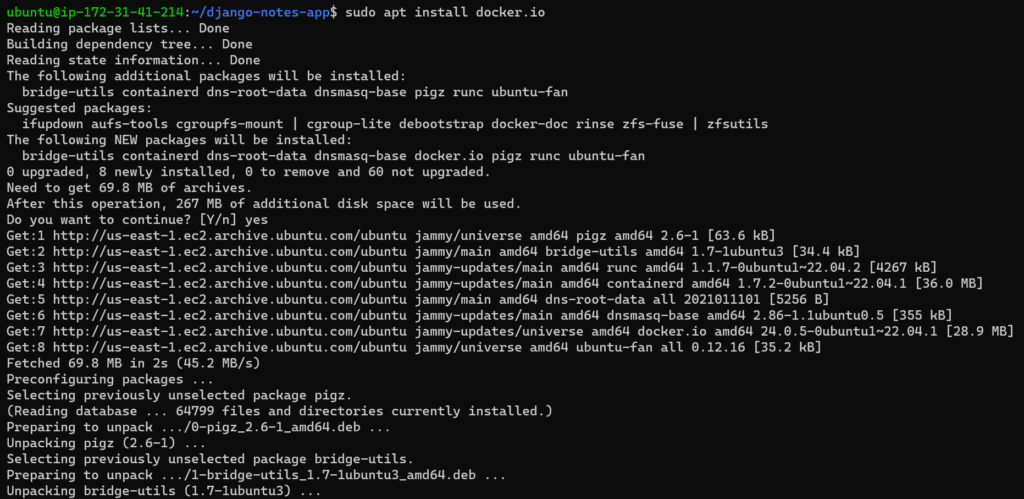
Step 6:- Our first step is cleared. We clone the code from repository, now we want to install “Docker” in our system by using below command. You can also check by verifying it that your docker is install or not by using second command.
You also install the the “docker-compose” in your system by using below command.
sudo apt install docker.io
sudo apt install docker-compose
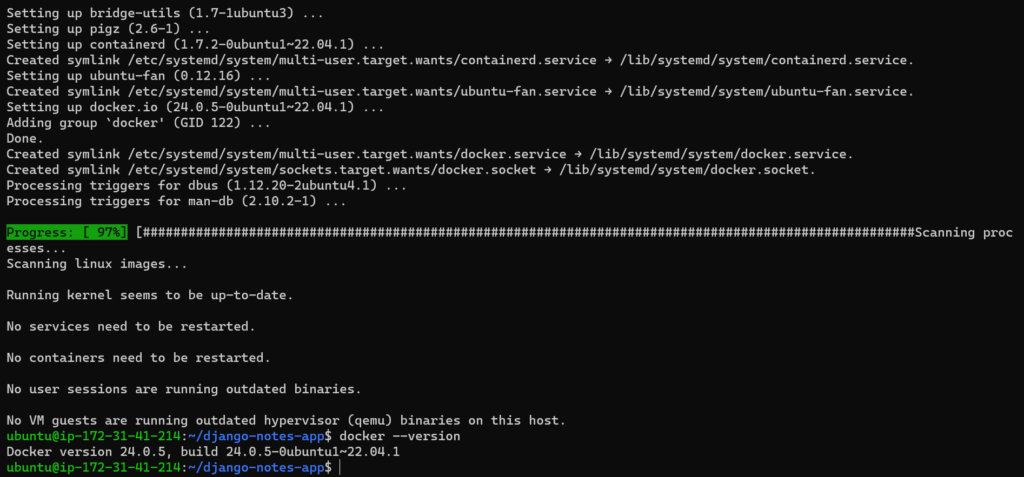
docker --version
Step 7:- Now run the below command. Once you run this command you will get an error. This error is about that your “Ubuntu” is not having a permission of a “Docker” that’s why you get an error.
docker ps
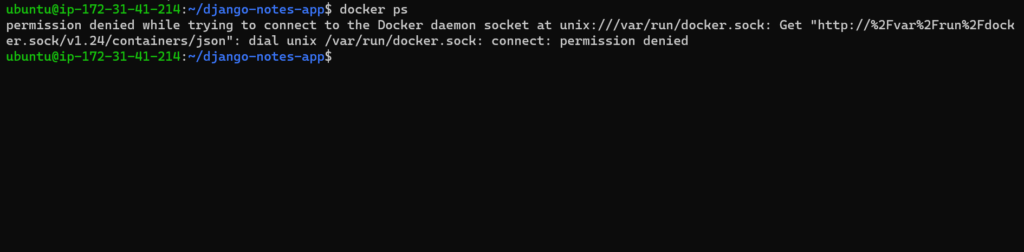
To resolve this error you have to give a proper permission, you have to change and modify the user “Ubuntu” permission by append it in “Docker” Group by using this command and reboot the server to update the changes.
Then again run “docker ps” command you will see that your error is solved. That’s how you install a Docker in your system.
sudo usermod -aG docker $USER
sudo reboot
docker ps

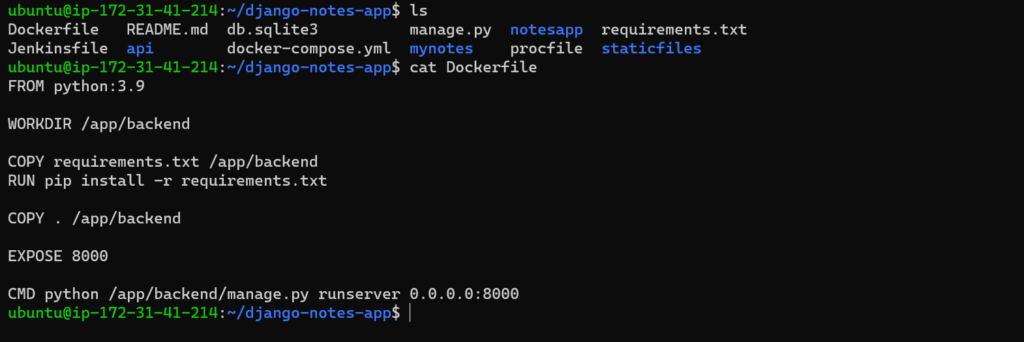
Step 8:- Now you have to create a Dockerfile to add requirements likes plugins, platform, dependencies, ports etc of your application to run your application, We have already pre-made Dockerfile in our code (you don’t have to create another one) you can check that by using this command.
cat Dockerfile
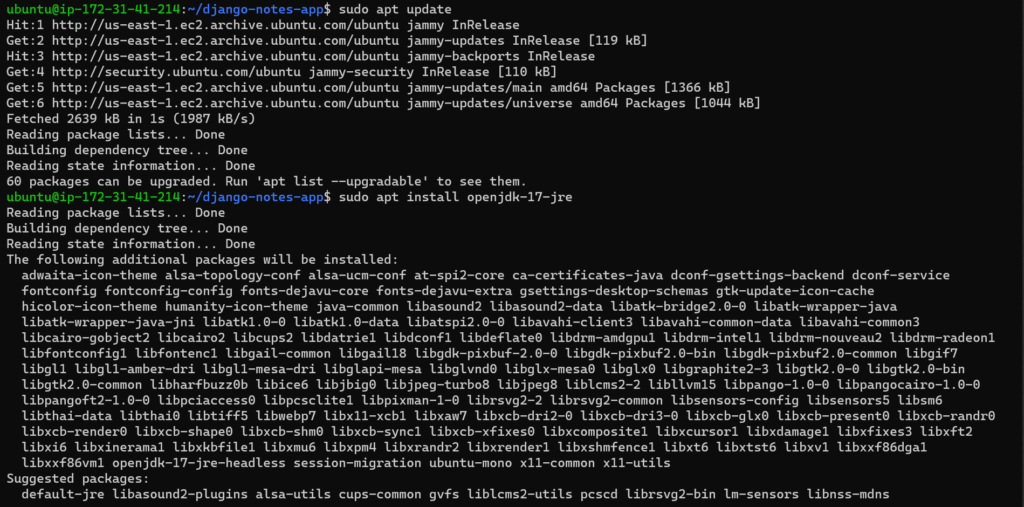
Step 9:- Now you have to install “Jenkins” in your system before that you have to install “Java” in your system by using below command.
Command’s to install “Java”.
sudo apt update
sudo apt install openjdk-17-jre
Once you done with installing “Java” you can verify it by using below command.
java --version

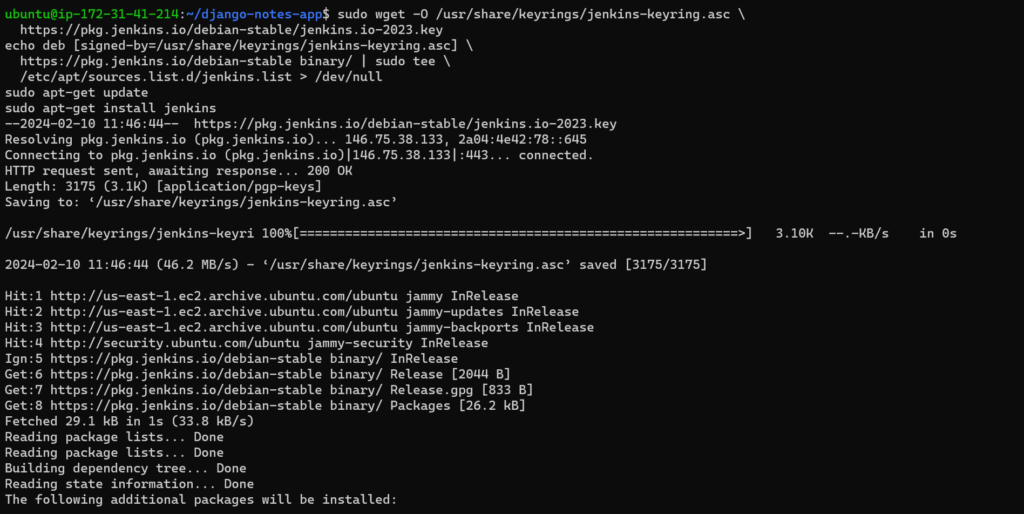
Now install “Jenkins” in your system by using this command.
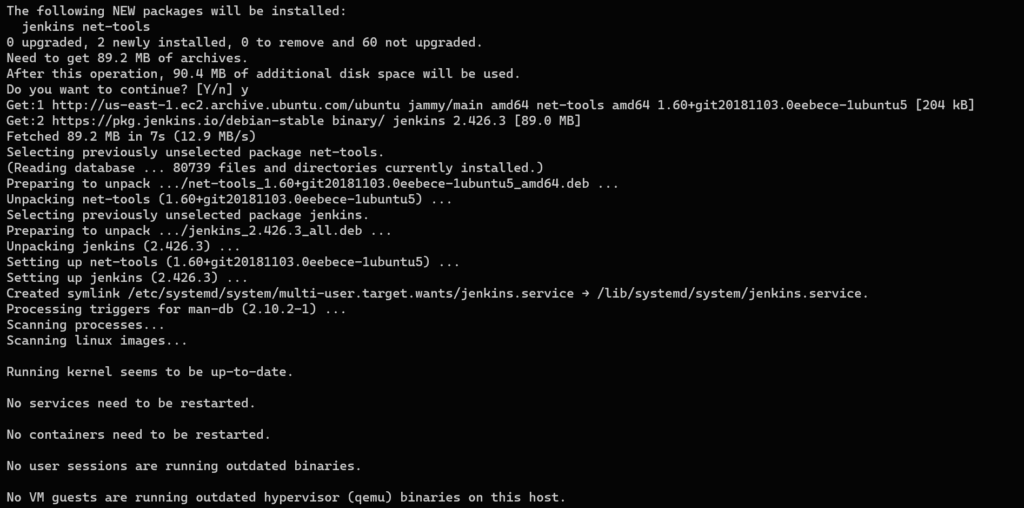
sudo wget -O /usr/share/keyrings/jenkins-keyring.asc \
  https://pkg.jenkins.io/debian-stable/jenkins.io-2023.key
echo deb [signed-by=/usr/share/keyrings/jenkins-keyring.asc] \
  https://pkg.jenkins.io/debian-stable binary/ | sudo tee \
  /etc/apt/sources.list.d/jenkins.list > /dev/null
sudo apt update
sudo apt install jenkins
Once you done with installing “Jenkins” you can verify it by using below command.
service jenkins status

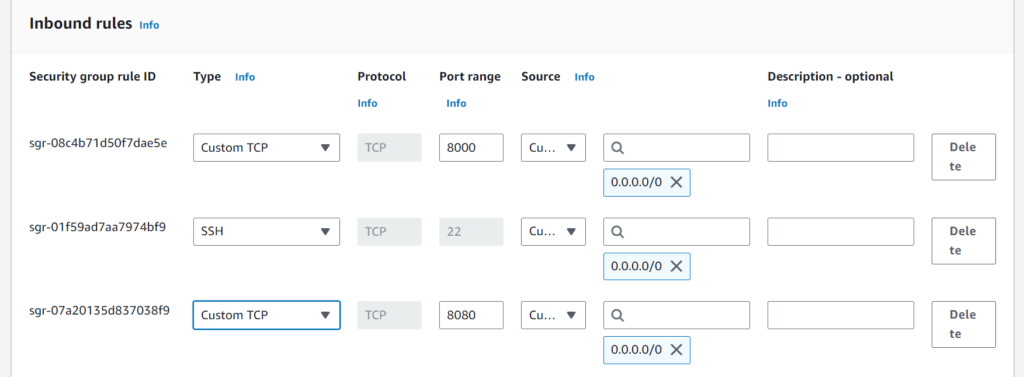
Great everything is installed in your system now go to AWS Console and click on your “EC2” and copy the Public IP of your “EC2”. Before that go to the Security Group and Edit the Inbound Rules and open port “8080” & “8000” because “Jenkins” run on a port “8080” and “8000” is for our application.
After this paste the copy Public IP on new browser you will see the “Jenkins” login page.
"your-public-ip":8080
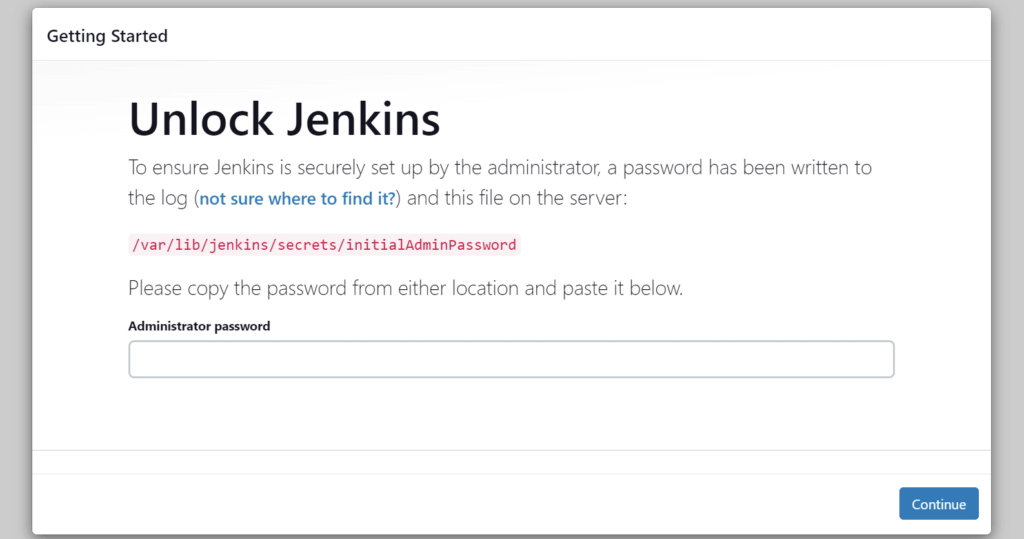
To ensure “Jenkins” is securely set up by the Administrator, a password has been written in this giving path. You just have to copy this giving path and paste it in your system. After that you will see a encrypted password copy it and paste it in place of Administrator Password.
sudo cat "YourFilePath"

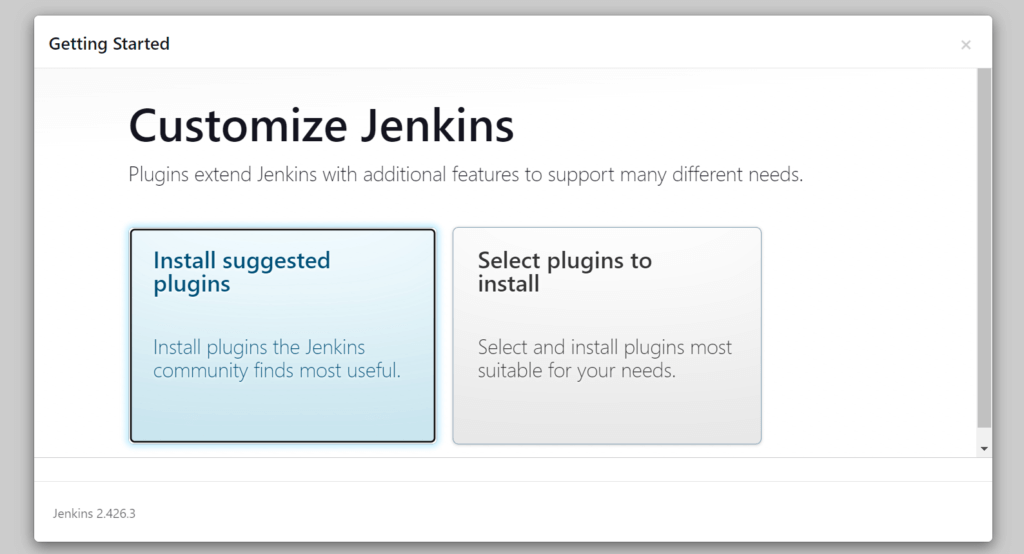
After this install suggested plugins for jenkins.
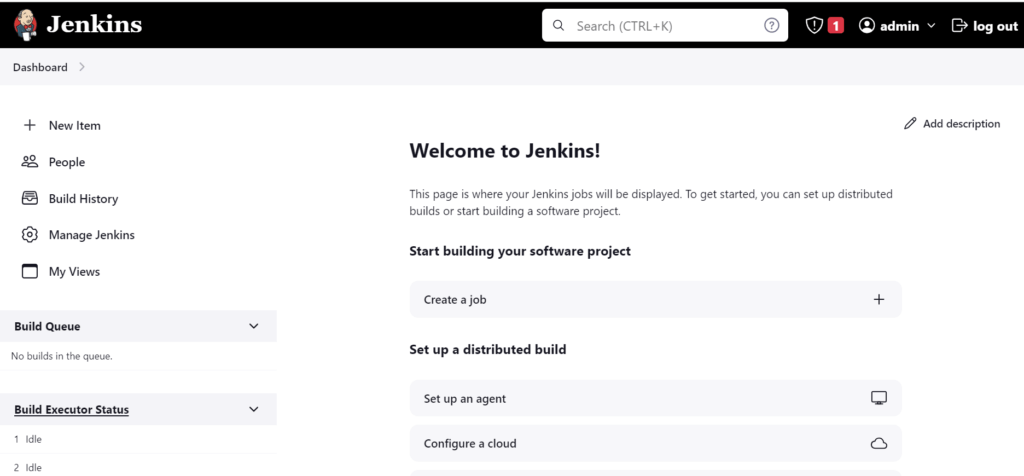
After completing the installation part, you have to setup a username and password (optional) or you can use as “admin” user also. After login you will see this type of Dashboard on your screen.
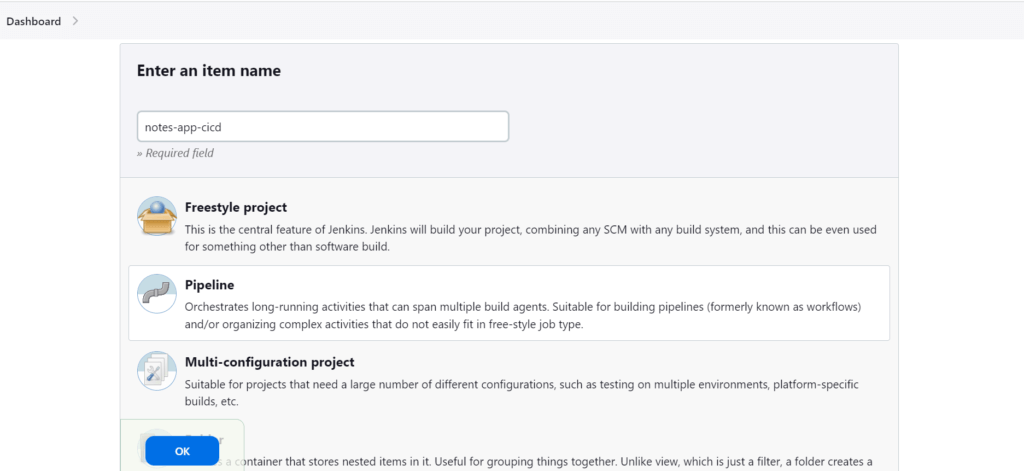
Step 10:- Now Click on the “Create Job” option then add a name according to your needs mine is “notes-app-cicd”. After this select “Pipeline” option then click on “Ok” .
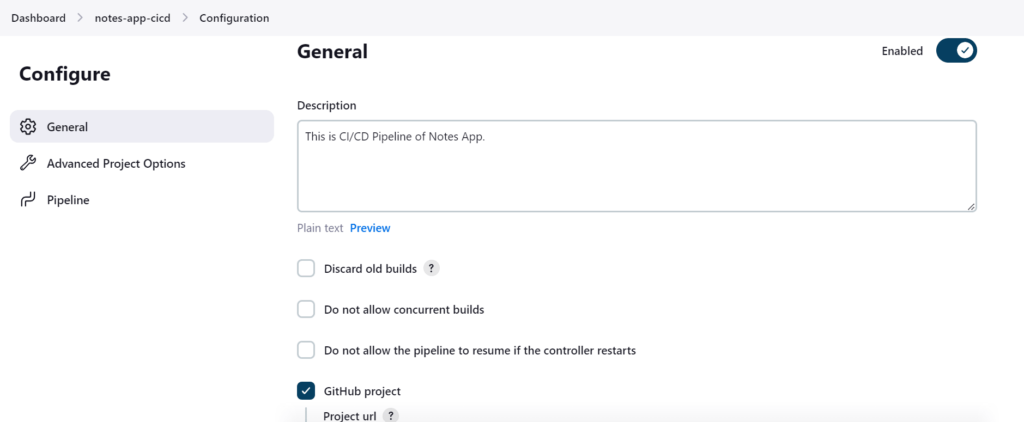
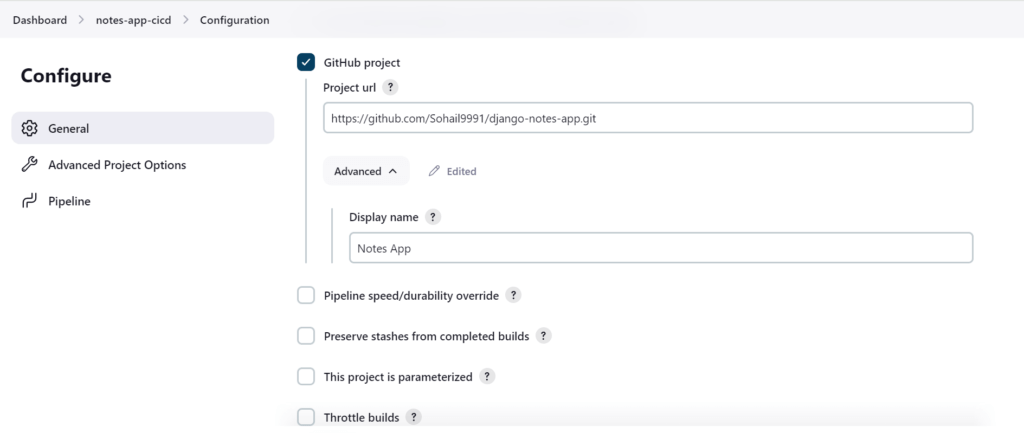
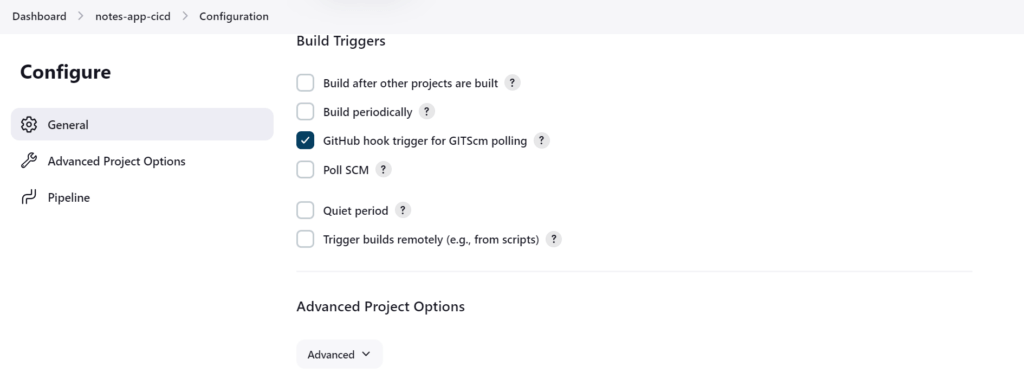
Step 11:- On General Page, first add a description of your pipeline then select the GitHub Project option after that paste the URL of your project from GitHub Repository and also add the name according to you. Then in Build Triggers option select GitHub hook trigger for GITScm polling and leave everything default or you can manage according to your project also. In our project this option’s are sufficient for us.
Step 12:- In Pipeline option you can select option according to your project, in this example we’re using Pipeline Script option. You can use below code script just copy and paste it into script box.
NOTE:- You have to change and modify the “Jenkins” permission by append it in “Docker” Group by using this command and reboot the server to update the changes.
cd /var/lib/jenkins/workspace/notes-app-cicd
sudo usermod -aG docker jenkins
NOTE:- Here in our code we use environment variable in our system to add credentials for better security. Edit your credentials first go to Jenkins Dashboard and navigate to “Manage Jenkins” > Credentials > System > Global credentials (unrestricted) > Add Credentials. By this you can add your credentials.
Username = “Your DockerHub Username”
Password = “Your DockerHub Password”
CredentialsId = “docker Hub”
pipeline {
    agent any

    stages{
        stage("CLONING THE CODE"){
            steps {
                echo "Cloning the code"
                git url:"https://github.com/Sohail9991/django-notes-app.git", branch: "main"
            }
        }
        stage("BUILDING THE IMAGE"){
            steps {
                echo "Building the image"
                sh "docker build -t my-note-app ."
            }
        }
        stage("PUSH TO THE DOCKER HUB"){
            steps {
                echo "Pushing the image to docker hub"
                withCredentials([usernamePassword(credentialsId:"dockerHub",passwordVariable:"dockerHubPass",usernameVariable:"dockerHubUser")]){
                sh "docker tag my-note-app ${env.dockerHubUser}/my-note-app:latestnew"
                sh "docker login -u ${env.dockerHubUser} -p ${env.dockerHubPass}"
                sh "docker push ${env.dockerHubUser}/my-note-app:latestnew"
                }
            }
        }
        stage("DEPLOYING THE CONTAINER"){
            steps {
                echo "Deploying the container"
                sh "docker-compose down && docker-compose up -d"

            }
        }
    }
}
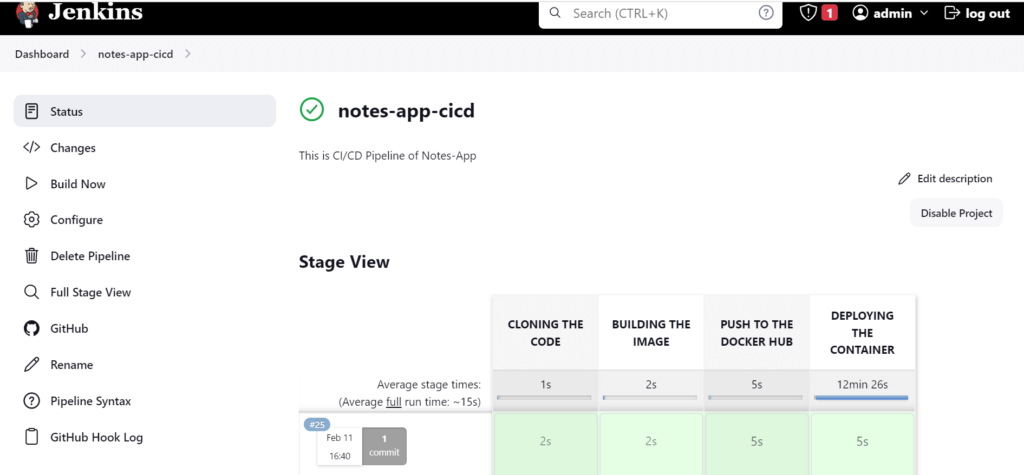
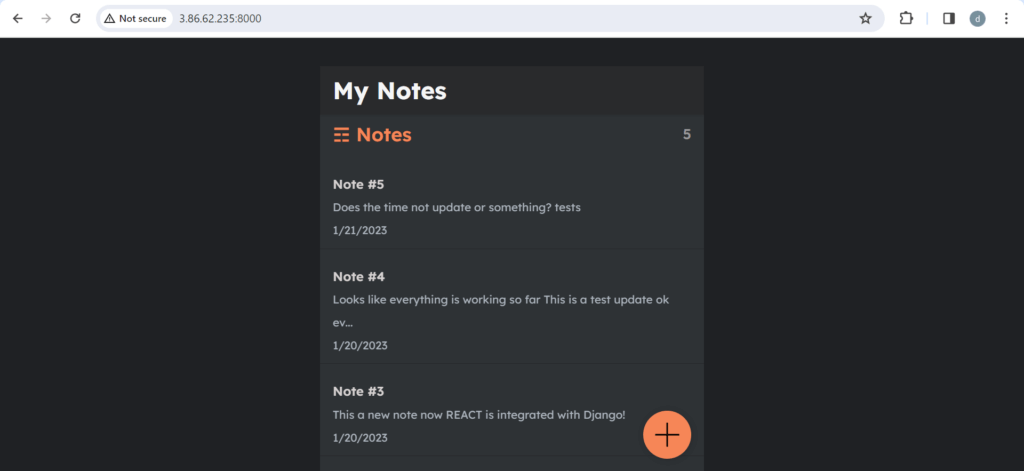
Step 13:- Save this and select the “Build Now” option. If you see “GREEN” color status which means your code is working fine. If you want to see your application is running or not then copy “Public IP” of your “EC2” and paste it with port “8000” into new browser.
“YOUR_PUBLIC_IP:8000”
If you want to trigger Auto Build then you can enable and set up “Webhook” in GitHub Account by adding the URL.
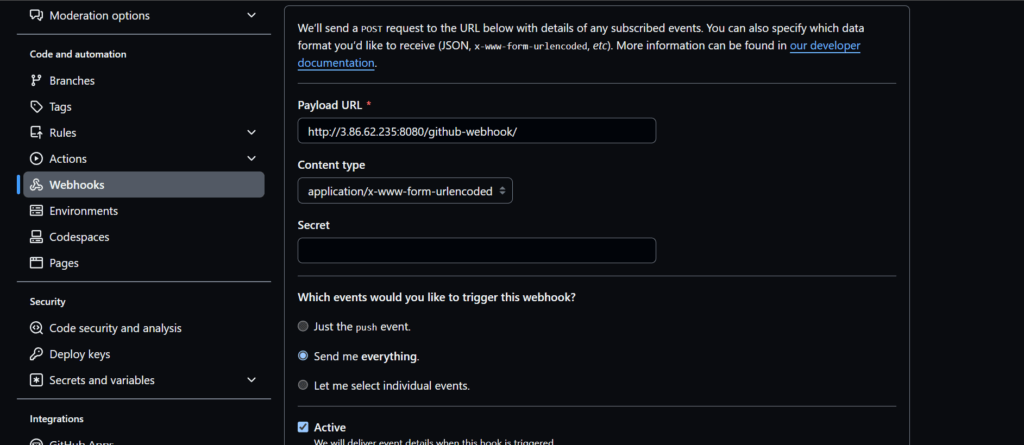
If you commit any changes in your repository then “Jenkins” will automatically update and Start Auto Build the application. You don’t have to Build again & again.
Conclusion:
In this article, we’ve shown you How to use Jenkins Declarative Pipeline to automate building and deploying Application using Git, Docker, and Docker Hub. By following these steps, you can make your software development process smoother and faster. Even if you don’t have any prior experience, don’t worry! These instructions are designed to be simple and easy to follow.
If you have any questions or want to share your experiences, just drop a comment below. We’re here to help!
Reference:
Any queries please contact us @www.fosstechnix.com
Related Articles: