In this article, we will cover how to build a Spring Boot project using Gradle, a popular build automation tool for Java projects. Gradle simplifies the build process and dependency management, allowing developers to focus on coding rather than configuration. This guide will walk you through the steps to set up and build a Spring Boot project using Gradle.
Table of Contents
Prerequisites
Before we begin, ensure you have the following installed on your Ubuntu system:
- AWS Account with Ubuntu 24.04 LTS EC2 Instance.
- OpenJDK 17: The Java Development Kit (JDK) for running Java applications.
- Gradle: A build automation tool that manages dependencies and build tasks.
Step #1:Set Up Ubuntu EC2 Instance
If you don’t have JDK or Gradle installed on your system, you can install them using the following commands.
First, update the package list.
sudo apt update

Then install OpenJDK 17, which is required to run your Spring Boot application.
sudo apt install openjdk-17-jdk -y

Verify the Java installation.
java -version

You should see the version details of your Java installation.
Now let’s install Gradle. Gradle can be installed using the following command,
sudo apt install gradle -y

Step #2:Create Spring Boot Project Using Gradle
To create a new Spring Boot project, you can use the command line. Run the following command to generate a new project.
First create a directory for the project.
mkdir spring-boot-project

Navigate to that directory.
cd spring-boot-project
Next, initialize the project using Gradle.
gradle init --type java-application
This command sets up a basic Gradle project structure.
Step #3:Create Spring Boot Application
Open the build.gradle file.
nano build.gradle
Replace its content with the following.
plugins {
        id 'java'
        id 'org.springframework.boot' version '3.3.5'
}

apply plugin: 'io.spring.dependency-management'

group = 'com.example'
version = '0.0.1-SNAPSHOT'
sourceCompatibility = '17'

repositories {
        mavenCentral()
}

dependencies {
    implementation 'org.springframework.boot:spring-boot-starter-web'
}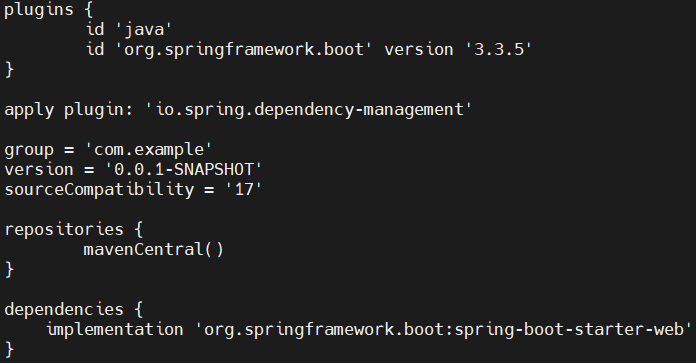
Explanation of the code:
This is a Gradle build script for a simple Java Spring Boot project, using the Spring Boot plugin and dependency management for easier setup and version control.
- Plugins Block:
id 'java': Adds support for Java compilation and packaging.id 'org.springframework.boot' version '3.3.5': Adds Spring Boot’s Gradle plugin (version 3.3.5) for Spring Boot application support, which includes tasks for running and packaging the app.
- apply plugin:
- This applies the Spring Dependency Management plugin, which manages transitive dependencies for Spring projects, making it easier to handle compatible versions of libraries.
- Project Metadata:
group: Defines the package namespace (e.g.,com.example) for identifying the project.version: Sets the current version of the project (0.0.1-SNAPSHOT), where “SNAPSHOT” denotes a work-in-progress.sourceCompatibility: Specifies Java 17 as the target version.
- Repositories:
- Defines
mavenCentralas the source for downloading dependencies, the main repository for Java libraries.
- Defines
- Dependencies Block:
implementation 'org.springframework.boot:spring-boot-starter-web': Adds the Spring Boot Web Starter dependency, which includes everything necessary to create a web application, including a Tomcat server and essential Spring components.
Next navigate to the Main Java source directory.
cd src/main/java

Remove the default App.java file that was generated.
sudo rm App.java

Create the package structure and navigate into it.
mkdir -p com/example
cd com/example

Create a new Java file named MyApplication.java.
nano MyApplication.java

Add the following code to create a simple Spring Boot application into MyApplication.java.
package com.example;

import org.springframework.boot.SpringApplication;
import org.springframework.boot.autoconfigure.SpringBootApplication;
import org.springframework.web.bind.annotation.RequestMapping;
import org.springframework.web.bind.annotation.RestController;

// Mark this class as a Spring Boot application
@SpringBootApplication
@RestController
public class MyApplication {

    // Define a simple REST endpoint
    @RequestMapping("/")
    public String home() {
        return "Hello World!";
    }

    // The main method to run the application
    public static void main(String[] args) {
        SpringApplication.run(MyApplication.class, args);
    }
}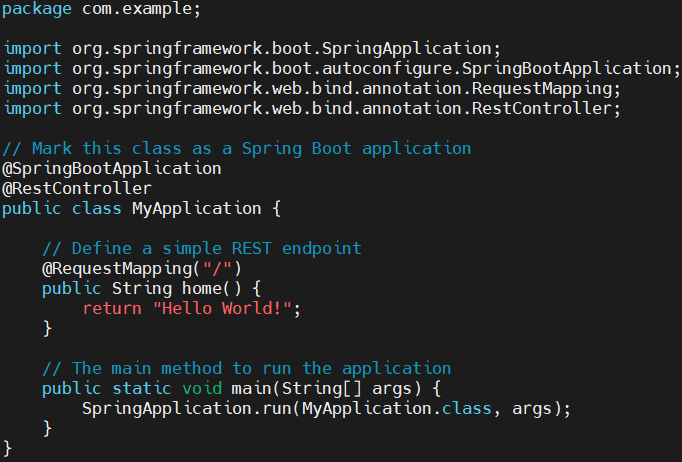
Explanation of the code:
This Java code defines a simple Spring Boot application with a REST API endpoint.
- Package Declaration:
- Declares the package as
com.example, helping to organize the code within this namespace.
- Declares the package as
- Imports:
SpringApplicationandSpringBootApplication: These provide the main structure for a Spring Boot application.RequestMappingandRestController: These are used to define a REST controller and map HTTP requests to methods.
- Class Annotation and Declaration:
@SpringBootApplication: Marks this class as the main entry point for Spring Boot, enabling auto-configuration and component scanning.@RestController: Marks the class as a REST controller, allowing it to handle HTTP requests and send responses directly.
- Define a Simple REST Endpoint:
@RequestMapping("/"): Maps the root URL (/) to this method, making it the default endpoint.home(): When a user accesses the root URL, this method returns"Hello World!"as a plain text response.
- Main Method:
main: The starting point of the application, running it by callingSpringApplication.run(MyApplication.class, args), which boots up the embedded web server (usually Tomcat by default) and deploys the application.
This creates a simple web application with a single endpoint (/) that returns “Hello World!” when accessed.
Step #4:Build and Run the Application
Navigate back to the root directory of the project.
cd ../../../../..

Now note that, here system install older version of gradle which is not compatible with our project setup.
gradle -version
so lets upgrade Gradle Wrapper.
Open the gradle-wrapper.properties file to configure the Gradle wrapper. This file is located in the gradle/wrapper directory. You can adjust the Gradle version here.
nano gradle/wrapper/gradle-wrapper.properties
specify the Gradle version you want to use in this file. Here we are using 8.1.1.

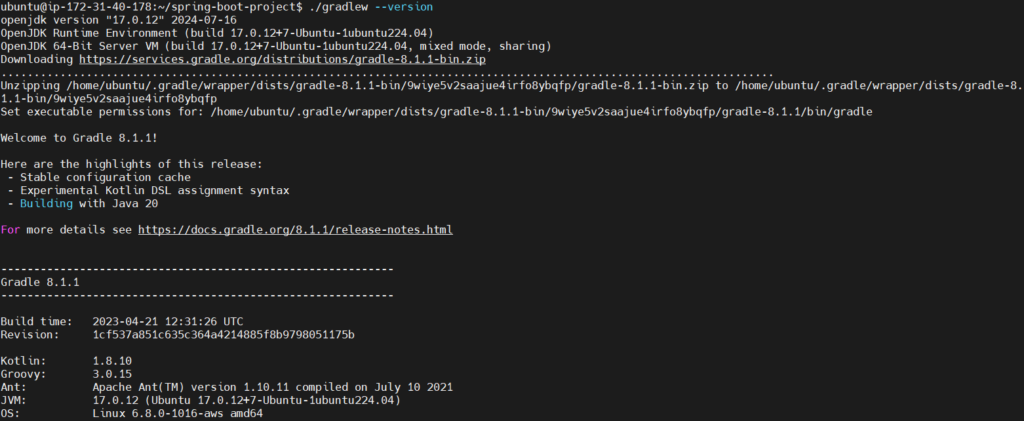
Once done, check the Gradle wrapper version.
./gradlew -version
Now you can build and run the application using the following command.
./gradlew bootRun

You should see logs indicating that your application has started successfully. Now lets access the Hello World Endpoint.
Open your web browser and run the following URL http://<EC2-Instance-IP>:8080.

You should see the message “Hello World!”.
Conclusion:
In conclusion, Gradle is a powerful tool that simplifies the process of building and managing Spring Boot projects. By following the steps outlined in this article, you can set up a new Spring Boot project, manage dependencies, and build your application effortlessly. This basic setup can be extended with various Spring Boot features, such as REST endpoints, database connections, and more. With practice, you’ll find that Gradle becomes an indispensable part of your Java development workflow.
Related Articles:
Metrics and Tracing for .NET App using OpenTelemetry, Jaeger and Prometheus
Reference: