In this article we will cover How to Install Jenkins on Ubuntu 24.04 LTS.
Jenkins is an open-source automation server that helps developers build, test, and deploy their software efficiently. It plays a key role in DevOps and CI/CD pipelines by automating repetitive tasks and improving software delivery speed. This guide walks you through the complete installation of Jenkins on Ubuntu 24.04 LTS. By the end of this article, you’ll have Jenkins up and running, ready for your projects.
Table of Contents
Prerequisites
- AWS Account with Ubuntu 24.04 LTS EC2 Instance.
- A user with sudo privileges.
Step #1:Set Up Ubuntu EC2 Instance
Update Package Index.
sudo apt update
Install Java Development Kit version 17, which is the minimum required version for SonarQube 25+.
sudo apt install openjdk-17-jdk -y
Confirm that Java is installed and displays the current version.
java -version
Step #2:Integrate the Jenkins Repository
Download the GPG key used to verify the authenticity of the Jenkins packages. The key is stored securely in the /usr/share/keyrings/ directory.
sudo wget -O /usr/share/keyrings/jenkins-keyring.asc https://pkg.jenkins.io/debian-stable/jenkins.io-2023.key
Next, add the Jenkins stable repository to your APT sources list. This tells your system where to find the Jenkins installation packages.
sudo sh -c 'echo deb [signed-by=/usr/share/keyrings/jenkins-keyring.asc] https://pkg.jenkins.io/debian binary/ > /etc/apt/sources.list.d/jenkins.list'
After adding the new repository, it’s essential to update your package lists once more. This ensures APT is aware of the Jenkins packages now available from the newly added source.
sudo apt update
Step #3:Install and Manage the Jenkins Service
Install Jenkins from the official repository you just added. It downloads Jenkins and all required dependencies.
sudo apt install jenkins
Once installed, start and enable the Jenkins service to bring it online.
sudo systemctl start jenkins
sudo systemctl enable jenkins
To confirm that the Jenkins service is active and running, check its status.
sudo systemctl status jenkins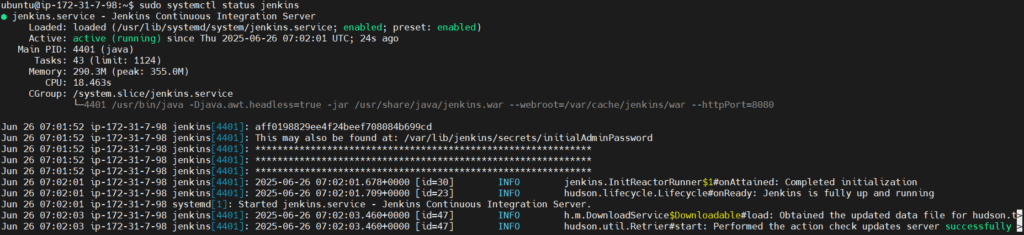
Step #4:Access the Jenkins Web Interface
Open your web browser and navigate to your server’s IP address followed by the Jenkins port.
http://your-public-ip:8080
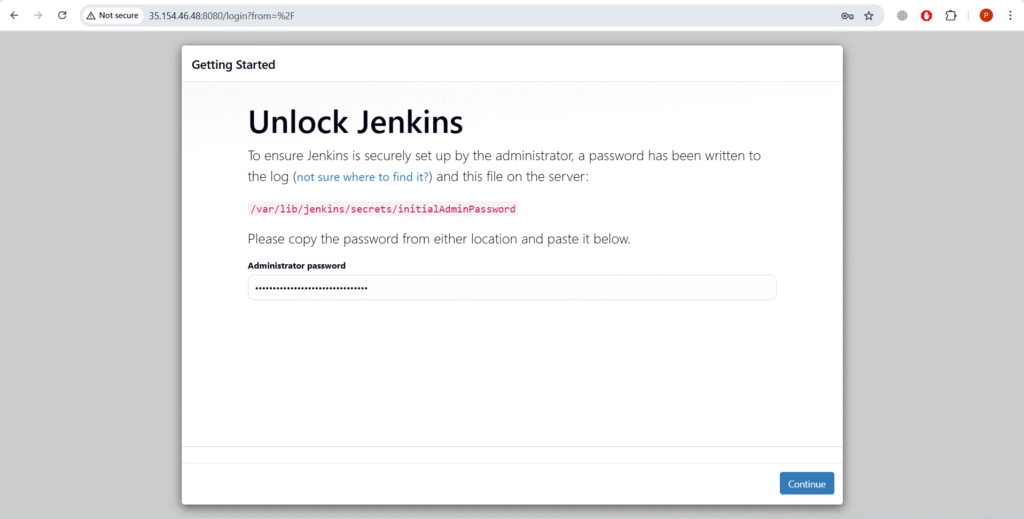
The first time you access the Jenkins web interface, you’ll be prompted to provide an initial administrator password to unlock the setup process.
Retrieve this one-time password from your server’s file system.
sudo cat /var/lib/jenkins/secrets/initialAdminPassword
This command displays the initial admin password needed to unlock Jenkins through the web interface. Copy and paste this into the Jenkins setup page in your browser. Click on Continue.
Once logged in, you’ll be presented with the “Customize Jenkins” screen. Click “Install suggested plugins”. Jenkins will install commonly used plugins.

This action automatically installs a core set of essential plugins that provide fundamental CI/CD functionalities. It may take some minutes to install the plugins.

Jenkins will prompt you to Create the First Admin User. Create your first admin user with a username, password, and email. Click “Save and Continue” to complete the installation.

Jenkins is now ready to use. Click “Start using Jenkins”.

You will see the Welcome page.

Conclusion:
Installing Jenkins on Ubuntu 24.04 LTS is a straightforward process when done step-by-step. With Java installed, the Jenkins repository configured, and the service running, you now have a powerful automation tool at your disposal. Jenkins simplifies CI/CD pipelines, boosts development productivity, and integrates seamlessly with many tools. Now that your Jenkins server is up and running, you can start configuring jobs and integrating it with your projects for automation and continuous delivery.
Related Articles:
Automate S3 File Processing with Python and Lambda
Reference: