In this Article we are going to learn How to install MySQL 5.7 on Ubuntu 22.04 LTS using command line, creating new user and enabled remote access in MySQL 5.7.
Table of Contents
Step #1: Add MySQL APT Repository
Download the MySQL repository by executing the following command
Update the system Packages:
sudo apt update
We need to Install wget using below command:
sudo apt install wget -y
Download the repository using the below command:
wget https://dev.mysql.com/get/mysql-apt-config_0.8.12-1_all.deb
Once downloaded install repository using below command:
sudo dpkg -i mysql-apt-config_0.8.12-1_all.deb
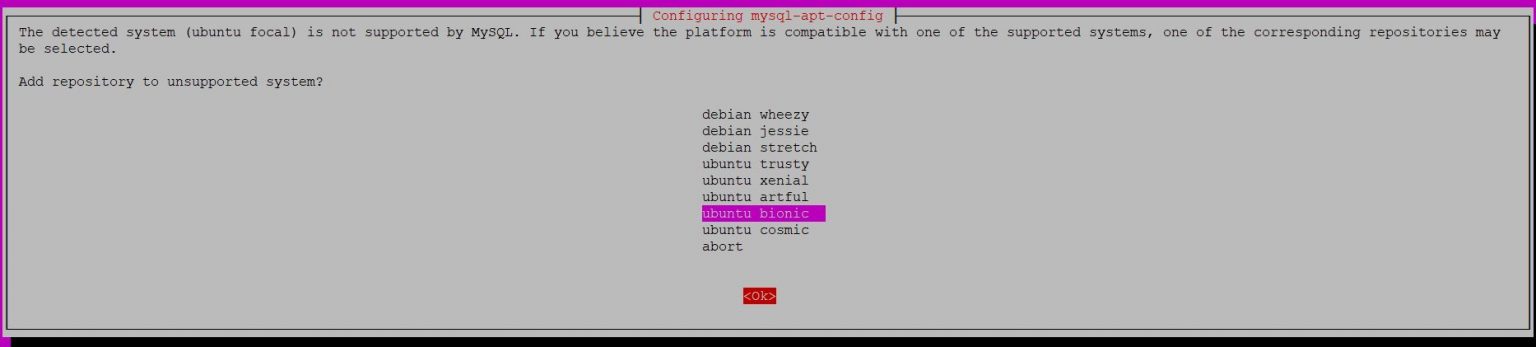
In the prompt, choose Ubuntu Bionic and click Ok
The next prompt shows MySQL 8.0 chosen by default. Choose the first option and click OK

In the next prompt, select MySQL 5.7 server and click OK.

The next prompt selects MySQL5.7 by default. Choose the last option Ok and click OK

Step #2: Update MySQL Repository:
Update your system package:
sudo apt-get update
Let’s search for MySQL 5,7 using below command:
sudo apt-cache policy mysql-server
Step #3: Install MySQL 5.7 on Ubuntu 22.04 LTS
Before Installing MySQL 5.7 you need to run this command:
sudo apt-key adv --keyserver keyserver.ubuntu.com --recv-keys 467B942D3A79BD29
sudo apt update
we are going to install MySQL 5.7 client, MySQL 5.7 server with the below command:
sudo apt install -f mysql-client=5.7* mysql-community-server=5.7* mysql-server=5.7*
Hit the y key to start installation of MySQL 5.7 on Ubuntu 22.04 LTS
Enter and re-enter root password:

Step #4: Secure MySQL 5.7 Installation on Ubuntu 22.04LTS:
Run the following commands
sudo mysql_secure_installation
Provide the root password set above and you will have output like this:
ubuntu@ip-172-31-44-141:~$ sudo mysql_secure_installation

Securing the MySQL server deployment.

Enter password for user root:

VALIDATE PASSWORD PLUGIN can be used to test passwords
and improve security. It checks the strength of password
and allows the users to set only those passwords which are
secure enough. Would you like to setup VALIDATE PASSWORD plugin?

Press y|Y for Yes, any other key for No: y

There are three levels of password validation policy:

LOW    Length >= 8
MEDIUM Length >= 8, numeric, mixed case, and special characters
STRONG Length >= 8, numeric, mixed case, special characters and dictionary                  file

Please enter 0 = LOW, 1 = MEDIUM and 2 = STRONG: 1
Using existing password for root.

Estimated strength of the password: 25
Change the password for root ? ((Press y|Y for Yes, any other key for No) : no

 ... skipping.
By default, a MySQL installation has an anonymous user,
allowing anyone to log into MySQL without having to have
a user account created for them. This is intended only for
testing, and to make the installation go a bit smoother.
You should remove them before moving into a production
environment.

Remove anonymous users? (Press y|Y for Yes, any other key for No) : y
Success.


Normally, root should only be allowed to connect from
'localhost'. This ensures that someone cannot guess at
the root password from the network.

Disallow root login remotely? (Press y|Y for Yes, any other key for No) : y
Success.

By default, MySQL comes with a database named 'test' that
anyone can access. This is also intended only for testing,
and should be removed before moving into a production
environment.


Remove test database and access to it? (Press y|Y for Yes, any other key for No) : y
 - Dropping test database...
Success.

 - Removing privileges on test database...
Success.

Reloading the privilege tables will ensure that all changes
made so far will take effect immediately.

Reload privilege tables now? (Press y|Y for Yes, any other key for No) : y
Success.

All done!
Step #5: Check MySQL 5.7 version
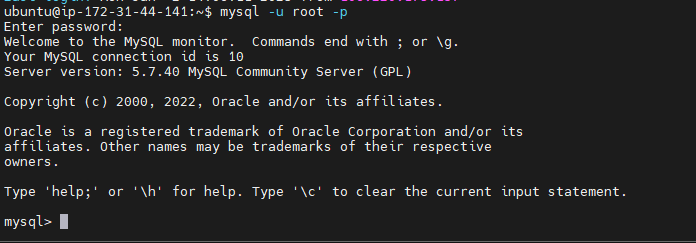
To confirm the installed version,Login to MySQL 5.7 Server using the below command.
mysql -u root -p
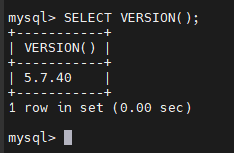
Check the version using below command:
Here we have covered Install MySQL 5.7 on Ubuntu 22.04 LTS.
Step #6: Create MySQL User
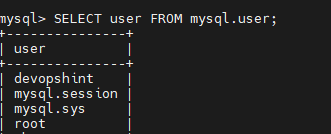
Let’s create user using below command
CREATE USER 'devopshint'@'%' IDENTIFIED BY 'Devops@123';
Step #7: Enable MySQL remote access
By default, In MySQL database server remote access is disabled for security reason.
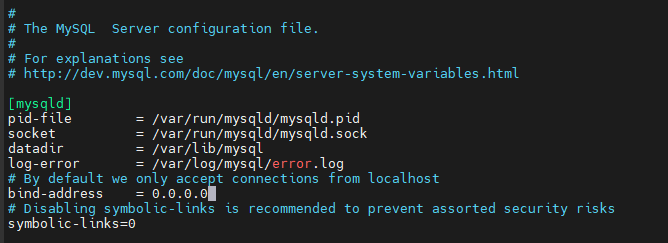
To enable remote connections of MySQL Server, we have to change bind-address in MySQL configuration file.
Open the /etc/mysql/mysql.conf.d/mysqld.cnf file
sudo nano /etc/mysql/mysql.conf.d/mysqld.cnf
Save the file and restart mysql
sudo systemctl restart mysql

To Restart, Stop and check the Status run the below commands:
sudo systemctl restart mysql
sudo systemctl stop mysql
sudo systemctl status mysql
Conclusion:
In this article, We have performed ,How to Install MySQL 5.7 on Ubuntu 22.04 LTS System, creating new user and enabled remote access in MySQL 5.7.
Related Articles:
- How to Install MySQL 8.0 on Ubuntu 18.04/16.04
- How to Install MySQL 8 on CentOS 8
- How to Install MariaDB on Ubuntu 18.04/16.04 LTS
Reference:
Good Job
Use this:
sudo apt-key adv –keyserver hkp://keyserver.ubuntu.com:80 –recv 467B942D3A79BD29
Good post
I’m looking to install MySQL 5.7 version on Ubuntu, there’s already installed MySQL 8.0,
I want both on same machine.
Can you guide to run multiple instances?
It tells me that the repository is not signed and is not installed…
Thanks in advance.
Hi SWETHA ,
Thanks for sharing ..
However i am getting error an unable to install mysql 5.7.xx .
I followed your steps as it is
and here is my output from all commands
root@ubuntumysql:~# uname -a
Linux ubuntumysql 5.15.0-91-generic #101-Ubuntu SMP Tue Nov 14 13:30:08 UTC 2023 x86_64 x86_64 x86_64 GNU/Linux
root@ubuntumysql:~#
root@ubuntumysql:~# cat /etc/os-release
PRETTY_NAME=”Ubuntu 22.04.3 LTS”
NAME=”Ubuntu”
VERSION_ID=”22.04″
VERSION=”22.04.3 LTS (Jammy Jellyfish)”
VERSION_CODENAME=jammy
ID=ubuntu
ID_LIKE=debian
HOME_URL=”https://www.ubuntu.com/”
SUPPORT_URL=”https://help.ubuntu.com/”
BUG_REPORT_URL=”https://bugs.launchpad.net/ubuntu/”
PRIVACY_POLICY_URL=”https://www.ubuntu.com/legal/terms-and-policies/privacy-policy”
UBUNTU_CODENAME=jammy
root@ubuntumysql:~#
root@ubuntumysql:~#
root@ubuntumysql:~# uname -m
x86_64
root@ubuntumysql:~# sudo apt update
Hit:1 http://mirrors.edge.kernel.org/ubuntu jammy InRelease
Hit:2 http://mirrors.edge.kernel.org/ubuntu jammy-updates InRelease
Hit:3 http://mirrors.edge.kernel.org/ubuntu jammy-backports InRelease
Hit:4 http://mirrors.edge.kernel.org/ubuntu jammy-security InRelease
Reading package lists… Done
Building dependency tree… Done
Reading state information… Done
97 packages can be upgraded. Run ‘apt list –upgradable’ to see them.
root@ubuntumysql:~#
root@ubuntumysql:~# wget https://dev.mysql.com/get/mysql-apt-config_0.8.12-1_all.deb –no-check-certificate
–2024-04-07 03:53:44– https://dev.mysql.com/get/mysql-apt-config_0.8.12-1_all.deb
Resolving dev.mysql.com (dev.mysql.com)… 184.84.96.61, 2405:200:1630:489::2e31, 2405:200:1630:484::2e31
Connecting to dev.mysql.com (dev.mysql.com)|184.84.96.61|:443… connected.
WARNING: cannot verify dev.mysql.com’s certificate, issued by ‘CN=Zscaler Intermediate Root CA (zscalerthree.net) (t)\\ ,OU=Zscaler Inc.,O=Zscaler Inc.,ST=Califo rnia,C=US’:
Unable to locally verify the issuer’s authority.
HTTP request sent, awaiting response… 302 Moved Temporarily
Location: https://repo.mysql.com//mysql-apt-config_0.8.12-1_all.deb [following]
–2024-04-07 03:53:45– https://repo.mysql.com//mysql-apt-config_0.8.12-1_all.deb
Resolving repo.mysql.com (repo.mysql.com)… 23.37.253.95, 2600:140f:ac00:18a::1d68, 2600:140f:ac00:1b7::1d68
Connecting to repo.mysql.com (repo.mysql.com)|23.37.253.95|:443… connected.
WARNING: cannot verify repo.mysql.com’s certificate, issued by ‘CN=Zscaler Intermediate Root CA (zscalerthree.net) (t)\\ ,OU=Zscaler Inc.,O=Zscaler Inc.,ST=Calif ornia,C=US’:
Unable to locally verify the issuer’s authority.
HTTP request sent, awaiting response… 200 OK
Length: 36306 (35K) [application/x-debian-package]
Saving to: ‘mysql-apt-config_0.8.12-1_all.deb’
mysql-apt-config_0.8.12-1_all.deb 100%[===============================================================================>] 35.46K –.-KB/s in 0.01s
2024-04-07 03:53:46 (3.22 MB/s) – ‘mysql-apt-config_0.8.12-1_all.deb’ saved [36306/36306]
root@ubuntumysql:~#
root@ubuntumysql:~# sudo dpkg -i mysql-apt-config_0.8.12-1_all.deb
Selecting previously unselected package mysql-apt-config.
(Reading database … 76204 files and directories currently installed.)
Preparing to unpack mysql-apt-config_0.8.12-1_all.deb …
Unpacking mysql-apt-config (0.8.12-1) …
Setting up mysql-apt-config (0.8.12-1) …
Warning: apt-key should not be used in scripts (called from postinst maintainerscript of the package mysql-apt-config)
Warning: apt-key is deprecated. Manage keyring files in trusted.gpg.d instead (see apt-key(8)).
OK
root@ubuntumysql:~#
root@ubuntumysql:~# sudo apt-get update
Get:1 http://repo.mysql.com/apt/ubuntu bionic InRelease [20.0 kB]
Err:1 http://repo.mysql.com/apt/ubuntu bionic InRelease
The following signatures couldn’t be verified because the public key is not available: NO_PUBKEY B7B3B788A8D3785C
Hit:2 http://mirrors.edge.kernel.org/ubuntu jammy InRelease
Hit:3 http://mirrors.edge.kernel.org/ubuntu jammy-updates InRelease
Hit:4 http://mirrors.edge.kernel.org/ubuntu jammy-backports InRelease
Hit:5 http://mirrors.edge.kernel.org/ubuntu jammy-security InRelease
Reading package lists… Done
W: GPG error: http://repo.mysql.com/apt/ubuntu bionic InRelease: The following signatures couldn’t be verified because the public key is not available: NO_PUBKEY B7B3B788A8D3785C
E: The repository ‘http://repo.mysql.com/apt/ubuntu bionic InRelease’ is not signed.
N: Updating from such a repository can’t be done securely, and is therefore disabled by default.
N: See apt-secure(8) manpage for repository creation and user configuration details.
root@ubuntumysql:~#
root@ubuntumysql:~# sudo apt-cache policy mysql-server
mysql-server:
Installed: (none)
Candidate: 8.0.36-0ubuntu0.22.04.1
Version table:
8.0.36-0ubuntu0.22.04.1 500
500 http://mirrors.edge.kernel.org/ubuntu jammy-updates/main amd64 Packages
500 http://mirrors.edge.kernel.org/ubuntu jammy-security/main amd64 Packages
8.0.28-0ubuntu4 500
500 http://mirrors.edge.kernel.org/ubuntu jammy/main amd64 Packages
root@ubuntumysql:~#
root@ubuntumysql:~# sudo apt install -f mysql-client=5.7* mysql-community-server=5.7* mysql-server=5.7*
Reading package lists… Done
Building dependency tree… Done
Reading state information… Done
Package mysql-client is not available, but is referred to by another package.
This may mean that the package is missing, has been obsoleted, or
is only available from another source
Package mysql-server is not available, but is referred to by another package.
This may mean that the package is missing, has been obsoleted, or
is only available from another source
E: Version ‘5.7*’ for ‘mysql-client’ was not found
E: Unable to locate package mysql-community-server
E: Version ‘5.7*’ for ‘mysql-server’ was not found
root@ubuntumysql:~#
root@ubuntumysql:~# sudo apt-key adv –keyserver keyserver.ubuntu.com –recv-keys B7B3B788A8D3785C
Warning: apt-key is deprecated. Manage keyring files in trusted.gpg.d instead (see apt-key(8)).
Executing: /tmp/apt-key-gpghome.MJQ3bu2oWD/gpg.1.sh –keyserver keyserver.ubuntu.com –recv-keys B7B3B788A8D3785C
gpg: key B7B3B788A8D3785C: public key “MySQL Release Engineering ” imported
gpg: Total number processed: 1
gpg: imported: 1
root@ubuntumysql:~#
root@ubuntumysql:~# sudo apt install -f mysql-client=5.7* mysql-community-server=5.7* mysql-server=5.7*
Reading package lists… Done
Building dependency tree… Done
Reading state information… Done
Package mysql-client is not available, but is referred to by another package.
This may mean that the package is missing, has been obsoleted, or
is only available from another source
Package mysql-server is not available, but is referred to by another package.
This may mean that the package is missing, has been obsoleted, or
is only available from another source
E: Version ‘5.7*’ for ‘mysql-client’ was not found
E: Unable to locate package mysql-community-server
E: Version ‘5.7*’ for ‘mysql-server’ was not found
root@ubuntumysql:~#
Its totaly wrong instruction!
Ubuntu 22 is jammy name, on os selection screenshot no jammy in list, this package dont work on 22 ubuntu
Thanks for update, we will correct this article
This instruction totaly dont work, i dunno why is on first possition in google.
Thanks for update, we will correct this article
Use this, key got updated.
apt-key adv –keyserver hkp://keyserver.ubuntu.com:80 –recv-keys B7B3B788A8D3785C