In this article, We are going to demonstrate How to install MySQL 8 on Ubuntu 20.04 using command line
Table of Contents
Introduction
MySQL is open-source relational database management server and mostly used in web-base technology and is owned by Oracle.
Prerequisites
- Ubuntu 20.04 LTS System
- SSH access with sudo privileges
- Firewall Port: 3306
New Features in MySQL 8.0
- Transnational Data Dictionary
- Atomic Data Definition Statement Support
- Enhanced Security and account management.
- Persistent runtime configuration
- Table encryption management
- MySQL’s JSON functionality Enhancements
- Support different types of indexes and Query Optimization
- Supports windows functions
- Handling client connections on multiple network interfaces
If you want to know detailed features of MySQL 8.0 , go through this link.
Step 1: Download and Install MySQL 8 APT Repository
Ubuntu comes with default package repositories and it is now latest version, if we want to add/install latest repositories then we have to add/install package repositories.
Below are commands to add/download MySQL APT repository using command line,
$ sudo wget https://dev.mysql.com/get/mysql-apt-config_0.8.15-1_all.deb
Then, below command is to install above downloaded apt repository,
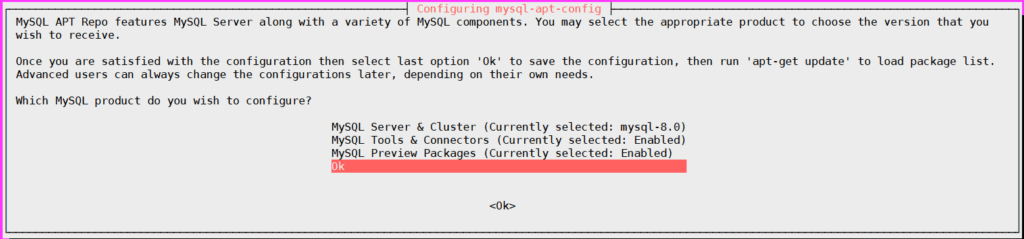
$ sudo dpkg -i mysql-apt-config_0.8.15-1_all.deb
when we run above command like below prompt will open, click on Ok.
# sudo apt-get update
# sudo apt-get install mysql-server
Next, you’ll we prompted to enter MySQL root password to access database.


After entering password , it’s asks for password encryption feature and it is recommended, but here i am selecting Use Legecy Authentication Method.

Step 3: Secure MySQL Installation
MySQL Server comes with a script mysql_secure_installation this can do multiple security related operations,
Run the below script on command prompt. you’ll first be need to enter the root password which you created during MySQL setup.
You will be asked to opt VALIDATE PASSWORD PLUGIN or not. This enables we to test MySQL Passwords and improve security.
Next, you have to enter yes or No to below security features,
- Change the password for root ? ((Press Y|Y for Yes, any other key for No)
- Remove anonymous users? (Press Y|Y for Yes, any other key for No)
- Disallow root login remotely? (Press Y|Y for Yes, any other key for No)
- Remove test database and access to it? (Press Y|Y for Yes, any other key for No)
- Reload privilege tables now? (Press Y|Y for Yes, any other key for No)
$ mysql_secure_installation
Securing the MySQL server deployment.
Enter password for user root:
Would you like to setup VALIDATE PASSWORD plugin?
Press y|Y for Yes, any other key for No: No

Change the password for root ? ((Press y|Y for Yes, any other key for No) : No

Remove anonymous users? (Press y|Y for Yes, any other key for No) : y

Disallow root login remotely? (Press y|Y for Yes, any other key for No) : y

Remove test database and access to it? (Press y|Y for Yes, any other key for No)  : y

Reload privilege tables now? (Press y|Y for Yes, any other key for No) : y

 Success.
 All done!
We have covered How to Install MySQL 8 on Ubuntu 20.04 LTS.
Step 4: Login to MySQL Database
Use below command to login MySQL database
# mysql -u root -p
here , -u flags specifies User Name and -p flags specifies Password.
After entering password , We can see below welcome message,
Enter password:
Welcome to the MySQL monitor.  Commands end with ; or \g.
Your MySQL connection id is 90
Server version: 8.0.19 MySQL Community Server - GPL

Copyright (c) 2000, 2020, Oracle and/or its affiliates. All rights reserved.

Oracle is a registered trademark of Oracle Corporation and/or its
affiliates. Other names may be trademarks of their respective
owners.

Type 'help;' or '\h' for help. Type '\c' to clear the current input statement.
Step 5: Create MySQL Remote User
First, Login to MySQL Server with root user using command line, Login to MySQL using username root and password
# mysql -u root -p
Below is command is to create user , here i am creating user “fosstechnix“.
mysql> CREATE USER 'fosstechnix'@'%' IDENTIFIED BY 'fosstechnix@123';
Next, assign the privileges to database with below command , here i am assigning all databases privileges to user fosstechnix, If you want to assign privileges to specific database replace ” .” with database name.
mysql> GRANT ALL PRIVILEGES ON * . * TO 'fosstechnix'@'%';
OR If you want to allow “fosstechnix” user to give privileges to other user.
mysql> GRANT ALL PRIVILEGES ON *.* TO 'fosstechnix'@'%' WITH GRANT OPTION;
To take effect reload the privileges using below command,
mysql> FLUSH PRIVILEGES;
Step 6: Enable MySQL Remote Access
By default, In MySQL database server remote access is disabled for security reason. To enable remote connections of MySQL Server, we have to change bind-address in MySQL configuration file. Open the /etc/mysql/mysql.conf.d/mysqld.cnf file
$ sudo vim /etc/mysql/mysql.conf.d/mysqld.cnf
Below the [mysqld] section find the Line,
[mysqld]
bind-address  = 127.0.0.1
And replace it to
bind-address = 0.0.0.0
Restart the MySQL Server to take effect.
$ sudo systemctl restart mysql.service
To Enable MySQL 8 on System startup.
$ sudo systemctl enable mysql.service
Step 7: Start,Stop,Restart and Status of MySQL Service
To start MySQL Service
$ sudo systemctl start mysql.service
To stop MySQL Service
$ sudo systemctl stop mysql.service
To restart of MySQL Service
$ sudo systemctl restart mysql.service
To check status of MySQL Service
$ sudo systemctl status mysql.service
Troubleshooting:
Ubuntu/Debian apt-get “KEYEXPIRED: The following signatures were invalid” How to Solve an Expired key (KEYEXPIRED) with apt
While updating apt packages if you are getting KEYEXPIRED message ( A4A9 4068 76FC BD3C 4567 70C8 8C71 8D3B 5072 E1F5 )
use below command to check expired key lists,
$ sudo apt-key list | grep -A 1 expired
Output:
  pub   dsa1024 2003-02-03 [SCA] [expired: 2019-02-17]
      A4A9 4068 76FC BD3C 4567  70C8 8C71 8D3B 5072 E1F5
uid           [ expired] MySQL Release Engineering <[email protected]>

/etc/apt/trusted.gpg.d/ubuntu-keyring-2012-archive.gpg
------------------------------------------------------
pub   rsa4096 2012-05-11 [SC]
      790B C727 7767 219C 42C8  6F93 3B4F E6AC C0B2 1F32
uid           [ unknown] Ubuntu Archive Automatic Signing Key (2012) <[email protected]>

/etc/apt/trusted.gpg.d/ubuntu-keyring-2012-cdimage.gpg
We can see the expired key list,

update the key:
use below command to update the key,
$ sudo apt-key adv --keyserver keys.gnupg.net --recv-keys 70C8 8C71 8D3B 5072 E1F5 [KEY]
Output:
 Executing: /tmp/apt-key-gpghome.5R54mS1bQd/gpg.1.sh --keyserver keys.gnupg.net --recv-keys 8C718D3B5072E1F5
gpg: key 8C718D3B5072E1F5: 3 duplicate signatures removed
gpg: key 8C718D3B5072E1F5: 99 signatures not checked due to missing keys
gpg: key 8C718D3B5072E1F5: "MySQL Release Engineering <[email protected]>" 26 new signatures
gpg: Total number processed: 1
gpg:         new signatures: 26
Conclusion
We have covered, How to Install MySQL 8 on Ubuntu 20.04, Securing MySQL , creating MySQL user, Enable MySQL Remote access and MySQL 8.0 management commands.
Related Articles:
How to Install MySQL 5.7 on Ubuntu 20.04 LTS
How to Install MySQL 5.7 on Ubuntu 18.04 LTS
How to Install MySQL 5.7 on Ubuntu 16.04
How to Install MySQL 8 on CentOS 8