In this article, We are going to perform How to Install Netdata On Ubuntu 20.04 LTS system.
Table of Contents
Introduction
Netdata is real-time performance,troubleshooting and health Monitoring tool for Applications and Systems.Netdata is free and Open Source tool which supports for Linux, FreeBSD and MacOS systems which is helpful for SysAdmins, DevOps and Developers for troubleshooting real time issues.
Prerequisites
- Ubuntu 20.04 LTS with Minimal Installation
- SSH Access with sudo privileges
- Open Firewall Port: 19999
Before installing make sure system packages are up to date.
$ sudo apt-get update
Step 1: How to Install Netdata on Ubuntu 20.04 LTS
There are two ways to install Netdata on Ubuntu
1) Install Netdata using Automatic Installation Script
Run the below script to install netdata with automatic updates
$ bash <(curl -Ss https://my-netdata.io/kickstart.sh)
Run the below script to install netdata with No automatic updates
$ bash <(curl -Ss https://my-netdata.io/kickstart.sh) --no-updates
2) Install Netdata using Manually
We have to install some dependency packages before installing netdata,
$ sudo apt-get install zlib1g-dev uuid-dev libuv1-dev liblz4-dev libjudy-dev libssl-dev libmnl-dev gcc make git autoconf autoconf-archive autogen automake pkg-config curl python cmake -y
Next, We have to Clone the Netdata Packages from Git, Enter below command.
$ sudo git clone https://github.com/netdata/netdata.git --depth=100
Output:
Cloning into 'netdata'...
remote: Enumerating objects: 2393, done.
remote: Counting objects: 100% (2393/2393), done.
remote: Compressing objects: 100% (1819/1819), done.
remote: Total 2393 (delta 765), reused 1235 (delta 516), pack-reused 0
Receiving objects: 100% (2393/2393), 4.00 MiB | 1.66 MiB/s, done.
Resolving deltas: 100% (765/765), done.
$ ls
Output:
netdata
$ cd netdata/
$ sudo ./netdata-installer.sh
Output:
 --- Installing netdata... ---
[/tmp/netdata-kickstart-rfaIZO/netdata-v1.22.1-206-g1841313e]$ sudo ./netdata-installer.sh --auto-update
  ^
  |.-.   .-.   .-.   .-.   .  netdata
  |   '-'   '-'   '-'   '-'   real-time performance monitoring, done right!
  +----+-----+-----+-----+-----+-----+-----+-----+-----+-----+-----+-----+--->


  You are about to build and install netdata to your system.

  It will be installed at these locations:

   - the daemon     at /usr/sbin/netdata
   - config files   in /etc/netdata
   - web files      in /usr/share/netdata
   - plugins        in /usr/libexec/netdata
   - cache files    in /var/cache/netdata
   - db files       in /var/lib/netdata
   - log files      in /var/log/netdata
   - pid file       at /var/run/netdata.pid
   - logrotate file at /etc/logrotate.d/netdata

  This installer allows you to change the installation path.
  Press Control-C and run the same command with --help for help.

NOTE:
  Anonymous usage stats will be collected and sent to Google Analytics.
  To opt-out, pass --disable-telemetry option to the installer or export
  the enviornment variable DO_NOT_TRACK to a non-zero or non-empty value
  (e.g: export DO_NOT_TRACK=1).

Press ENTER to build and install netdata to your system >
Press “Enter” Key to proceed installation, after successful installation you will see below output at end.
Output:
netdata by default listens on all IPs on port 19999,
so you can access it with:

  http://this.machine.ip:19999/

To stop netdata run:

  systemctl stop netdata

To start netdata run:

  systemctl start netdata

Uninstall script copied to: /usr/libexec/netdata/netdata-uninstaller.sh

 --- Installing (but not enabling) the netdata updater tool ---
Update script is located at /usr/libexec/netdata/netdata-updater.sh

 --- Check if we must enable/disable the netdata updater tool ---
You chose *NOT* to enable auto-update, removing any links to the updater from cron (it may have happened if you are reinstalling)

Did not find any cron entries to remove

 --- Wrap up environment set up ---
Preparing .environment file
[/home/user/netdata]# chmod 0644 /etc/netdata/.environment
 OK

Setting netdata.tarball.checksum to 'new_installation'

 --- We are done! ---

  ^
  |.-.   .-.   .-.   .-.   .-.   .  netdata                          .-.   .-
  |   '-'   '-'   '-'   '-'   '-'   is installed and running now!  -'   '-'
  +----+-----+-----+-----+-----+-----+-----+-----+-----+-----+-----+-----+--->

  enjoy real-time performance and health monitoring...
Finally, we need to start and enable the Netdata service to make the changes effect.
$ sudo systemctl start netdata

$ sudo systemctl enable netdata

$ sudo systemctl status netdata
Output:
● netdata.service - Real time performance monitoring
     Loaded: loaded (/lib/systemd/system/netdata.service; enabled; vendor preset: enabled)
     Active: active (running)
    Process: 76098 ExecStartPre=/bin/mkdir -p /var/cache/netdata (code=exited, status=0/SUCCESS)
    Process: 76105 ExecStartPre=/bin/chown -R netdata:netdata /var/cache/netdata (code=exited, status=0/SUCCESS)
    Process: 76106 ExecStartPre=/bin/mkdir -p /var/run/netdata (code=exited, status=0/SUCCESS)
    Process: 76107 ExecStartPre=/bin/chown -R netdata:netdata /var/run/netdata (code=exited, status=0/SUCCESS)
   Main PID: 76108 (netdata)
      Tasks: 30 (limit: 4621)
     Memory: 25.8M
     CGroup: /system.slice/netdata.service
             ├─76108 /usr/sbin/netdata -P /var/run/netdata/netdata.pid -D
             ├─76112 /usr/sbin/netdata --special-spawn-server
             ├─76269 bash /usr/libexec/netdata/plugins.d/tc-qos-helper.sh 1
             ├─76275 /usr/libexec/netdata/plugins.d/apps.plugin 1
             └─76278 /usr/libexec/netdata/plugins.d/go.d.plugin 1
Step 2: Add Firewall Rule
To allow traffic on port 19999 enter the below command:
$ sudo ufw allow 19999/tcp
Check the firewall status to verify if port is enables
$ sudo ufw status
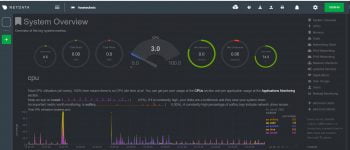
Step 3: Netdata Web Interface
Open a browser and type the following URL of http://localhost:19999 OR http://IP-Address:19999
Finally, We have performed , How to Install Netdata on Ubuntu 20.04 LTS.
Step 3: Configure Netdata Alarm Email Notification
Netdata supports different typed alarm notification methods such as Amazon SNS,email,IRC,slack..,etc. To know more about supported notifications method, go through this link.
For Email notification , Netdata supports Sendmail as MTA (Mail Transfer Agent), make sure you have installed and configured sendmail on your system, if not go through below link.
How to Configure Sendmail to Relay Emails using Gmail SMTP on Ubuntu 18.04/16.04 LTS
To learn more about Netdata. Please refer Netdata official documentation.
Uninstall/Remove Netdata from Ubuntu 20.04 LTS
Run below commands to uninstall netdata from ubuntu
$ sudo wget https://raw.githubusercontent.com/netdata/netdata/master/packaging/installer/netdata-uninstaller.sh

$ sudo chmod +x ./netdata-uninstaller.sh

$ sudo ./netdata-uninstaller.sh --yes --env /etc/netdata/.environment
Troubleshooting:
Errors:
LISTENER: IPv6 bind() on ip ‘::’ port 19999, socktype 1 failed.
fosstechnix systemd[1]: netdata.service: Failed with result ‘exit-code’.
fosstechnix netdata[70712]: LISTENER: Cannot bind to ip ‘::’, port 19999
fosstechnix netdata[70712]: LISTENER: Cannot listen on any API socket. Exiting…
fosstechnix netdata[70712]: EXIT: netdata prepares to exit with code 1…
fosstechnix netdata[70712]: EXIT: cleaning up the database…
fosstechnix netdata[70712]: Cleaning up database [0 hosts(s)]…
fosstechnix netdata[70712]: EXIT: removing netdata PID file ‘/var/run/netdata/netdata.pid’…
fosstechnix netdata[70712]: EXIT: cannot unlink pidfile ‘/var/run/netdata/netdata.pid’.
fosstechnix netdata[70712]: EXIT: all done – netdata is now exiting – bye bye…
Solution:
If you are facing above issue while checking status of netdata or while starting netdata
First check the netdata is listening and you are seeing below output
$ ss -lptn 'sport = :19999'
Output:
State                 Recv-Q                Send-Q                               Local Address:Port                                  Peer Address:Port                Process
LISTEN                0                     4096                                       0.0.0.0:19999                                      0.0.0.0:*
LISTEN                0                     4096                                          [::]:19999                                         [::]:*
$ ps aux | grep netdata
Output:
root       70072  0.0  0.0 167132  1192 ?        SNl  05:06   0:02 /usr/libexec/netdata/plugins.d/ebpf.plugin 1
netdata    80690  0.8  0.8 223604 36172 ?        Ssl  06:58   0:11 /usr/sbin/netdata -P /var/run/netdata/netdata.pid -D
netdata    80696  0.0  0.0  21432  2304 ?        Sl   06:58   0:00 /usr/sbin/netdata --special-spawn-server
netdata    80854  0.1  0.0   4236  3300 ?        S    06:58   0:02 bash /usr/libexec/netdata/plugins.d/tc-qos-helper.sh 1
netdata    80858  0.8  0.0  53348  3360 ?        S    06:58   0:11 /usr/libexec/netdata/plugins.d/apps.plugin 1
netdata    80861  0.0  0.4 123644 17340 ?        Sl   06:58   0:00 /usr/libexec/netdata/plugins.d/go.d.plugin 1
user       82573  0.0  0.0   5192   664 pts/0    S+   07:21   0:00 grep --color=auto netdata
Kill the all netdata process
$ sudo killall -9 netdata
Start the Netdata Service
$ sudo systemctl start netdata
Conclusion
In this article, we have performed how to install netdata on Ubuntu 20.04 LTS system.
How to Install Netdata on CentOS 7
How to download and Install Nagios on Ubuntu 18.04/16.04 LTS
How to Install Netdata using Ansible Playbook on Ubuntu 18.04/16.04 LTS.
How to Install ELK Stack on Ubuntu