In this article, We are going to perform How to Install Netdata using Ansible Playbook on Ubuntu 18.04/16.04 LTS.
Table of Contents
Introduction
In this article, we will install NetData using ansible-playbook. Before installing Netdata, we need to install some per-requisite tools. Let’s follow the article step by step to setup Netdata.
Prerequisites
- Ubuntu Server 16.04/18.04 LTS
- SSH access with sudo privileges
- Firewall Ports 19999
If you have not Installed Ansible. Please use the below link to Install and Configure Ansible.
How to Install Ansible on Ubuntu 18.04/16.04 LTS
First create a directory:
$ sudo mkdir ansible
Navigate to ansible directory
$ cd ansible
Now create a YAML file for ansible playbook.
sudo vi netdata.yaml
Host Format in Ansible-Playbook
Initially Playbook always starts with – – –
– hosts module refers to on which nodes its should run the playbook based on the Inventory file. We can mention all in place of master on the hosts module to run the playbook on all the instances.
become refers to activate privileges escalation.
Add the below modules in Yaml file.
---
- hosts: master
  become: yes
Task Format
Tasks refers to units of actions in Ansible to install and configiure packages.
In the tasks module we have – name which refers to display the content.
apt refers to Ansible module which is used to install packages on Debian OS
update_cache- used to updating the repositories cache
state-
tasks:
    - name: To install pre-requisite tools
       apt:
           name: ['git', 'zlib1g-dev', 'uuid-dev', 'libmnl-dev', 'pkg-config', 'curl', 'gcc', 'make', 'autoconf', 'autoconf-archive', 'autogen', 'automake', 'python', 'python-yaml',
'python-mysqldb', 'lm-sensors', 'python-psycopg2', 'netcat', 'nodejs', 'libuv1-dev', 'zlib1g-dev']
           update_cache: yes
           state: present
Git Module in Ansible
In the below module we are using git to clone the repository into particular directory.
git- To check out source code from github
repo – Specify github repo name and clone using https
dest – destination directory to clone
clone – Cloning to local directory
    - name: To clone the github dir
       git:
           repo: 'https://github.com/firehol/netdata.git'
           dest: /opt/netdata/
           clone: yes
           update: yes
Shell Module in Ansible
In this we are running the shell script to install the netdata packages and placing on netdata directory.
shell- To executive shell command
args- To pass named parameters
chdir- To change/navigate directory
    - name: to run the shell script to install the Netdata Packages using shell
       shell: bash netdata-installer.sh --dont-wait --libs-are-really-here
              args:
                  chdir: /opt/netdata
Handlers Module in Ansible
After Installing the netdata, we have to run the services of Netdata using handlers and services module.
handlers- To take action/restart netdata service
service- Check the service status
    handlers:
      - name: to restart netdata services
         service:
             name: netdata
             state: restarted
Overview of Playbook
$ sudo vi netdata.yaml
---
- hosts: master
  become: yes
  tasks:
   - name: To install NetData
     apt:
       name: ['git', 'zlib1g-dev', 'uuid-dev', 'libmnl-dev', 'pkg-config', 'curl', 'gcc', 'make', 'autoconf', 'autoconf-archive', 'autogen', 'automa$
'python-mysqldb', 'lm-sensors', 'python-psycopg2', 'netcat', 'nodejs', 'libuv1-dev', 'zlib1g-dev']
       update_cache: yes
       state: present
   - name:
     git:
       repo: 'https://github.com/firehol/netdata.git'
       dest: /opt/netdata/
       clone: yes
       update: yes
   - name: to run the shell script
     shell: bash netdata-installer.sh --dont-wait --libs-are-really-here
     args:
       chdir: /opt/netdata
  handlers:
   - name: to restart netdata
     service:
       name: netdata
       state: restarted
Install netdata using Ansible Playbook
Use below command to run the playbook:
$ ansible-playbook -i hosts ~/ansible/netdata.yml
Output
[DEPRECATION WARNING]: The TRANSFORM_INVALID_GROUP_CHARS settings is set to allow bad characters in group names by default, this will change, but still be user configurable on deprecation.
This feature will be removed in version 2.10. Deprecation warnings can be disabled by setting deprecation_warnings=False in ansible.cfg.
[WARNING]: Invalid characters were found in group names but not replaced, use -vvvv to see details
[WARNING]: * Failed to parse /home/fosstechnix/ansible/hosts with yaml plugin: Syntax Error while loading YAML. did not find expected <document start> The error appears to be in
'/home/fosstechnix/ansible/hosts': line 2, column 1, but may be elsewhere in the file depending on the exact syntax problem. The offending line appears to be: [masters] ansible
ansible_ssh_host=192.168.100.1 ansible_user=fosstechnix ansible_ssh_pass=fosstechnix@123 ^ here
[WARNING]: * Failed to parse /home/fosstechnix/ansible/hosts with ini plugin: /home/fosstechnix/ansible/hosts:35: Expected key=value host variable assignment, got: -f
[WARNING]: Unable to parse /home/fosstechnix/ansible/hosts as an inventory source
[WARNING]: No inventory was parsed, only implicit localhost is available
[WARNING]: provided hosts list is empty, only localhost is available. Note that the implicit localhost does not match 'all'

PLAY [masters] ******************************************************************************************************************************************************************************

TASK [Gathering Facts] **********************************************************************************************************************************************************************
[DEPRECATION WARNING]: Distribution Ubuntu 18.04 on host ansible should use /usr/bin/python3, but is using /usr/bin/python for backward compatibility with prior Ansible releases. A future
Ansible release will default to using the discovered platform python for this host. See https://docs.ansible.com/ansible/2.9/reference_appendices/interpreter_discovery.html for more
information. This feature will be removed in version 2.12. Deprecation warnings can be disabled by setting deprecation_warnings=False in ansible.cfg.
ok: [ansible]

TASK [To install NetData] *******************************************************************************************************************************************************************
[WARNING]: Updating cache and auto-installing missing dependency: python-apt
ok: [ansible]

TASK [git] **********************************************************************************************************************************************************************************
changed: [ansible]

TASK [to run the shell script] **************************************************************************************************************************************************************
changed: [ansible]

PLAY RECAP **********************************************************************************************************************************************************************************
ansible : ok=4 changed=2 unreachable=0 failed=0 skipped=0 rescued=0 ignored=0
Once installed check Status of netdata services
$ sudo systemctl status netdata
Successfully we have covered install netdata using ansible playbook.
Add Firewall Rule
To allow traffic on port 19999 enter the below command:
$ sudo ufw allow 19999/tcp
Check the firewall status to verify if port is enables
$ sudo ufw status
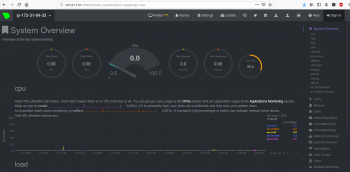
Netdata Web Interface
Open a browser and type the following URL of http://localhost:19999 OR http://IP-Address:19999
We have covered Install Netdata using Ansible Playbook.
Conclusion
In this article, we have performed How to Install Netdata using Ansible Playbook on Ubuntu 18.04/16.04 LTS.
How to Install Netdata on Ubuntu 18.04/16.04 LTS
How to Install Netdata on CentOS 7
How to download and Install Nagios on Ubuntu 18.04/16.04 LTS
How to Install ELK Stack on Ubuntu
How to Install Splunk on Ubuntu 18.04/16.04 LTS