In this article, We are going to perform How to Install Jenkins on CentOS 8/RHEL 8 or any other cloud platform like Amazon EC2, Azure VM, Google Cloud Compute,etc. with preinstalled CentOS 8/RHEL 8.
Table of Contents
Introduction
Jenkins is an opensource automation tool which is used for continuous integration. Some of below features of Jenkins
- Jenkins can be used as a simple CI server or turned into the continuous delivery hub for any project.
- Easy installation
- Easy configuration
- It provides 400+ Plugin
- Jenkins provides extensible features by adding plugins and distributed by build different projects and testing etc.
Prerequisites
- CentOS 8 with minimal Installation
- Atleast 1 GB RAM
- JDK 1.8 or Higher version is supported
- Open Port 8080
Install JDK on Ubuntu
Please follow below article to download and install Oracle JAVA 11 on CentOS 8 Manually
Download and Install Oracle Java 11 on CentOS 8
OR
You can install Open JDK 11
sudo yum -y install java-11-openjdk-devel
Verify Java Version
To check the java version:
java -version
Output:
java version "11.0.6" 2020-01-14 LTS

Java(TM) SE Runtime Environment 18.9 (build 11.0.6+8-LTS)

Java HotSpot(TM) 64-Bit Server VM 18.9 (build 11.0.6+8-LTS, mixed mode)
Step #1: Download and Add Jenkins GPG Key
Download and Add Jenkins LTS repo in /etc/yum.repos.d/jenkins.repo location
sudo wget -O /etc/yum.repos.d/jenkins.repo http://pkg.jenkins-ci.org/redhat-stable/jenkins.repo
Output:
http://pkg.jenkins-ci.org/redhat-stable/jenkins.repo

Resolving pkg.jenkins-ci.org (pkg.jenkins-ci.org)... 52.202.51.185, 40.90.4.6, 64.4.48.6, ...

Connecting to pkg.jenkins-ci.org (pkg.jenkins-ci.org)|52.202.51.185|:80... connected.

HTTP request sent, awaiting response... 200 OK

Length: 85

Saving to: ‘/etc/yum.repos.d/jenkins.repo’

/etc/yum.repos.d/jenkins.repo                   100%[====================================================================================================>]      85  --.-KB/s    in 0s

 ‘/etc/yum.repos.d/jenkins.repo’ saved [85/85]
Import Jenkins GPG Key
sudo rpm --import https://jenkins-ci.org/redhat/jenkins-ci.org.key
Step #2: Install Jenkins On CentOS 8/RHEL 8
Once key and repository added , update the system packages
sudo yum update
Now its time to Install Jenkins and its dependencies:
sudo yum install jenkins
Step #4: Start Jenkins Service
Once installation completed, start the Jenkins service
sudo systemctl start jenkins
Check the Jenkins Service
sudo systemctl status jenkins
Output:
jenkins.service - LSB: Jenkins Automation Server

   Loaded: loaded (/etc/rc.d/init.d/jenkins; generated)

   Active: active (running) since Fri 2020-04-03 19:53:29 EDT; 43s ago

     Docs: man:systemd-sysv-generator(8)

  Process: 20505 ExecStart=/etc/rc.d/init.d/jenkins start (code=exited, status=0/SUCCESS)

    Tasks: 37 (limit: 26213)

   Memory: 360.5M

   CGroup: /system.slice/jenkins.service

           └─20528 /etc/alternatives/java -Dcom.sun.akuma.Daemon=daemonized -Djava.awt.headless=true -DJENKINS_HOME=/var/lib/jenkins -jar /usr/lib/jenkins/jenkins.war --logfile=/var/log/jenkins
Allow port 8080/tcp in Firewall to Access Jenkins from remotely
sudo firewall-cmd --permanent --zone=public --add-port=8080/tcp
sudo firewall-cmd --reload
If you have installed Jenkins on Cloud Instance Allow the Port in Incoming or Network Security Group
How to check jenkins version command line in Linux
To check Jenkins version using command line in CentOS
grep version /var/lib/jenkins/config.xml
Output:
grep version /var/lib/jenkins/config.xml

<?xml version='1.1' encoding='UTF-8'?>

  <version>2.222.1</version>
Step #5: Configure Jenkins
After installation of Jenkins ,successfully running Jenkins services and we will check on browser by Jenkins default port number 8080.
We can browse server IP address or domain
http://ip_address_or_domain_name:8080.
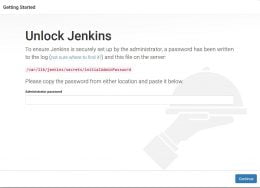
By hitting IP and Port on browser for the first time it will prompt for InitialAdminPassword. ssh server and type below command.
sudo cat /var/lib/jenkins/secrets/intialAdminPassword
Output:
9aef30398db54a53a1a81ee86dd80726
After entering it will give some key as output. Copy and Paste in the browser and Click “Continue” .
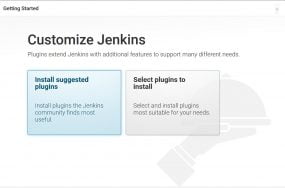
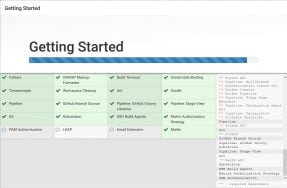
In the above image we select “Install Suggested Plugins”, and progress bar will start.
When the Installation get successful it will prompt for another page “Create First Admin User”. On the below page enter username,password,Email.
In the above pic you can create new user and password or you can “Continue as admin“. After configuring everything you will prompt a new page.

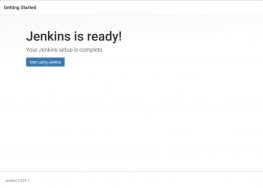
Next it will ask to configure URL to access Jenkins and click on save and Finish button.

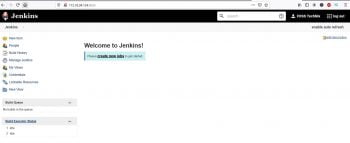
Now click on “Start using Jenkins”. It will redirect to Jenkins Dashboard:
Finally you can see Jenkins Dashboard
With the above steps we have performed install jenkins on centos 8/RHEL 8.
How to Completely Remove Jenkins from CentOS 8/RHEL 8
Perform below steps, If you want to uninstall jenkins from centos 8/RHEL 8
stop the jenkins service
sudo systemctl stop jenkins
Remove the jenkins packages from centos 8
sudo yum -y remove jenkins
Remove the Jenkins cache files
sudo rm -rf /var/cache/jenkins
Remove the Jenkins config files directory
sudo rm -rf /var/lib/jenkins/
clean the yum packages
sudo yum clean all
Conclusion
In this article, We have covered How to install Jenkins on CentOS 8/RHEL 8, installed JDK, checked java, Jenkins version and configured Jenkins.
Related Articles
- How to Install Jenkins on Ubuntu 20.04 LTS
- How to Install Jenkins on Ubuntu 18.04/16.04 LTS
- How to Build Java Project using maven in Jenkins
Reference: