In this article, We are going to perform How to Install Jenkins on Ubuntu 20.04.
Table of Contents
Introduction
Jenkins is an free and open source automation tool which is used for continuous integration.
Prerequisites
- One Ubuntu server 20.04 LTS
- Atleast 1 GB RAM
- JDK 1.8 or Higher version is supported
- Open Port 8080
Install JDK on Ubuntu
Please follow below article to download and install Oracle JAVA 8 on Ubuntu 18.04/16.04 LTS Manually.
Download and Install Oracle Java 8 on Ubuntu 18.04/16.04 LTS
OR
We can install OpenJDK 8
sudo apt-get update
To install default JDK and JRE
sudo apt install default-jdk
sudo apt install default-jre
sudo apt install openjdk-11-jdk
java -version
openjdk version "11.0.11" 2021-04-20
OpenJDK Runtime Environment (build 11.0.11+9-Ubuntu-0ubuntu2.20.04)
OpenJDK 64-Bit Server VM (build 11.0.11+9-Ubuntu-0ubuntu2.20.04, mixed mode, sharing)
Step #1: Add Jenkins APT Repository Key
Here We are installing latest stable version of Jenkins, if you want to install older LTS version then visit Jenkins Installation page.
sudo wget -q -O - https://pkg.jenkins.io/debian-stable/jenkins.io.key | sudo apt-key add -
Output:
ok
Add the Jenkins repository in system
sudo sh -c 'echo deb https://pkg.jenkins.io/debian-stable binary/ > \
    /etc/apt/sources.list.d/jenkins.list'
Step #2: How to Install Jenkins on Ubuntu 20.04
Once key and repository added , update the source list
sudo apt-get update
While updating Jenkins source list if you are getting below errors.
Error: W: GPG error: https://pkg.jenkins.io/debian-stable binary/ Release: The following signatures couldn’t be verified because the public key is not available: NO_PUBKEY 9B7D32F2D50582E6
Error: E: The repository ‘https://pkg.jenkins.io/debian-stable binary/ Release’ is not signed.
As per the above error, above key is missing: 9B7D32F2D50582E6.
Syntax:
sudo apt-key adv --keyserver keyserver.ubuntu.com --recv-keys <the key>
Add the missing key
sudo apt-key adv --keyserver keyserver.ubuntu.com --recv-keys 9B7D32F2D50582E6
Output:
Executing: /tmp/apt-key-gpghome.M2Ehv2EdIk/gpg.1.sh --keyserver keyserver.ubuntu.com --recv-keys 9B7D32F2D50582E6

gpg: key 9B7D32F2D50582E6: 7 signatures not checked due to missing keys

gpg: key 9B7D32F2D50582E6: public key "Kohsuke Kawaguchi <[email protected]>" imported

gpg: Total number processed: 1

gpg:               imported: 1
Update the Jenkins Source list packages
sudo apt update
Now its time to Install Jenkins and its dependencies:
sudo apt-get install jenkins
error: jenkins : Depends: daemon but it is not installable
Solution:
sudo add-apt-repository universeStep #3: Start Jenkins Service
sudo systemctl start jenkins
sudo systemctl status jenkins
Output:
● jenkins.service - LSB: Start Jenkins at boot time
   Loaded: loaded (/etc/init.d/jenkins; bad; vendor preset: enabled)
   Active: active (exited) since Tue 2019-05-11 10:18:52 IST; 22h ago
     Docs: man:systemd-sysv-generator(8)
Step #4: Add Firewall Rule
Allow port 8080/tcp in Firewall to Access Jenkins from remotely
sudo ufw allow 8080
Verify if port is enables
sudo ufw status
If you have installed Jenkins on Cloud Instance Allow the Port in Incoming or Network Security Group
Step #5: How to check Jenkins version command line in Linux
To check Jenkins version using command line in CentOS
grep version /var/lib/jenkins/config.xml
Output:
grep version /var/lib/jenkins/config.xml

<?xml version='1.1' encoding='UTF-8'?>

  <version>2.222.1</version>
Step #6: Configure Jenkins on Ubuntu 20.04 LTS
After installation of Jenkins ,successfully running Jenkins services and we will check on browser by Jenkins default port number 8080. We can browse server IP address or domain
http://ip_address_or_domain_name:8080.
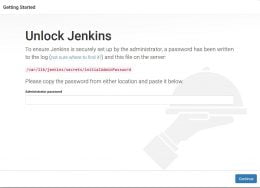
By hitting IP and Port on browser for the first time it will prompt for InitialAdminPassword. ssh server and type below command.
sudo cat /var/lib/jenkins/secrets/initialAdminPassword
Output:
9aef30398db54a53a1a81ee86dd80726
After entering it will give some key as output. Copy and Paste in the browser and Click “Continue” .
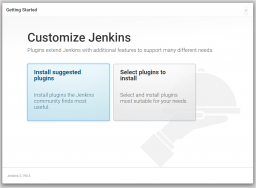
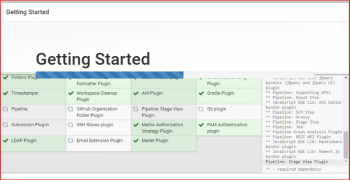
In the above image we select “Install Suggested Plugins”, and progress bar will start.
When the Installation get successful it will prompt for another page “Create First Admin User”. On the below page enter username,password,Email.
In the above pic you can create new user and password or you can “Continue as admin“. After configuring everything you will prompt a new page.

Next it will ask to configure URL to access Jenkins and click on save and Finish button.

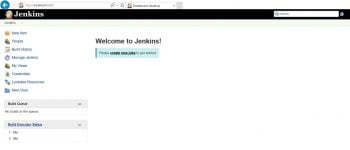
Now click on “Start using Jenkins”. It will redirect to Jenkins Dashboard:
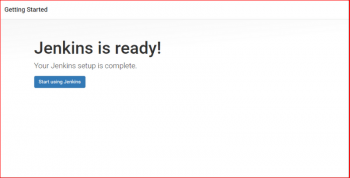
Finally you can see Jenkins Dashboard
With the above steps we have performed How to Install Jenkins on Ubuntu 20.04 LTS.
How to Completely Remove Jenkins from Ubuntu
Perform below steps, If you want to uninstall Jenkins from Ubuntu Ubuntu 20.04 LTS
stop the Jenkins service
sudo systemctl stop jenkins
Remove the Jenkins packages from Ubuntu 20.04
sudo apt remove jenkins -y
Remove the Jenkins cache files
sudo rm -rf /var/cache/jenkins
Remove the Jenkins config files directory
sudo rm -rf /var/lib/jenkins/
clean the yum packages
sudo apt clean all
Conclusion
In this article, We have covered How to install Jenkins on Ubuntu 20.04 LTS, installed JDK, checked java, jenkins version and configured Jenkins.
Related Articles
Reference:
Really useful command and explanations….thanks
Thanks for your feedback.
its very helpful….thank you