In this article , We are going to cover Install Kubernetes Dashboard, Configure Kubernetes Dashboard and How to access Kubernetes Dashboard Remotely
Table of Contents
What is Kubernetes Dashboard ?
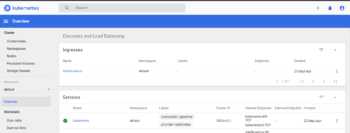
Kubernetes Dashboard is Web/GUI based User Interface of Kubernetes which is used to see overview of resource running on your cluster like Clusters ,Pods, Deployment, Service, CPU and Memory Usage, etc.,
Prerequisite
- Kubernetes Cluster Access
If you have not setup Kubernetes Cluster , Follow below articles to setup.
9 Steps to Setup Kubernetes on AWS using KOPS
1. Install Kubernetes Dashboard using Kubectl
First login to Master node using putty OR if you are using Kubernetes KOPS then login to Instance from where you installed Kubernetes KOPS
Deploy Kubernetes Dashboard using Kubectl using below command
kubectl apply -f https://raw.githubusercontent.com/kubernetes/dashboard/v2.0.0/aio/deploy/recommended.yamlHere we are changing ClusterIP to LoadBalancer to access Kubernetes Dashboard using Loadbalancer
You can also access using IP of Kubernetes Cluster,
Note: If you want to access Kubernetes Dashboard using ClusterIP then Don’t Change
Run below command to edit Kubernetes dashboard service
kubectl edit svc kubernetes-dashboard -n kubernetes-dashboard
Output:
# Please edit the object below. Lines beginning with a '#' will be ignored,
# and an empty file will abort the edit. If an error occurs while saving this file will be
# reopened with the relevant failures.
#
apiVersion: v1
kind: Service
metadata:
  annotations:
    kubectl.kubernetes.io/last-applied-configuration: |
      {"apiVersion":"v1","kind":"Service","metadata":{"annotations":{},"labels":{"k8s-app":"kubernetes-dashboard"},"name":"kubernetes-dashboard","namespace":"kubernetes-dashboard"},"spec":{"ports":[{"port":443,"targetPort":8443}],"selector":{"k8s-app":"kubernetes-dashboard"}}}
  creationTimestamp: "2020-07-22T14:40:47Z"
  labels:
    k8s-app: kubernetes-dashboard
  name: kubernetes-dashboard
  namespace: kubernetes-dashboard
  resourceVersion: "2733310"
  selfLink: /api/v1/namespaces/kubernetes-dashboard/services/kubernetes-dashboard
  uid: a93ce918-7328-4df8-820d-382308b3f0f4
spec:
  clusterIP: 100.66.10.251
  ports:
  - port: 443
    protocol: TCP
    targetPort: 8443
  selector:
    k8s-app: kubernetes-dashboard
  sessionAffinity: None
  type: ClusterIP
status:
  loadBalancer: {}
Change Cluster IP to LoadBalancer
# Please edit the object below. Lines beginning with a '#' will be ignored,
# and an empty file will abort the edit. If an error occurs while saving this file will be
# reopened with the relevant failures.
#
apiVersion: v1
kind: Service
metadata:
  annotations:
    kubectl.kubernetes.io/last-applied-configuration: |
      {"apiVersion":"v1","kind":"Service","metadata":{"annotations":{},"labels":{"k8s-app":"kubernetes-dashboard"},"name":"kubernetes-dashboard","namespace":"kubernetes-dashboard"},"spec":{"ports":[{"port":443,"targetPort":8443}],"selector":{"k8s-app":"kubernetes-dashboard"}}}
  creationTimestamp: "2020-07-22T14:40:47Z"
  labels:
    k8s-app: kubernetes-dashboard
  name: kubernetes-dashboard
  namespace: kubernetes-dashboard
  resourceVersion: "2733310"
  selfLink: /api/v1/namespaces/kubernetes-dashboard/services/kubernetes-dashboard
  uid: a93ce918-7328-4df8-820d-382308b3f0f4
spec:
  clusterIP: 100.66.10.251
  ports:
  - port: 443
    protocol: TCP
    targetPort: 8443
  selector:
    k8s-app: kubernetes-dashboard
  sessionAffinity: None
  type: LoadBalancer
status:
  loadBalancer: {}
2. Configure Kubernetes Dashboard
By default Kubernetes Dashboard has minimum privileges. To Access with Kubernetes dashboard with full permission, create service account, cluster role binding with cluster admin permission.
Create yml file named k8s-dashboard.yml
sudo nano k8s-dashboard.yml
Paste the below lines into it
apiVersion: v1
kind: ServiceAccount
metadata:
  name: dashboard-admin
  namespace: kubernetes-dashboard
---
apiVersion: rbac.authorization.k8s.io/v1beta1
kind: ClusterRoleBinding
metadata:
  name: cluster-admin-rolebinding
roleRef:
  apiGroup: rbac.authorization.k8s.io
  kind: ClusterRole
  name: cluster-admin
subjects:
- kind: ServiceAccount
  name: dashboard-admin
  namespace: kubernetes-dashboard
Apply the permission to create Kubernetes dashboard
kubectl create -f k8s-dashboard.yml
To verify the Kubernetes Dashboard is up and running
kubectl get pod -n kubernetes-dashboard
Verify the Kubernetes dashboard service is running
kubectl get svc -n kubernetes-dashboard
Successfully we have covered Install Kubernetes Dashboard.
3. Access Kubernetes Dashboard using ClusterIP
If you have not changed Cluster IP to LoadBalancer then Run below command to access Kubernetes Dashboard remotely using Cluster IP.
kubectl proxy --address 0.0.0.0 --accept-hosts '.*'
Now hit the below Kubernetes Dashboard URL on browser
https://<IP>:<PORT>/api/v1/namespaces/kubernetes-dashboard/services/https:kubernetes-dashboard:/proxy/#/login
You will see below Kubernetes Dashboard screen
4. Access Kubernetes Dashboard using LoadBalancer
Run below command to access Kubernetes dashboard remotely, You will get LoadBalancer External URL
kubectl get svc -n kubernetes-dashboard
Output:
NAME                        TYPE           CLUSTER-IP      EXTERNAL-IP                                                               PORT(S)         AGE
dashboard-metrics-scraper   ClusterIP      100.64.101.31   <none>                                                                    8000/TCP        25h
kubernetes-dashboard        LoadBalancer   100.70.31.180   ada40491eb69f4a628555676ac977dcd-489540283.ap-south-1.elb.amazonaws.com   443:30446/TCP   25h
Copy the external Load Balancer URL and Paste in Browser
OR
If you have purchased domain and you want access your Kubernetes Dashboard using URL then add CNAME record with AWS Load Balancer URL.
https://ada40491eb69f4a628555676ac977dcd-489540283.ap-south-1.elb.amazonaws.com
You will see below Kubernetes Dashboard screen
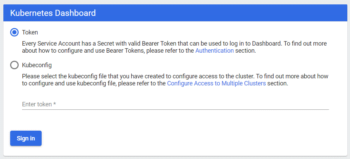
You can Login Kubernetes Dashboard using below ways
- Token
- Kubeconfig
Login to Kubernetes Dashboard using Token
Enter below to command to get token using kubectl
kubectl describe secrets dashboard-admin -n kubernetes-dashboard
Output:
Name: dashboard-admin-token-5gb8p
Namespace: kubernetes-dashboard
Labels: <none>
Annotations: kubernetes.io/service-account.name: dashboard-admin
kubernetes.io/service-account.uid: 018a95a3-df94-444f-b12c-280af58fba11

Type: kubernetes.io/service-account-token

Data
====
token: eyJhbGciOiJSUzI1NiIsImtpZCI6IkNsdGo5WkRnZUxOM1ZSQnpITGJhVVVRUXNPSnVyT0NIVGFMcjN3RVJrWkEifQ.eyJpc3MiOiJrdWJlcm5ldGVzL3NlcnZpY2VhY2NvdW50Iiwia3ViZXJuZXRlcy5pby9zZXJ2aWNlYWNjb3VudC9uYW1lc3BhY2UiOiJrdWJlcm5ldGVzLWRhc2hib2FyZCIsImt1YmVybmV0ZXMuaW8vc2VydmljZWFjY291bnQvc2VjcmV0Lm5hbWUiOiJkYXNoYm9hcmQtYWRtaW4tdG9rZW4tNWdiOHAiLCJrdWJlcm5ldGVzLmlvL3NlcnZpY2VhY2NvdW50L3NlcnZpY2UtYWNjb3VudC5uYW1lIjoiZGFzaGJvYXJkLWFkbWluIiwia3ViZXJuZXRlcy5pby9zZXJ2aWNlYWNjb3VudC9zZXJ2aWNlLWFjY291bnQudWlkIjoiMDE4YTk1YTMtZGY5NC00NDRmLWIxMmMtMjgwYWY1OGZiYTExIiwic3ViIjoic3lzdGVtOnNlcnZpY2VhY2NvdW50Omt1YmVybmV0ZXMtZGFzaGJvYXJkOmRhc2hib2FyZC1hZG1pbiJ9.edmBSZs6jdnWYbiauVPERp4oBSWHv5TdR2OH-lii-5BQmvSk0xAS0suaocOfCkug0-WWtG1psUna5n1lLUQWIawUVn9R3s0CxbG3daGXwkWV4HR7Es4CAOks5bs2QkOBV16uRRHY6tVE_uBDpOvHcHG75gYnzT6Tl349Sik2NagJ_EGlBR7wWbswlF8Lies0E1rDQvRs0Z10g5abTlwy5qSXDKkoHGPojO8OZ-ef2ZvwsvhVqMo65Jux1szq6CisXXnXfopV3mTU8Bh3iALkV3aAN_di5SiNtb1J5OxcongQHCTXJWQmMHwIZPYWJ8XZ3YB7PvH89LGB5LIvPJEeQQ
ca.crt: 1042 bytes
namespace: 20 bytes
Copy the token value and paste on Kubernetes Dashboard login Page in Token value
Once you pasted the token, you will directed to your Kubernetes Web UI Dashboard as shown below
Increase Kubernetes Dashboard –token-ttl
By default Kubernetes Dashboard token-ttl is for 15 Minutes ,
To increase token-ttl edit the Kubernetes Dashboard deployment
kubectl edit deployment kubernetes-dashboard -n kubernetes-dashboard
Paste the below lines into it and save it
args:
- --tls-key-file=k8sm.key
- --tls-cert-file=k8sm.crt
- --token-ttl=43200
Reload the Kubernetes Dashboard to take effect.
Conclusion
We have covered, How to Install Kubernetes Dashboard, Configure Kubernetes Dashboard using LoadBalancer, Access Kubernetes Dashboard remotely, Generate Kubernetes dashboard-token.
Related Articles:
How to Install Kubernetes Cluster using Kubeadm on Ubuntu
Reference:
I am trying the above steps without cluster but not sure what the should be URL for the dashboard.
not sure URL should be same as u given https://:/api/v1/namespaces/kubernetes-dashboard/services/https:kubernetes-dashboard:/proxy/#/login
without cluster
why I am getting following error
kubectl create -f k8s-dashboard.yml
serviceaccount/dashboard-admin created
error: resource mapping not found for name: “cluster-admin-rolebinding” namespace: “” from “k8s-dashboard.yml”: no matches for kind “ClusterRoleBinding” in version “rbac.authorization.k8s.io/v1beta1”
ensure CRDs are installed first