InIn this article We are going to perform How to Setup Kubernetes on AWS using KOPS.
Table of Contents
What is KOPS in Kubernetes?
Kops (Kubernetes Operations) used to you create, destroy, upgrade and maintain production-grade, highly available, Kubernetes clusters using command line.
Kubernetes KOPS Features
- Automatic creation of Kubernetes clusters in AWS and GCE
- We can create multi master with HA
- Automatic creation of VPC, Security Groups, etc., while creating Cluster
- Support Public and Private DNS
- Runs in Auto scaling
- We can Add and Edit the Cluster configuration such as Master and worker nodes
Below are prerequisites to setup kubernetes on aws using kops.
- AWS account
- Create a Domain to Access Kubernetes API
- Create a Hosted Zone in Route53 and point AWS nameserver to Domain
- Create a S3 bucket with Versioning Enabled to store Kubernetes Kops cluster state
- IAM user with full S3, EC2, Route53 and VPC access
- Ubuntu 20.04/18.04/16.04 LTS with minimal installation
- AWS-CLI
Assuming you have created Ubuntu Instance in your AWS account.
Step #1: Install AWS CLI on Ubuntu
To download the latest AWS CLI version for 64 bit Linux using curl use below command
curl "https://awscli.amazonaws.com/awscli-exe-linux-x86_64.zip" -o "awscliv2.zip"
if you want download specific version of AWS CLI version then use below command
curl "https://awscli.amazonaws.com/awscli-exe-linux-x86_64-awscliversion.zip" -o "awscliv2.zip"
To download AWS CLI Version 2.0.30 use below command
curl "https://awscli.amazonaws.com/awscli-exe-linux-x86_64-2.0.30.zip" -o "awscliv2.zip"
Install the unzip on Ubuntu if not installed
sudo apt install unzip
Extract AWS CLI Setup on Linux using unzip
unzip awscliv2.zipInstall AWS CLI on Linux
once extracted Install AWS CLI on Linux using below command
sudo ./aws/installOutput:
sudo ./aws/install
You can now run: /usr/local/bin/aws --version
Check the AWS CLI version using command line on Linux
/usr/local/bin/aws --version
Output:
aws-cli/2.1.28 Python/3.8.8 Linux/4.14.214-160.339.amzn2.x86_64 exe/x86_64.amzn.2 prompt/off
OR
aws --version
Output:
aws-cli/2.1.28 Python/3.8.8 Linux/4.14.214-160.339.amzn2.x86_64 exe/x86_64.amzn.2 prompt/off
Step #2: Install Kubectl Binary with CURL on Ubuntu
Download kubectl binary with curl on Ubuntu using below command
sudo curl -LO https://storage.googleapis.com/kubernetes-release/release/$(curl -s https://storage.googleapis.com/kubernetes-release/release/stable.txt)/bin/linux/amd64/kubectl
Make the kubectl binary executable
sudo chmod +x ./kubectl
Move kubectl to /usr/local/bin/kubectl directory
sudo mv ./kubectl /usr/local/bin/kubectl
Step #3: Install KOPS on Ubuntu Instance
Download the KOPS setup on Ubuntu using curl
curl -LO https://github.com/kubernetes/kops/releases/download/$(curl -s https://api.github.com/repos/kubernetes/kops/releases/latest | grep tag_name | cut -d '"' -f 4)/kops-linux-amd64
set the execution permission
sudo chmod +x kops-linux-amd64
move the kops to /usr/local/bin directory
sudo mv kops-linux-amd64 /usr/local/bin/kops
Step #4: Creating Domain and Hosted Zone in AWS
Kubernetes kops need DNS to discover within cluster and to connect Kubernetes API Server from Clients
You can create either public or private hosted zone, if you created public hosted zone you have to point AWS nameservers in Domain.
Here We have domain in GoDaddy, created public hosted zone in AWS and pointed AWS nameservers in GoDaddy Domain
We have created domain k8s.fosstechnix.com,
Step #5: Create and configure IAM User in AWS
Create IAM user in AWS using login console -> IAM -> ADD User -> Username -> Select Programmatic access -> then you will get Access Key ID and Secret Access Key.
Configure AWS CLI with your Access Key ID, Secret Access key and region
aws configure
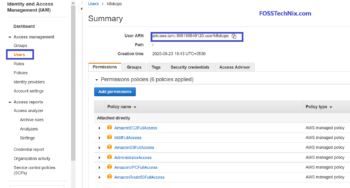
Step #6: Create IAM User with full S3, EC2, Route53 and VPC access in AWS
Now create IAM user with full S3, EC2, Route 53 and VPC access in your AWS account as shown below
- AmazonS3FullAccess
- AmazonEC2FullAccess
- AmazonRoute53FullAccess
- IAMFullAccess
- AmazonVPCFullAccess
Step #7: Creating S3 Bucket using command line
Create the S3 bucket to store Kubernetes cluster states
aws s3 mb s3://k8s.fosstechnix.info
Enable versioning on S3 bucket
aws s3api put-bucket-versioning --bucket k8s.fosstechnix.info --versioning-configuration Status=Enabled
Export kops state
export KOPS_STATE_STORE=s3://k8s.fosstechnix.info
Step #8: Create SSH Keys
Create ssh keys on Ubuntu instance to exchange kubernetes cluster and connect
ssh-keygen
Step #9: Setup Kubernetes on AWS using KOPS
Create Kubernetes on AWS using Kops using below command
kops create cluster --cloud=aws --zones=ap-south-1a --name=k8s.fosstechnix.info --dns-zone=k8s.fosstechnix.info --dns public
if you want to install calico networking along with setup of Kubernetes KOPS add –networking with calico as shown below
kops create cluster --cloud=aws --zones=ap-south-1a --networking calico --name=k8s.fosstechnix.info --dns-zone=k8s.fosstechnix.info --dns public
If you want to create K8s cluster using multimaster and different availability zone use below command
kops create cluster --cloud=aws --zones=ap-south-1a,ap-south-1b --networking calico --master-size t3.medium --master-count 3 --node-size t3.xlarge --node-count 3 --name=k8s.fosstechnix.info --dns-zone=k8s.fosstechnix.info --dns public
Sample Output:
Must specify --yes to apply changes

Cluster configuration has been created.

Suggestions:
* list clusters with: kops get cluster
* edit this cluster with: kops edit cluster k8s.fosstechnix.info
* edit your node instance group: kops edit ig --name=k8s.fosstechnix.info nodes-us-east-1a
* edit your master instance group: kops edit ig --name=k8s.fosstechnix.info master-ap-south-1a

Finally configure your cluster with: kops update cluster --name k8s.fosstechnix.info --yes --admin
Configure the k8s kops cluster using below command,
kops update cluster k8s.fosstechnix.info --yes --admin
Sample Output:
Cluster is starting.  It should be ready in a few minutes.

 Suggestions:

 * validate cluster: kops validate cluster

 * list nodes: kubectl get nodes --show-labels

 * ssh to the master: ssh -i ~/.ssh/id_rsa admin@api.k8s.fosstechnix.info

 * the admin user is specific to Debian. If not using Debian please use the appropriate user based on your OS.

 * read about installing addons at: https://github.com/kubernetes/kops/blob/master/docs/operations/addons.md
Validate the Kubernetes KOPS cluster
kops validate cluster
To list the nodes
kubectl get nodes
To get Cluster Information
kubectl cluster-info
To delete Kubernetes KOPS cluster
kops delete cluster k8s.fosstechnix.info --yes
Finally We have covered Setup Kubernetes on AWS using KOPS
How to add or change node size/type in Kops Cluster
kops get ig
Output:
Using cluster from kubectl context: k8s.fosstechnix.info

NAME ROLE MACHINETYPE MIN MAX ZONES
master-ap-south-1a Master t3.medium 1 1 ap-south-1a
nodes-ap-south-1a Node t3.medium 1 1 ap-south-1a
kops edit ig master-ap-south-1a
Output:
apiVersion: kops.k8s.io/v1alpha2
kind: InstanceGroup
metadata:
creationTimestamp: "2021-03-06T05:29:52Z"
labels:
kops.k8s.io/cluster: k8s.fosstechnix.info
name: master-ap-south-1a
spec:
image: 099720109477/ubuntu/images/hvm-ssd/ubuntu-focal-20.04-amd64-server-20210119.1
machineType: t3.medium
maxSize: 1
minSize: 1
nodeLabels:
kops.k8s.io/instancegroup: master-ap-south-1a
role: Master
subnets:
- ap-south-1a
Troubleshooting:
kubectl get nodesError:
You must be logged in to the server (Unauthorized) if you are getting above error on Kubernetes kops cluster
Solution:
Login to Kubernetes kops cluster Master node from management node
ssh -i ~/.ssh/id_rsa [email protected]
Navigate to .kube directory
cd .kube
copy the client-certificate-data and client-key-data values, exit from master node
Replace above values to management node /.kube/config file
Now you can run the kubectl commands
To delete Kubernetes KOPS cluster use below command
Error: exactly one ‘admin’ SSH public key can be specified when running with AWS; please delete a key using `kops delete secret`
Solution:
To check list of secrets in Kubernetes Kops cluster
kops get secret
Output:
TYPE            NAME                            ID

Keypair         apiserver-aggregator-ca         6933429814222041362322666137

Keypair         ca                              6933429813663588303876984541

Keypair         etcd-clients-ca                 6933429813788008634835356814

Keypair         etcd-manager-ca-events          6933429814919214502125133873

Keypair         etcd-manager-ca-main            6933429813961434714756350017

Keypair         etcd-peers-ca-events            6933429814048350100913985823

Keypair         etcd-peers-ca-main              6933429814135513819119005976

Keypair         master                          6933429813874453479985214673

SSHPublicKey    admin                           01:98:16:b4:a0:44:99:6c:a8:f7:6c:3b:a2:43:0b:c2

SSHPublicKey    admin                           6e:14:33:11:9c:4a:0c:0a:70:68:53:c1:b1:7e:cb:bd

SSHPublicKey    admin                           78:6a:e1:00:74:e6:ee:95:fa:32:fc:ae:2a:d7:63:68

Secret          admin

Secret          kube

Secret          kube-proxy

Secret          kubelet

Secret          system:controller_manager

Secret          system:dns

Secret          system:logging

Secret          system:monitoring

Secret          system:scheduler
Delete the duplicate secret from kops cluster using below command
kops delete secret SSHPublicKey admin 78:6a:e1:00:74:e6:ee:95:fa:32:fc:ae:2a:d7:63:68
Creating Kubernetes KOPS Cluster in Existing VPC
To create Kubernetes cluster in AWS using KOPS in Existing VPC
Export the s3 bucket to store kops states
export KOPS_STATE_STORE=s3://k8s.fosstechnix.info
Export the cluster name
export CLUSTER_NAME=k8s.fosstechnix.info
Export the existing AWS VPC
export VPC_ID=VPC_ID
Export the VPC CIDR range
export NETWORK_CIDR=172.20.0.0/16
Now create Kubernetes Kops cluster
kops create cluster --zones=ap-south-1a,ap-south-1b --name=${CLUSTER_NAME} --vpc=${VPC_ID}
To create a secret on Kubernetes KOPS cluster
kops create secret --name k8s.fosstechnix.info sshpublickey admin -i ~/.ssh/id_rsa.pub
Login to kops master node
ssh -i ~/.ssh/id_rsa [email protected]
Conclusion:
We have covered How to Setup Kubernetes on AWS using KOPS, install kops, install kubectl, creating S3 bucket, genrate ssh keygen.
- How to Setup Kubernetes Dashboard
- How To Setup Kubernetes Cluster Using Kubeadm on Ubuntu 18.04/16.04 LTS
- Deploy to Kubernetes using Helm and GitLab
- How to Install AWS CLI on Windows
- How to Install Minikube on Ubuntu
Reference:
Can you please help me with private dns zone syntax instead of public DNS.
Hello Ashwath,
Please use below syntax for private DNS
kops create cluster –cloud=aws –zones=ap-south-1a –name=k8s.fosstechnix.com –dns-zone=k8s.fosstechnix.com –dns private
ubuntu@ip-172-31-22-237:~$ kops update cluster sunil-k8s.xyz –yes
I0224 04:28:45.362973 13729 dns.go:97] Private DNS: skipping DNS validation
I0224 04:28:45.740729 13729 executor.go:111] Tasks: 0 done / 79 total; 44 can run
W0224 04:28:45.838261 13729 vfs_castore.go:604] CA private key was not found
I0224 04:28:45.849785 13729 keypair.go:195] Issuing new certificate: “apiserver-aggregator-ca”
I0224 04:28:45.879178 13729 keypair.go:195] Issuing new certificate: “etcd-clients-ca”
I0224 04:28:45.940271 13729 keypair.go:195] Issuing new certificate: “etcd-manager-ca-main”
W0224 04:28:45.960099 13729 vfs_castore.go:604] CA private key was not found
I0224 04:28:45.960230 13729 keypair.go:195] Issuing new certificate: “ca”
I0224 04:28:46.020605 13729 keypair.go:195] Issuing new certificate: “etcd-peers-ca-main”
I0224 04:28:46.040859 13729 keypair.go:195] Issuing new certificate: “etcd-peers-ca-events”
I0224 04:28:46.081525 13729 keypair.go:195] Issuing new certificate: “master”
I0224 04:28:46.384669 13729 keypair.go:195] Issuing new certificate: “etcd-manager-ca-events”
I0224 04:28:48.110174 13729 executor.go:111] Tasks: 44 done / 79 total; 15 can run
I0224 04:28:48.992312 13729 executor.go:111] Tasks: 59 done / 79 total; 18 can run
I0224 04:28:49.763387 13729 executor.go:111] Tasks: 77 done / 79 total; 2 can run
I0224 04:28:50.838421 13729 executor.go:137] Task “AutoscalingGroup/nodes-us-east-1a.sunil-k8s.xyz” not ready: waiting for the IAM Instance Profile to be propagated
I0224 04:28:50.838631 13729 executor.go:137] Task “AutoscalingGroup/master-us-east-1a.masters.sunil-k8s.xyz” not ready: waiting for the IAM Instance Profile to be propagated
I0224 04:28:50.838758 13729 executor.go:155] No progress made, sleeping before retrying 2 task(s)
I0224 04:29:00.839083 13729 executor.go:111] Tasks: 77 done / 79 total; 2 can run
I0224 04:29:02.580279 13729 executor.go:111] Tasks: 79 done / 79 total; 0 can run
I0224 04:29:02.580496 13729 dns.go:157] Pre-creating DNS records
I0224 04:29:02.993496 13729 update_cluster.go:313] Exporting kubecfg for cluster
W0224 04:29:03.033873 13729 create_kubecfg.go:91] Did not find API endpoint for gossip hostname; may not be able to reach cluster
kops has set your kubectl context to sunil-k8s.xyz
W0224 04:29:03.082836 13729 update_cluster.go:337] Exported kubecfg with no user authentication; use –admin, –user or –auth-plugin flags with `kops export kubecfg`
Cluster is starting. It should be ready in a few minutes.
I got the error as CA private key was not found. I dont know how to resolve this issue. pls help me
as per error message, follow below link.
https://kops.sigs.k8s.io/cli/kops_export_kubecfg/
This article really helps me.. thanks…