In this article, We are going to perform How to Install phpMyAdmin on Ubuntu 18.04/16.04 LTS System.
Table of Contents
Introduction
phpMyAdmin is most popular and free open source web based tool for MySQL and MariaDB adminstration.
Prerequisites
- Ubuntu 18.04/16.04 with Minimal Installation
- SSH Access with Sudo previleges
- Preinstalled PHP and MySQL/MariaDB
Step 1: Install phpMyAdmin on Ubuntu
Update the system packages
$ sudo apt-get update
Install phpMyAdmin
$ sudo apt-get install -y phpmyadmin
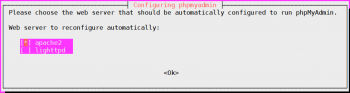
While installing it will asks to select web server which you have installed on your system. Select apache2 and hit Enter.
Step 2: Configure phpMyAdmin on Ubuntu
It will ask to configure database for phpmyadmin which you have already installed. Select “Yes” and Enter

Enter the password for phpmyadmin application.

Re-Enter the password again to confirm.

Next it will asks for Database administrator password. Type the password, Select “OK” and Enter.

Step 3: Enable mbstring Extension
Enter below command to enable mbstring.
$ sudo phpenmod mbstring
Enable phpMyAdmin in /etc/apache2/apache2.conf
$ sudo nano /etc/apache2/apache2.conf
Add below line at end of file.
Include /etc/phpmyadmin/apache.conf
To take effect restart apache2
$ sudo systemctl restart apache2
Step 4: Access phpMyAdmin
Open browser on your system and Type ServerName or IP , http://IP/phpmyadmin

Conclusion:
In this article, We have performed ,How to Install phpMyAdmin on Ubuntu 18.04/16.04 LTS System.