In this article, we are going to cover How to install SonarQube on Ubuntu 24.04 LTS.
SonarQube is an open-source platform widely used for continuous inspection of code quality. It provides detailed static code analysis to detect bugs, code smells, and security vulnerabilities in over 20 programming languages. This article walks you through installing the latest version of SonarQube (v25.6) on Ubuntu 24.04, setting up PostgreSQL as its backend database, and configuring it to run as a service. By the end, you’ll have a production-ready code quality analysis tool running
Table of Contents
Prerequisites
- AWS Account with Ubuntu 24.04 LTS EC2 Instance.
- At least 2 CPU cores and 4 GB of RAM for smooth performance.
Step #1:Set Up Ubuntu EC2 Instance
Update Package Index.
sudo apt update
Install Java Development Kit version 17, which is the minimum required version for SonarQube 25+.
sudo apt install openjdk-17-jdk -y
Confirm that Java is installed and displays the current version.
java -version
Step #2:Configure System Limits
SonarQube uses Elasticsearch, which requires increased system limits. Edit /etc/sysctl.conf.
sudo nano /etc/sysctl.conf
Add the following at the end.
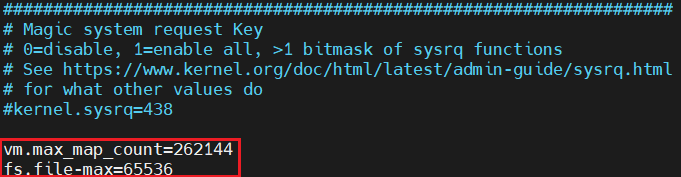
vm.max_map_count=262144
fs.file-max=65536
These values ensure SonarQube has enough memory and file descriptors.
Apply the changes.
sudo sysctl --system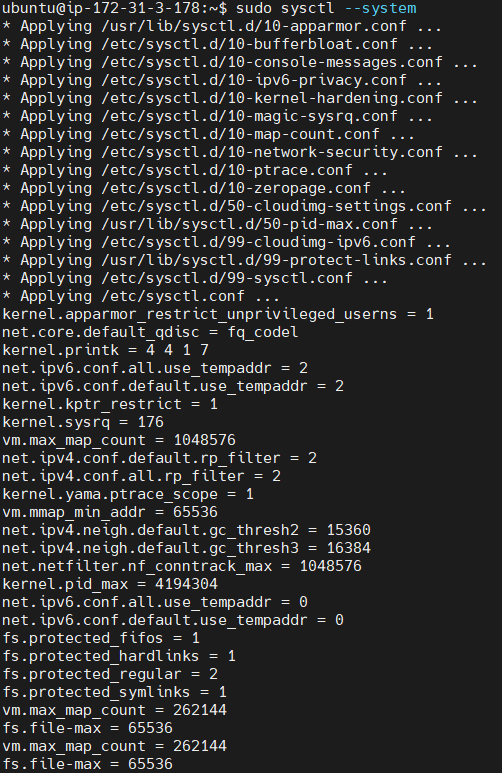
Step #3:Configure Limits for the User
Edit the security limits configuration.
sudo nano /etc/security/limits.conf
Add these lines at the end.
sonarqube - nofile 65536
sonarqube - nproc 4096
These limits define the maximum number of open files and processes for the SonarQube user.

Step #4:Install PostgreSQL and Configure the Database
Install PostgreSQL Database.
sudo apt install postgresql postgresql-contrib -y
Start and enable the PostgreSQL service.
sudo systemctl start postgresql
sudo systemctl enable postgresql
Verify if its running.
sudo systemctl status postgresql
Switch to PostgreSQL user.
sudo -i -u postgres
Open the PostgreSQL shell.
psql
Now, execute these SQL commands one by one in the psql prompt.
Create a new PostgreSQL user named sonarqube and sets its password to sonar123.
CREATE USER sonarqube WITH ENCRYPTED PASSWORD 'sonar123';Create a new database named sonarqube and assigns its ownership to the sonarqube user we just created.
CREATE DATABASE sonarqube OWNER sonarqube;Grant all available privileges on the sonarqube database to the sonarqube user.
GRANT ALL PRIVILEGES ON DATABASE sonarqube TO sonarqube;Revoke all default permissions on the public schema from the public role.
REVOKE ALL ON SCHEMA public FROM public;Grant the sonarqube user ALL privileges on the public schema within the sonarqube database.
GRANT ALL ON SCHEMA public TO sonarqube;Connect to the newly created sonarqube database
\c sonarqube;Set default privileges for any future tables, sequences, and functions created by the sonarqube user within the public schema.
ALTER DEFAULT PRIVILEGES IN SCHEMA public GRANT ALL ON TABLES TO sonarqube;
ALTER DEFAULT PRIVILEGES IN SCHEMA public GRANT ALL ON SEQUENCES TO sonarqube;
ALTER DEFAULT PRIVILEGES IN SCHEMA public GRANT ALL ON FUNCTIONS TO sonarqube;
Exit the PostgreSQL command-line client.
\q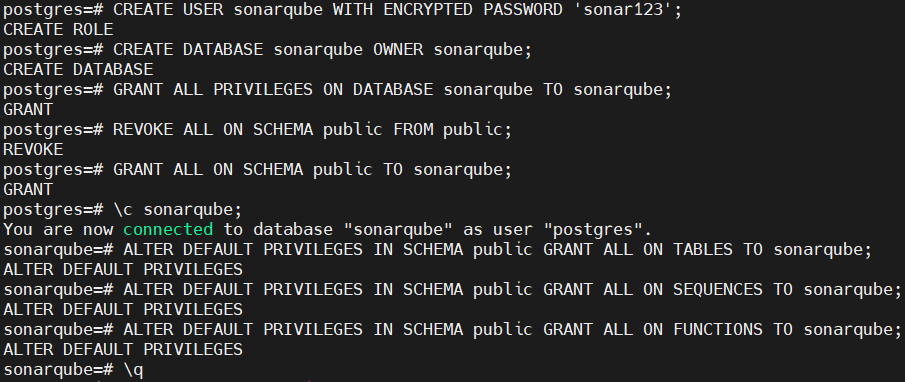
Exit the postgres user shell, returning to regular Ubuntu user.
exit
Step #5:Install and Configure SonarQube
Now, we’ll download and configure the SonarQube application itself. Create a new system user and group named sonarqube.
sudo adduser --system --no-create-home --group sonarqube
Download the latest SonarQube package.
wget https://binaries.sonarsource.com/Distribution/sonarqube/sonarqube-25.6.0.109173.zip
Install the unzip utility, which is necessary to extract the SonarQube .zip archive.
sudo apt install unzip -y
Unzip the downloaded SonarQube archive into the /opt/ directory.
sudo unzip sonarqube-25.6.0.109173.zip -d /opt/
Rename the extracted SonarQube directory from sonarqube-25.6.0.109173 to a simpler /opt/sonarqube.
sudo mv /opt/sonarqube-25.6.0.109173 /opt/sonarqube
changes the ownership of the /opt/sonarqube directory and all its contents recursively (-R) to the sonarqube user and sonarqube group.
sudo chown -R sonarqube:sonarqube /opt/sonarqube
Edit the configuration file.
sudo nano /opt/SonarQube/conf/sonar.properties
Uncomment and set these properties. This connects SonarQube to PostgreSQL and makes it accessible from any IP.
#--- DATABASE
sonar.jdbc.username=sonarqube
sonar.jdbc.password=sonar123

#--- PostgreSQL 13 or greater
sonar.jdbc.url=jdbc:postgresql://localhost/sonarqube

#--- WEB SERVER
sonar.web.host=0.0.0.0
sonar.web.port=9000


Create a new systemd service file.
sudo nano /etc/systemd/system/sonarqube.service
Paste the following code in it.
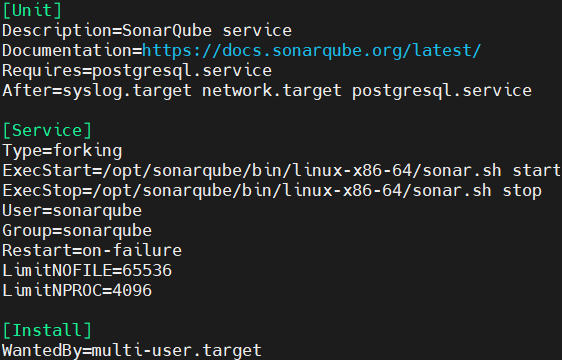
[Unit]
Description=SonarQube service
Documentation=https://docs.sonarqube.org/latest/
Requires=postgresql.service
After=syslog.target network.target postgresql.service

[Service]
Type=forking
ExecStart=/opt/SonarQube/bin/linux-x86-64/sonar.sh start
ExecStop=/opt/SonarQube/bin/linux-x86-64/sonar.sh stop
User=sonarqube
Group=sonarqube
Restart=on-failure
LimitNOFILE=65536
LimitNPROC=4096

[Install]
WantedBy=multi-user.target
Reload systemd. Start and enable the service.
sudo systemctl daemon-reload
sudo systemctl enable sonarqube
sudo systemctl start sonarqube
Verify if its running or not.
sudo systemctl status sonarqube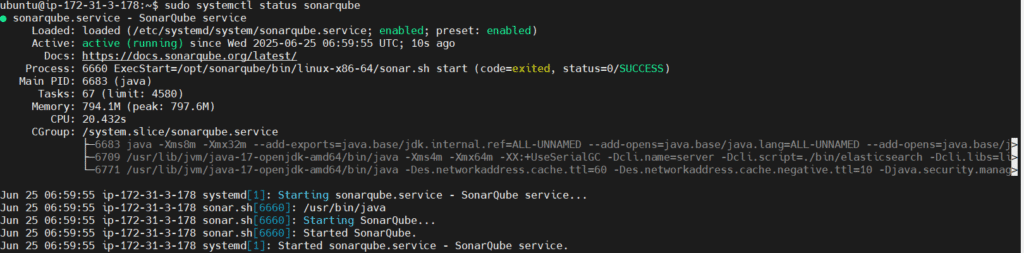
Step #6:Access SonarQube Web Interface
Open your browser and go to,
http://<Your-EC2-Public-IP>:9000
You should be presented with the SonarQube login page. The default administrator credentials are:
- Username: admin
- Password: admin
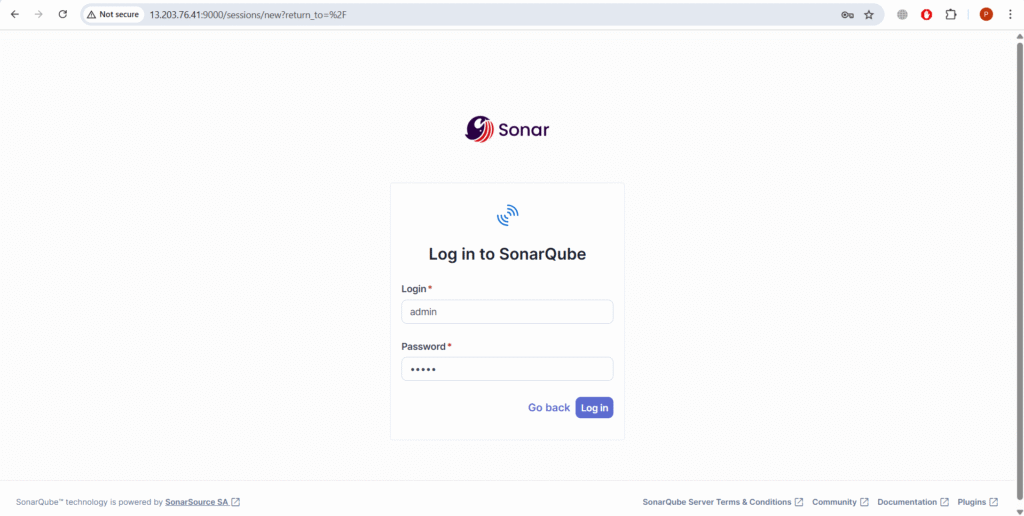
You will be prompted to change the password on your first login.

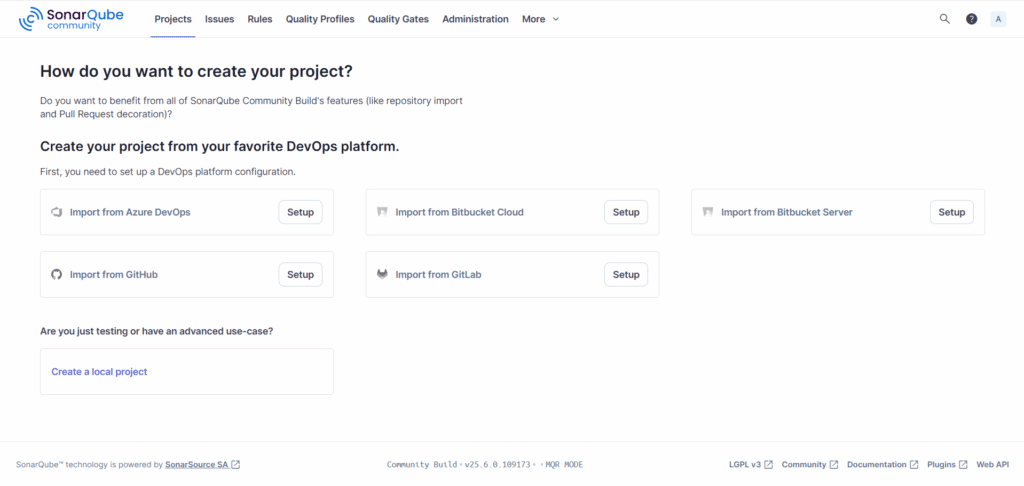
After changing password you will see the SonarQube Home page.
Conclusion:
You’ve now successfully installed and configured the latest SonarQube on Ubuntu 24.04 with PostgreSQL and systemd support. This setup is optimized for production with proper system tuning, a secure database backend, and managed service control. SonarQube is now ready to help your team continuously analyze and improve code quality. You can now start integrating your projects and setting up quality gates and dashboards
Related Articles:
Automate S3 File Processing with Python and Lambda
Reference: