In this article we are going to cover How to setup Multi Tier WebApp with Python Django and PostgreSQL on Ubuntu 24.04 LTS.
- Install and set up Django with PostgreSQL for a user authentication system.
- Create a signup page to register users.
- Configure PostgreSQL for remote access and link it to your Django project.
Table of Contents
Prerequisites:
Before you start, ensure you have the following:
- AWS Account with Ubuntu 24.04 LTS EC2 Instance.
- Install Django installed (5.1.5)
- Python 3 installed (3.12.3)
- PostgreSQL installed (16.6)
- Basic knowledge of Python and Django
What is Python?
- Python is a high-level, interpreted programming language known for its simplicity and readability.
- It is widely used in web development, data science, artificial intelligence, machine learning, automation, and much more.
- Python’s syntax is clean and easy to understand, making it ideal for beginners as well as experienced developers.
- Python is the primary language used for writing Django applications. Since Django is a Python-based web framework, understanding Python is essential for building web applications with Django.
What is Django?
- Django is a high-level, open-source web framework for building web applications using the Python programming language.
- It was designed to make it easier and faster to build robust, secure, and maintainable web applications.
- Django follows the Model-View-Template (MVT) architectural pattern, which separates the application logic, user interface, and data.
What is PostgreSQL?
- PostgreSQL is a powerful, open-source object-relational database management system (DBMS) that is widely used in web development and data-driven applications.
- It is known for its reliability, scalability, and performance, making it a popular choice for managing large amounts of data and complex queries.
Multi Tier WebApp with Python Django and PostgreSQL
Below is diagram to deploy Multi Tier WebApp with Python Django and PostgreSQL
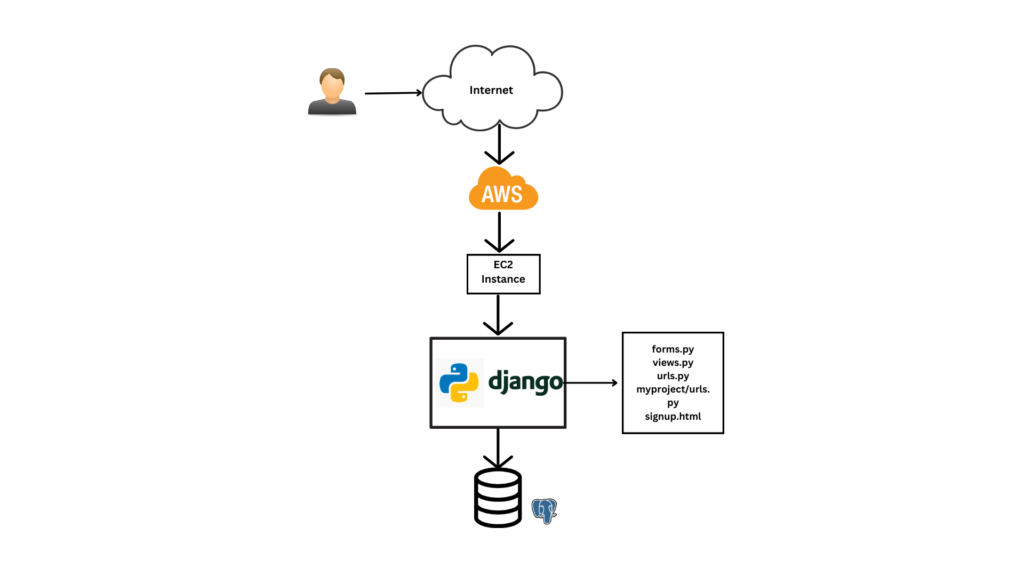
Python Django Business applications
1.E-commerce and Retail
2.Content Management Systems
3.Hotel booking & reservation systems
4.Event management & ticketing systems
5.Customer Relationship Management (CRM) systems
Step #1:Install Python3 and create Virtual Environment in Ubuntu 24.04 LTS
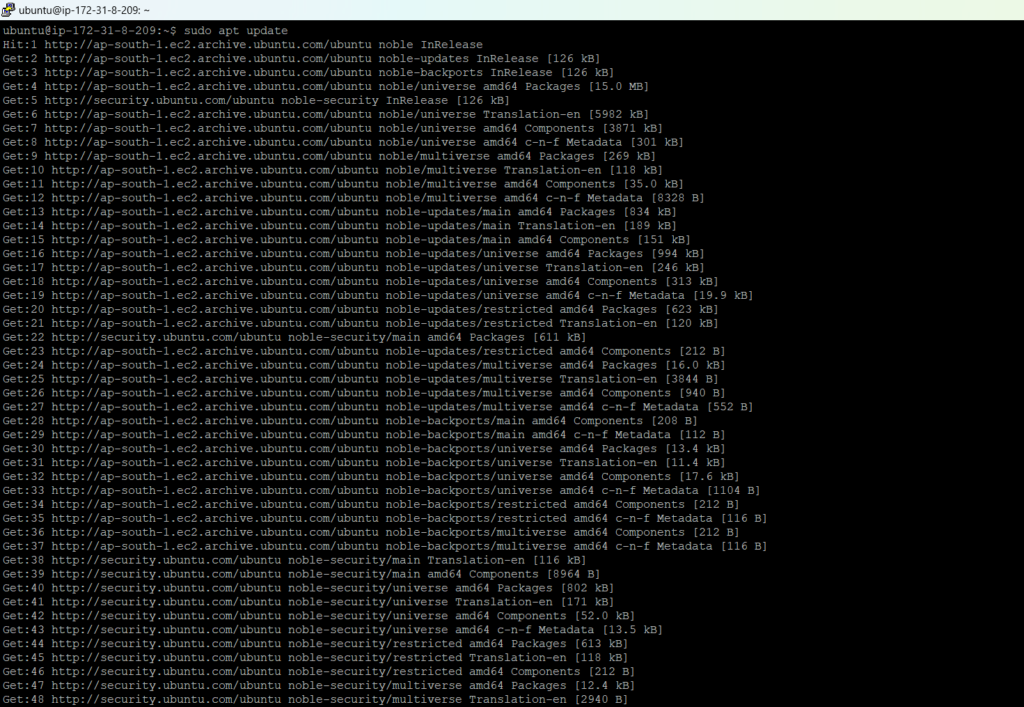
- First, update your system and install
pip(Python Package Installer):
sudo apt update

sudo apt install python3-pip

- To create and activate a Python virtual environment in Ubuntu 24.04 LTS
sudo apt install python3-venv

python3 -m venv myenv

source myenv/bin/activate


Step #2:Install Django on Ubuntu 24.04 LTS
- Once the virtual environment is activated, install Django:
pip install django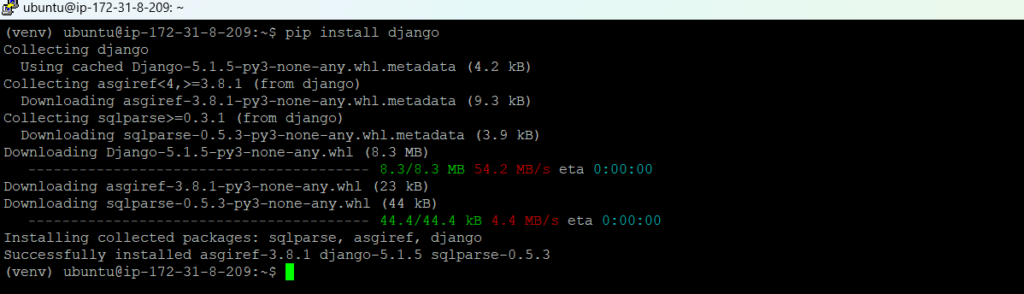
Step #3:Install the pre-built binary package
- This step involves installing
psycopg2-binary, a pre-built package for PostgreSQL database interaction in Python. Instead of compiling from source, this binary package comes pre-compiled, making installation easier and faster.
pip install psycopg2-binary
Step #4:Create a New Django Application on Ubuntu 24.04 LTS
- Run the following command to create a new Django project:
django-admin startproject myproject
cd myproject

Step #5:Install and Configure PostgreSQL on Ubuntu 24.04 LTS
1. Install PostgreSQL on Ubuntu 24.04 LTS
sudo apt install postgresql
2.Once PostgreSQL is installed, check if the PostgreSQL service is running
sudo systemctl status postgresql
3. Create a PostgreSQL Database and User
- Log in to PostgreSQL Database:
- This command allows you to access the PostgreSQL interactive shell (
psql) as the defaultpostgresuser.
sudo -u postgres psql- Once the above command is executed, you’ll be logged into the PostgreSQL shell. From here, you can execute SQL command
- To create a database use the following command:
CREATE DATABASE mydatabase;- To create a user with name =’myuser’ and password =’mypassword’:
CREATE USER myuser WITH PASSWORD 'mypassword';- To grant privileges to the user with name =’myuser’:
- This SQL command is used in PostgreSQL to grant full access (privileges) on a specific database (
mydatabase) to a specific user (myuser).
GRANT ALL PRIVILEGES ON DATABASE mydatabase TO myuser;- Connect to the database named as mydatabase:
\c mydatabase- The command
\c mydatabasein PostgreSQL means “connect to the database namedmydatabase.”
- Grant superuser privileges to the user
myuser.
ALTER USER myuser WITH SUPERUSER;- Exit PostgreSQL
\q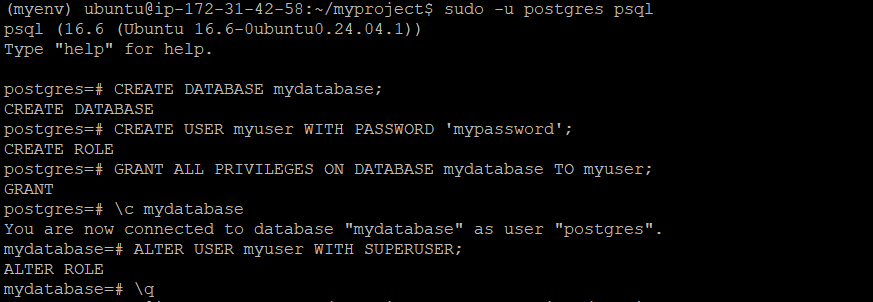
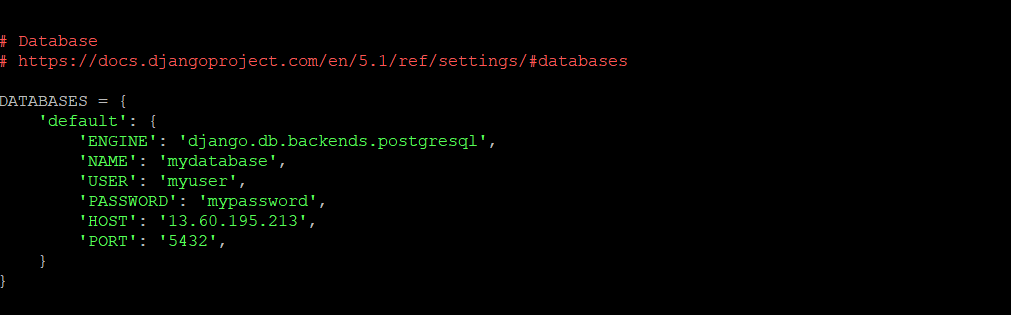
Step #6:Configure Database Settings for Django App
- Open
settings.pyand update theDATABASESsection:
nano myproject/settings.py

- Modify the
DATABASESdictionary to use PostgreSQL:

- Replace the default SQLite database setting with below setting:
DATABASES = {
    'default': {
        'ENGINE': 'django.db.backends.postgresql',
        'NAME': 'mydatabase',
        'USER': 'myuser',
        'PASSWORD': 'mypassword',
        'HOST': ' <EC2-Public-IP>',
        'PORT': '5432',
    }
}
- Locate the ALLOWED_HOSTS setting and update it as follows:
ALLOWED_HOSTS = ['<EC2-Public-IP>', 'localhost', '127.0.0.1']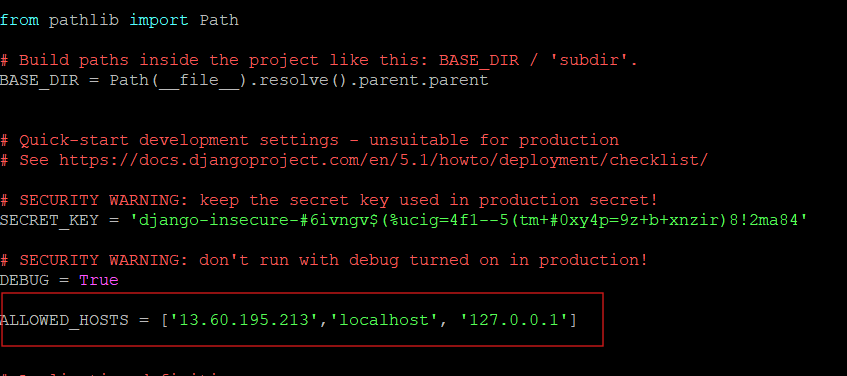
Step #7:Create a Django Application for user Signup
- To organize your project, you’ll create a new Django app named
accountsto handle user-related functionality such as signup.
python manage.py startapp accounts
Add 'accounts' to INSTALLED_APPS in myproject/settings.py:
nano myproject/settings.pyINSTALLED_APPS = [
...
'accounts',
]
Step #8:Develop the Signup Page in Django
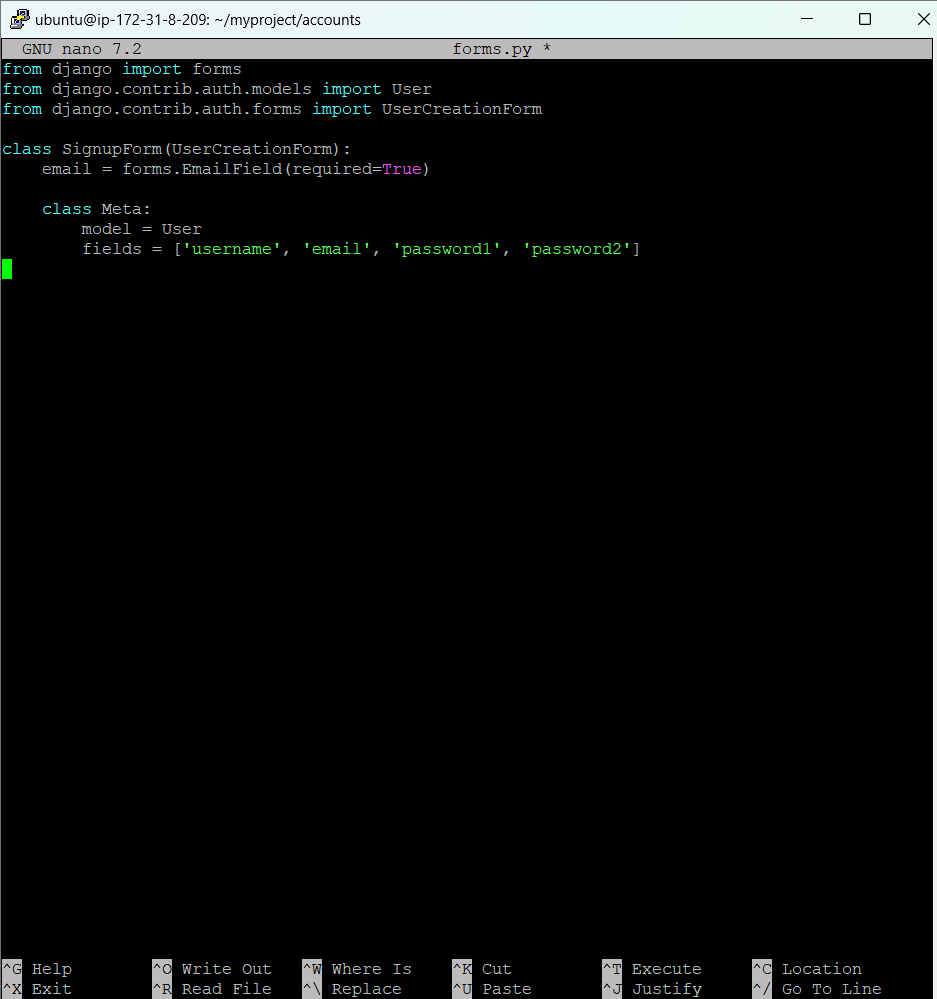
- First navigate to accounts then check whether forms.py file is present or not if not then create forms.py file.
cd accounts
touch forms.py
nano forms.py
- Add the following code in forms.py file :
from django import forms
from django.contrib.auth.models import User
from django.contrib.auth.forms import UserCreationForm

class SignupForm(UserCreationForm):
    email = forms.EmailField(required=True)

    class Meta:
        model = User
fields = ['username', 'email', 'password1', 'password2']SignupForminherits fromUserCreationFormto handle user registration.email = forms.EmailField(required=True): Adds a required email field to the form.class Meta:: Specifies the model (User) and the fields (username,email,password1,password2) to include in the form.
- Save and exit.
Step #9:Create the Signup page View
- In this step, we will create the view in Django that handles the signup process. This view will handle form submission, validation, and user creation.
- Open
views.pyinsideaccounts
nano views.py
- Add the code in to the views.py file :
from django.shortcuts import render
from .forms import SignupForm
from django.contrib import messages

def signup(request):
    if request.method == 'POST':
        form = SignupForm(request.POST)
        if form.is_valid():
            form.save()
            messages.success(request, "Account created successfully!")
            return render(request, 'accounts/signup.html', {'form': form})
    else:
        form = SignupForm()
    return render(request, 'accounts/signup.html', {'form': form})
- The
signupview handles user registration by: - Processing POST requests: Validates the form and creates a new user if the data is valid.
- Displays a success message after user creation.
- Handles GET requests: Renders an empty form for user input when the page is first loaded.
- Save and exit.

Step #10:Set Up URLs for Signup page
- In this step, we will define the URL path for the signup page and link it to the view that we created earlier. This allows users to visit the signup page via a specific URL.
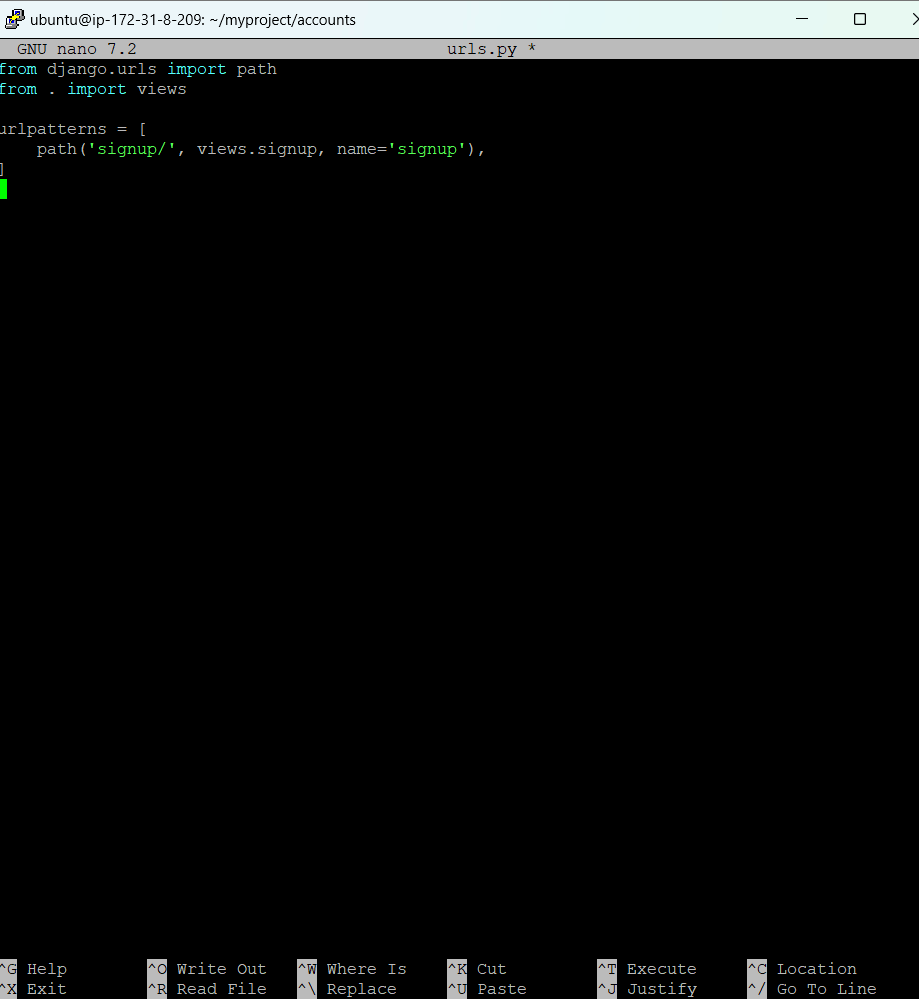
- Create
urls.pyfile inaccountsApp
touch urls.py
nano urls.py
- Add the following code in urls.py file :
from django.urls import path
from . import views

urlpatterns = [
    path('signup/', views.signup, name='signup'),
]- This code defines the URL pattern for the signup page in the
accountsapp: 'signup/': The URL path for the signup page.views.signup: The view function that handles the signup process.name='signup': The name given to the URL for easy referencing in templates or redirects.- This allows users to visit
/accounts/signup/to access the signup page.
- Save and exit.
- Include
accounts.urlsinmyproject/urls.py
cd ..
nano myproject/urls.py
Modify it as follows:
from django.contrib import admin
from django.urls import path, include

urlpatterns = [
    path('admin/', admin.site.urls),
    path('accounts/', include('accounts.urls')),
]
- Save and exit.
Step #11:Create Signup Template
- In this step, we will create the HTML template for the signup page. The template defines how the form will be presented to the user, including where the fields for username, email, and password will appear.
- First, you need to create a specific folder structure for your templates, which Django expects.
- Navigate to the accounts app directory.
- Inside the accounts app, create a new folder called templates, and inside that, create another folder called accounts.
- Inside the accounts/templates/accounts/ folder, create a new HTML file called signup.html.
mkdir -p accounts/templates

mkdir -p accounts/templates/accounts

ls accounts/templates

touch accounts/templates/accounts/signup.html

ls accounts/templates/accounts/
- Open
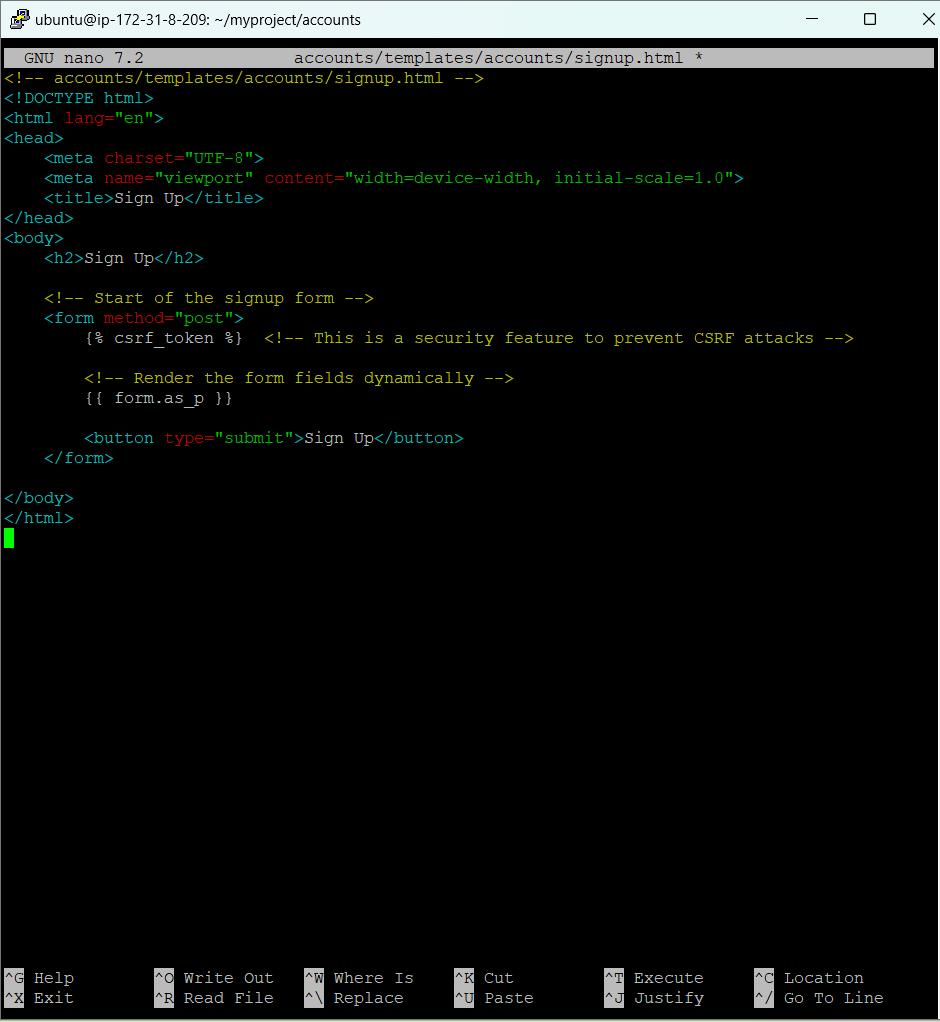
signup.htmland add the following html code.
nano accounts/templates/accounts/signup.html
- Add the following code in signup.html
<!DOCTYPE html>
<html lang="en">
<head>
    <meta charset="UTF-8">
    <title>Sign Up</title>
</head>
<body>
    <h2>Sign Up</h2>
    <form method="post">
        {% csrf_token %}
        {{ form.as_p }}
        <button type="submit">Sign Up</button>
    </form>
</body>
</html>
<form method="post">: Defines the form for user input, sending data via POST.{% csrf_token %}: Adds a security token to prevent CSRF attacks.{{ form.as_p }}: Renders form fields (username, email, password) as paragraphs.<button type="submit">Sign Up</button>: A button to submit the form.- This template displays the signup form and submits it securely.
- Save and exit.
Step #12:Verify PostgreSQL Configuration
- If you’re connecting to a remote PostgreSQL server, you need to ensure that it is configured to accept remote connections.
- Edit postgresql.conf to allow remote connections:
- Open the PostgreSQL configuration file:
sudo nano /etc/postgresql/16/main/postgresql.conf

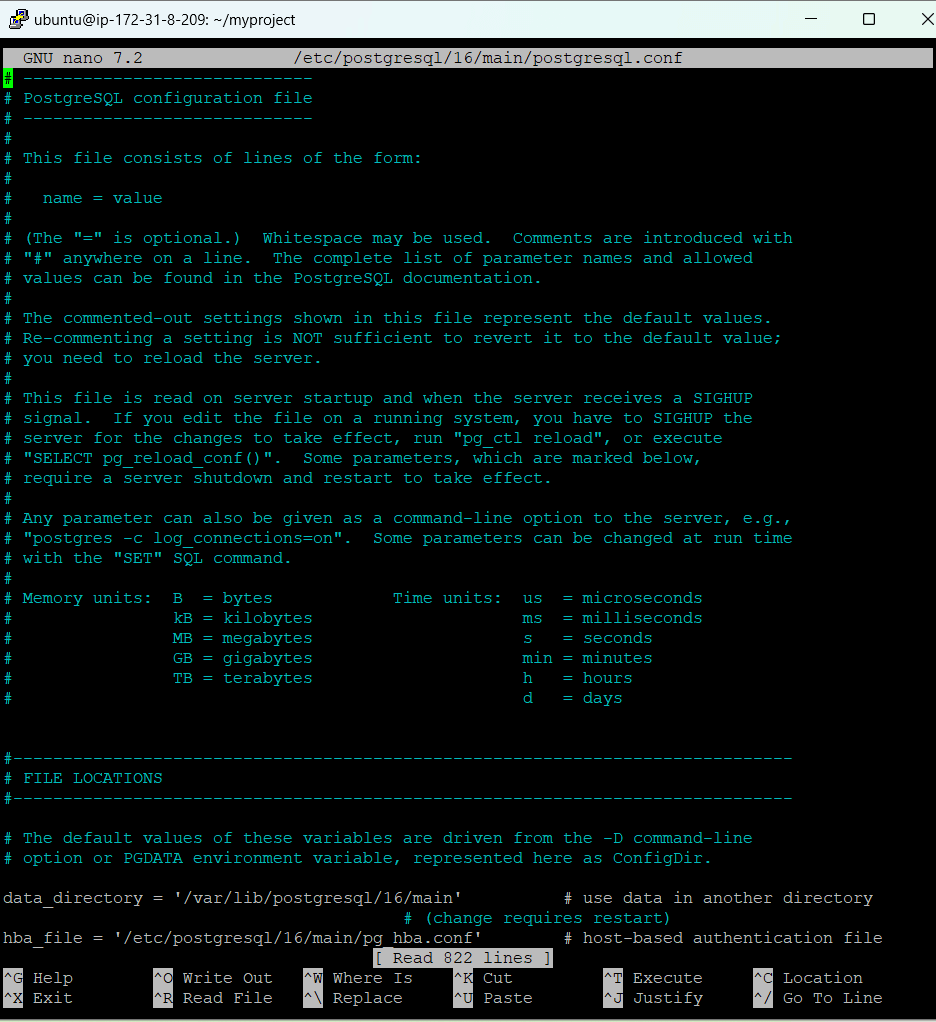
- Find the line listen_addresses and ensure it’s set to ‘*’:
listen_addresses = '*'
- This allows PostgreSQL to listen for connections from any IP address.
- Edit pg_hba.conf to allow connections from your local machine:
- Open the pg_hba.conf file:
sudo nano /etc/postgresql/16/main/pg_hba.conf
- Add a line to allow connections from any IP address (or a specific IP range if needed):
host all all 0.0.0.0/0 md5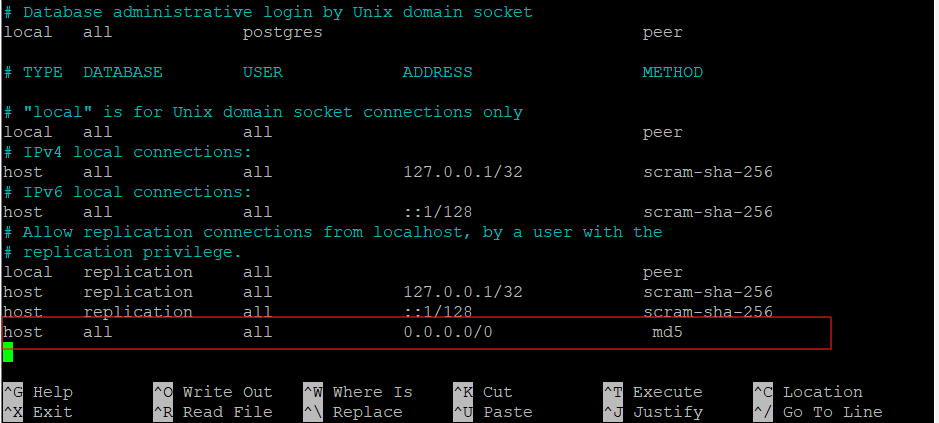
- This allows any IP to connect using password authentication. If you want to restrict this further, you can replace 0.0.0.0/0 with your IP range.
- Restart PostgreSQL: After modifying these files, restart PostgreSQL for the changes to take effect:
sudo systemctl restart postgresql
Step #13:Allow port 5432 through firewall/security group
- Ensure that the firewall on the remote server is not blocking PostgreSQL’s default port (5432).
- Allow PostgreSQL port through the firewall: On the remote server, run the following command:
sudo ufw allow 5432/tcp- If you are Instance in cloud then allow port in cloud security group.
Step #14:Test the Connection with Postgresql
- In this step, we will test whether your Django project can successfully connect to the PostgreSQL database
psql -h ip_addr -U myuser -d mydatabase
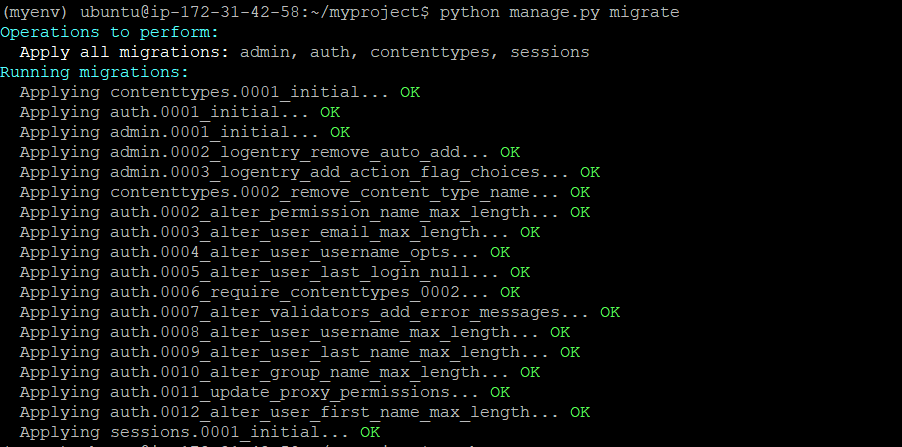
Step #15:Apply Database Migrations
- In Django, migrations are used to apply changes to the database schema based on the models defined in your application. Whenever you make changes to the models (e.g., adding new fields or creating new models), you need to apply the migrations to update the actual database.
python manage.py makemigrations
python manage.py migrate- It is used to apply the changes made in your models to the actual database.
Step #16:Create a Superuser in Django
- In this step, we will create a superuser account that gives you administrator privileges to access the Django admin interface. The superuser can manage users, view and edit data, and perform other administrative tasks.
python manage.py createsuperuser
Step #17:Run the Django Server in Ubuntu 24.04 LTS
python manage.py runserver 0.0.0.0:8000
0.0.0.0: This makes the server accessible on any IP address of your machine8000: The default port Django uses.
- Access the Django admin panel by opening your browser and going to:
http://public_ip_addr:8000/admin/
- Log in using the superuser credentials you just created.

- Now, open your browser and go to:
- http://public_ip_addr:8000/accounts/signup/

- Now, you can view the users in Django.

- After successful registration you can view user information in postgresql database.
sudo -u postgres psql
\c mydatabase
\du
select * from auth_user;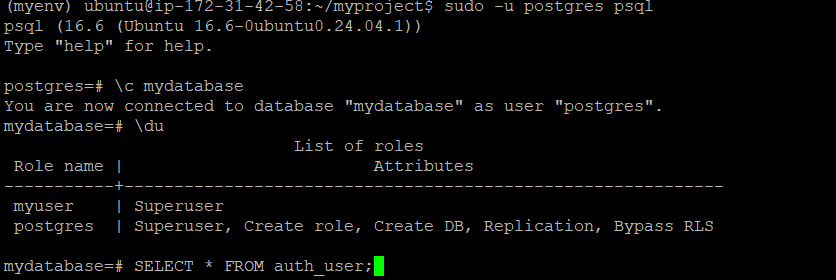

Conclusion:
By following these steps, you will have successfully set up a Django signup page integrated with PostgreSQL. The setup will allow users to register accounts and store them in a PostgreSQL database, with the ability to access the Django admin interface.
Related Articles:
How to Install LAMP Stack on Ubuntu 24.04 LTS
Reference: