In this guide, we will explore how to configure Single Sign-On (SSO) for Argo CD using Okta. SSO enables users to securely authenticate with Argo CD through a centralized identity provider, simplifying access management and enhancing security. By integrating Okta, a leading identity and access management solution, with Argo CD, you can streamline user authentication and provide seamless access to your Kubernetes deployments.
Table of Contents
Prerequisites
- AWS Account with Ubuntu 24.04 LTS EC2 Instance.
- Minikube and kubectl, Helm Installed.
- Basic knowledge of Kubernetes and Okta.
What is Okta?
Okta is a leading identity and access management (IAM) platform that provides secure, reliable, and seamless authentication solutions for businesses of all sizes. It acts as a centralized identity provider (IdP) that manages user identities and access permissions across various applications and services. Okta offers features like Single Sign-On (SSO), multi-factor authentication (MFA), and directory integration, making it a popular choice for organizations looking to enhance their security and simplify user access management.
Why Use Okta?
There are other tools like Github and Gitlab but we are using Okta instead of GitHub or GitLab for authentication because Okta is a specialized identity and access management platform. While GitHub and GitLab are primarily source control and CI/CD tools with basic authentication capabilities, Okta provides advanced features like Single Sign-On (SSO), Multi-Factor Authentication (MFA), centralized user management, and seamless integration with a wide range of applications. This makes Okta more robust, secure, and scalable for managing access across multiple platforms in enterprise environments.
Why Integrate SSO with Argo CD?
Argo CD’s default authentication system involves creating and managing individual user accounts within its environment. While functional, this approach can quickly become a challenge for administrators as the number of users increases. The process of manually creating, updating, and managing user credentials is not only time-consuming but also prone to inefficiencies and errors.
By integrating Single Sign-On (SSO) with Argo CD using a robust identity provider like Okta, these challenges can be addressed effectively. SSO simplifies user access by enabling a single, unified login for all connected applications. This not only enhances security through centralized authentication policies but also streamlines administration by allowing administrators to manage user access from one central location.
For organizations already leveraging Okta, integrating it with Argo CD offers additional benefits. The seamless connection between platforms fosters a smoother user experience, reduces the need for redundant login credentials, and ensures that users can quickly access resources without compromising security. SSO, in essence, combines convenience, security, and efficiency, making it a smart choice for managing authentication in modern DevOps workflows.
Install and Configure ArgoCD
Create a new namespace called argocd in your Kubernetes cluster.
kubectl create namespace argocd
Install ArgoCD in the argocd namespace by applying the YAML file from the provided URL.
kubectl apply -n argocd -f https://raw.githubusercontent.com/argoproj/argo-cd/stable/manifests/install.yaml
List all the resources in the argocd namespace. It provides an overview of the ArgoCD setup includes Pods, Services, Deployments, ReplicaSets, and more.
kubectl -n argocd get all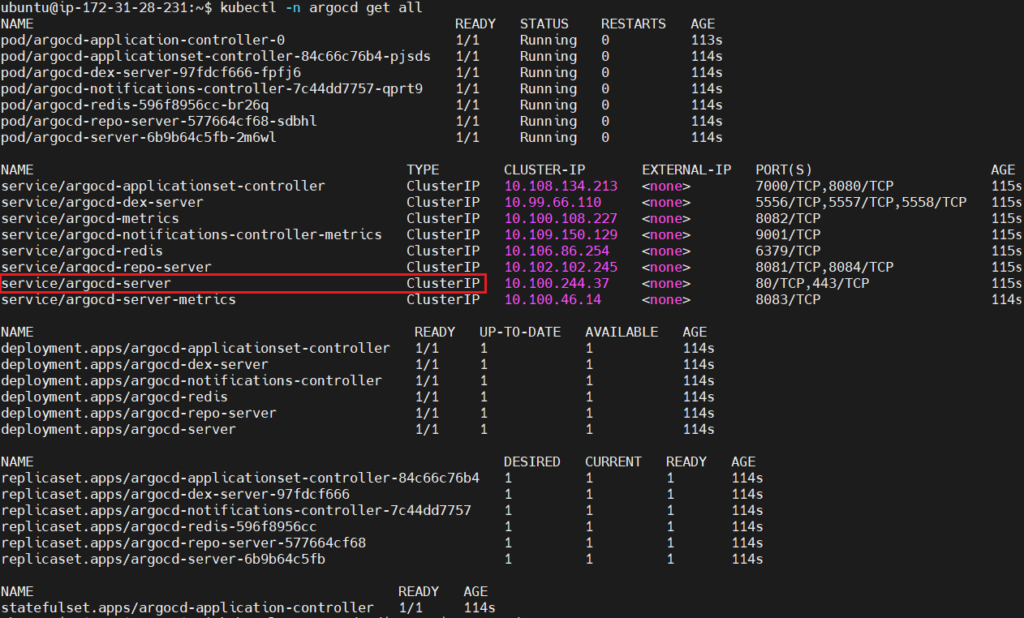
Edit the service configuration of argocd-server.
kubectl -n argocd edit service argocd-server
modify it shown below. Change the type field from ClusterIP to NodePort. ClusterIP exposes the service only within the cluster. NodePort makes the service accessible externally via a specific port on the nodes.
type: NodePort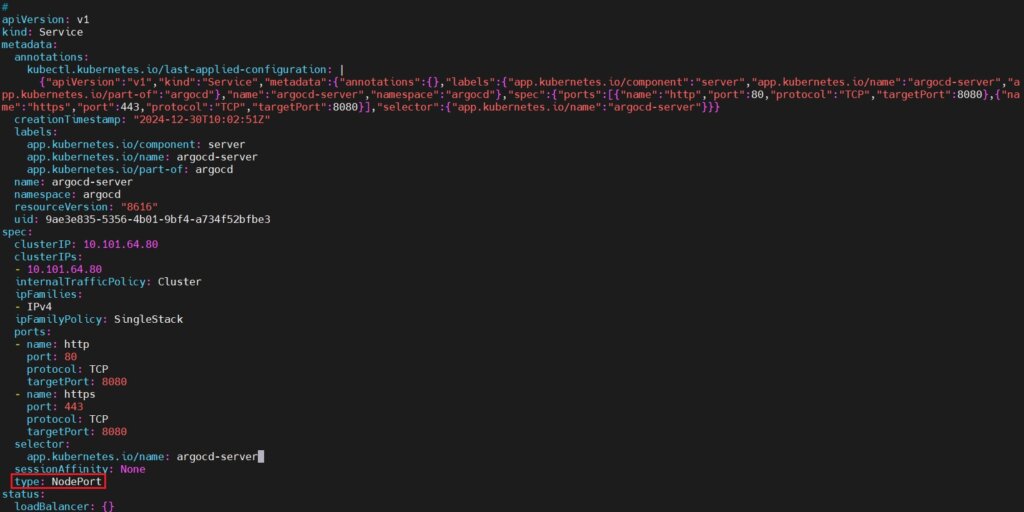
Run the kubectl -n argocd get all again to see if service type changed to NodePort or not.
kubectl -n argocd get all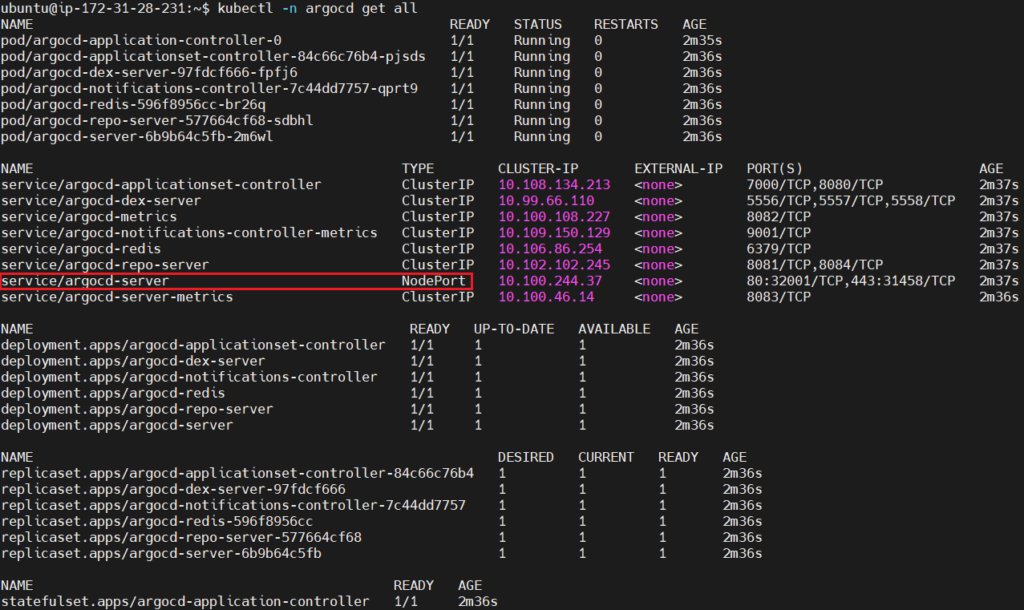
Secure Argo CD Access with HTTPS Using NGINX and Certbot
Step #1: Setup DNS for Your Domain
Go to your GoDaddy DNS settings and edit a record:
- In the DNS Records table, find:
- Type:
A - Name:
@
- Type:
- Click the Edit (pencil icon)
Update it:
- Points to:
your public IP(e.g.,3.91.78.123) - TTL: Leave it as default (e.g., 1 Hour)
- Click Save

Step #2: Install NGINX & Certbot
SSH into your EC2 instance and run:
sudo apt update
sudo apt install nginx certbot python3-certbot-nginx -y
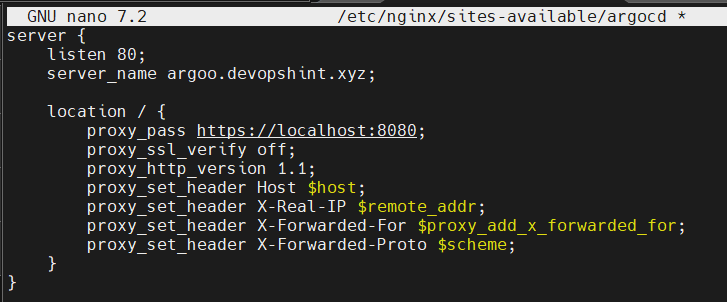
Step #3: Configure NGINX Reverse Proxy
Create a new config file:
sudo nano /etc/nginx/sites-available/argocd
Paste this content:
server {
    listen 80;
    server_name <name of your server>;

    location / {
        proxy_pass https://localhost:8080;
        proxy_ssl_verify off;
        proxy_http_version 1.1;
        proxy_set_header Host $host;
        proxy_set_header X-Real-IP $remote_addr;
        proxy_set_header X-Forwarded-For $proxy_add_x_forwarded_for;
        proxy_set_header X-Forwarded-Proto $scheme;
    }
}
Enable the config:
sudo ln -s /etc/nginx/sites-available/argocd /etc/nginx/sites-enabled/
sudo nginx -t
sudo systemctl reload nginx
Step #4: Start Argo CD Port-Forwarding
In a separate terminal or tmux/screen session, run:
kubectl port-forward svc/argocd-server -n argocd 8080:443
This exposes Argo CD to https://localhost:8080 on your EC2 instance.
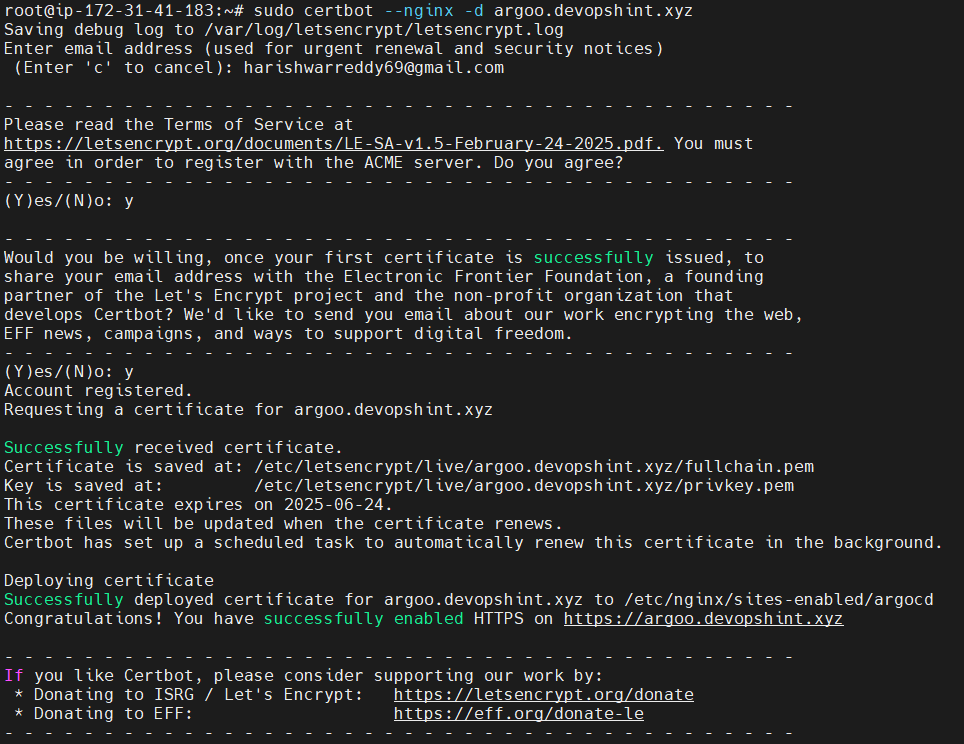
Step #5: Issue SSL Certificate with Certbot
Now, run:
sudo certbot --nginx -d <your server name>
Follow the prompts:
- Enter email
- Accept TOS
- Certbot will update your NGINX config to support HTTPS
Step #6: Access Argo CD via HTTPS
Access the Argocd by using port forwarding:
kubectl port-forward svc/argocd-server -n argocd 8080:443
Go to:
https://<your-domain-name>
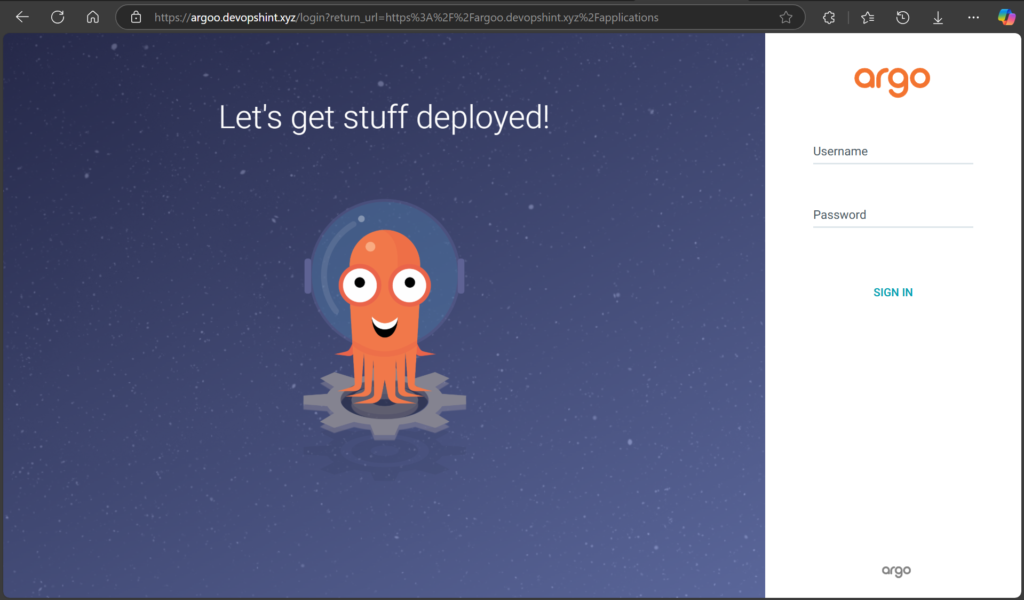
You should see:
- 🔒 Secure padlock
- Argo CD login screen
Setting Up Okta
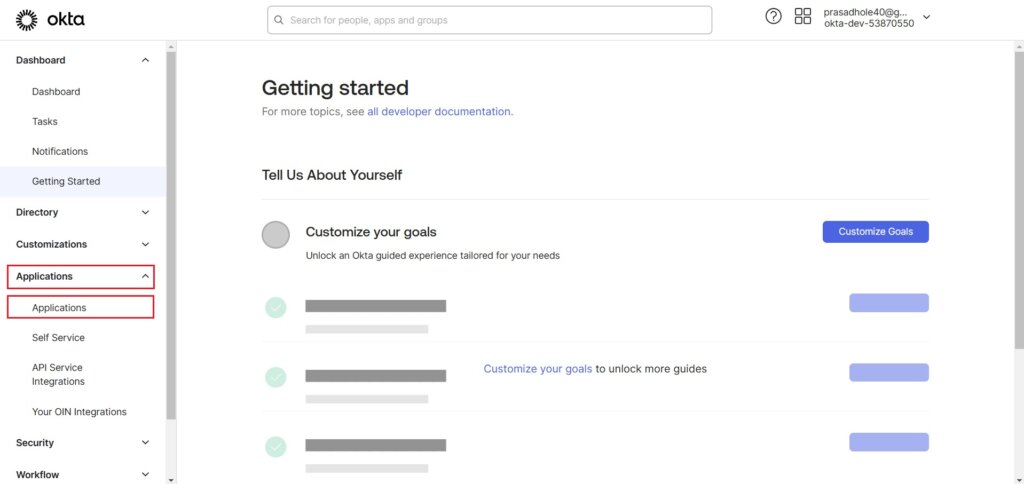
Log in to your Okta admin dashboard.

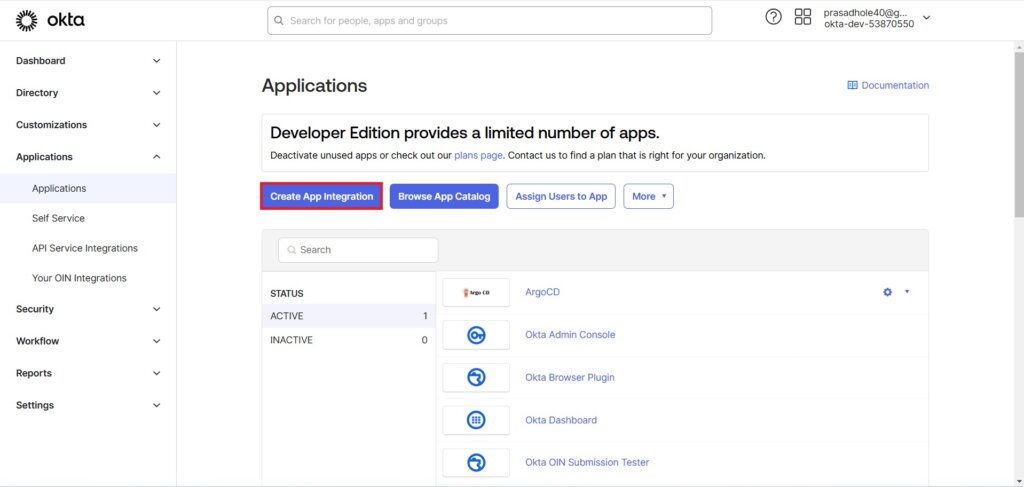
Navigate to Applications > Applications.
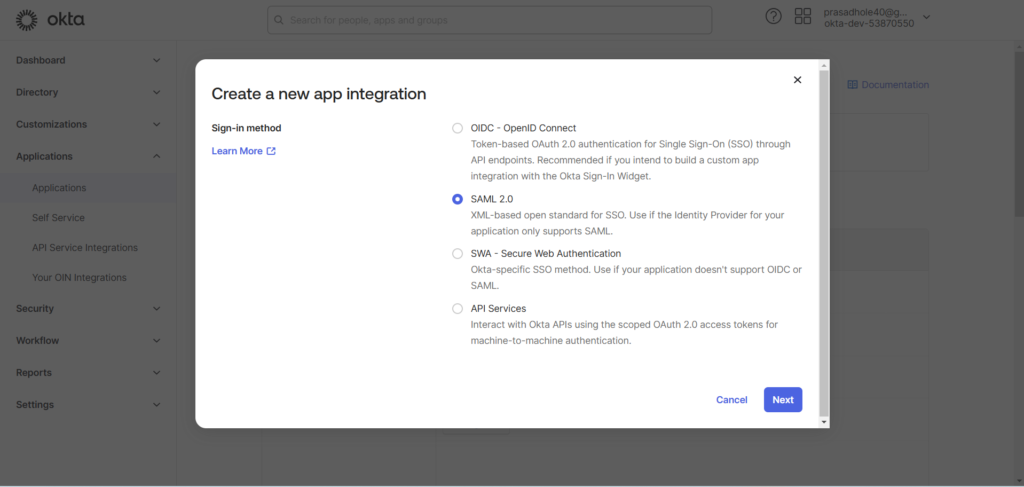
Click on Create App Integration.
Select SAML 2.0 as the sign-on method and click Next.
We use SAML 2.0 over OIDC, SWA, and API services because it is specifically designed for enterprise-grade Single Sign-On (SSO). SAML 2.0 enables robust integration with legacy systems, provides extensive security features, and supports rich attribute sharing between identity providers and applications. While OIDC is lightweight and ideal for modern apps, SAML excels in handling complex enterprise use cases. SWA and API services lack the scalability and security SAML offers for seamless authentication across multiple platforms.
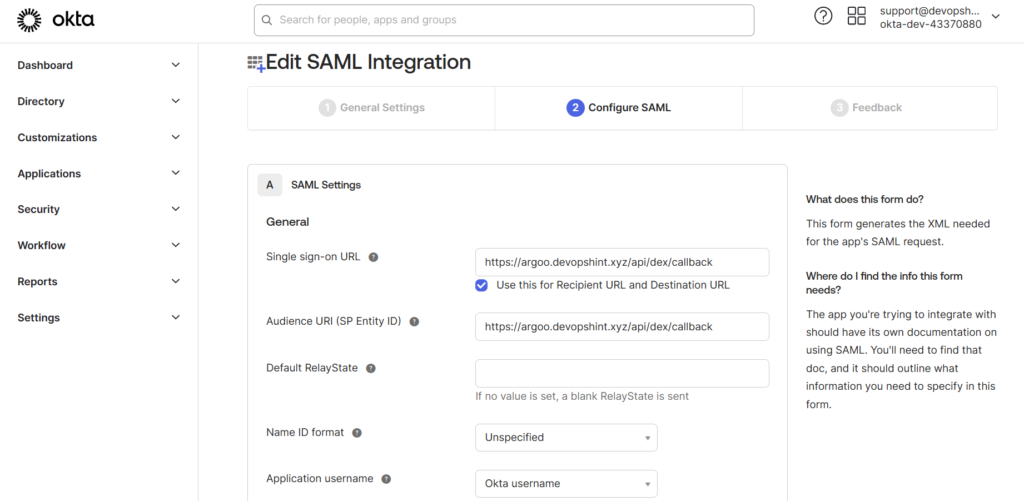
Configure SAML Integration. Provide a name like “ArgoCD“. You can add the App logo and in App visibility select both checkbox.

- Single Sign-On URL: Enter your Argo CD callback URL (e.g.,
https://<ARGO-CD-URL>/api/dex/callback). - Recipient URL: Use the same as the Single Sign-On URL.
- Destination URL: Enter the same callback URL here.
- Audience URI (SP Entity ID): Set this to the callback URL as well.
Here I have used my EC2 Instance Public IP Address and :8080 port.
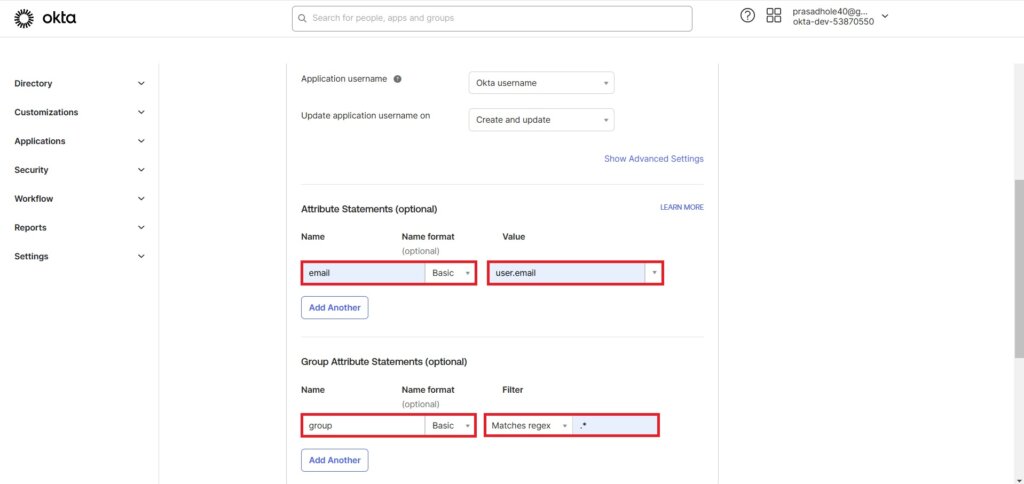
In Attribute Statements write Name: email, Name format : Basic and Value: user.email.
In Group Attribute Statements write Name: group, Name format : Basic and Filter: Matches regex .*
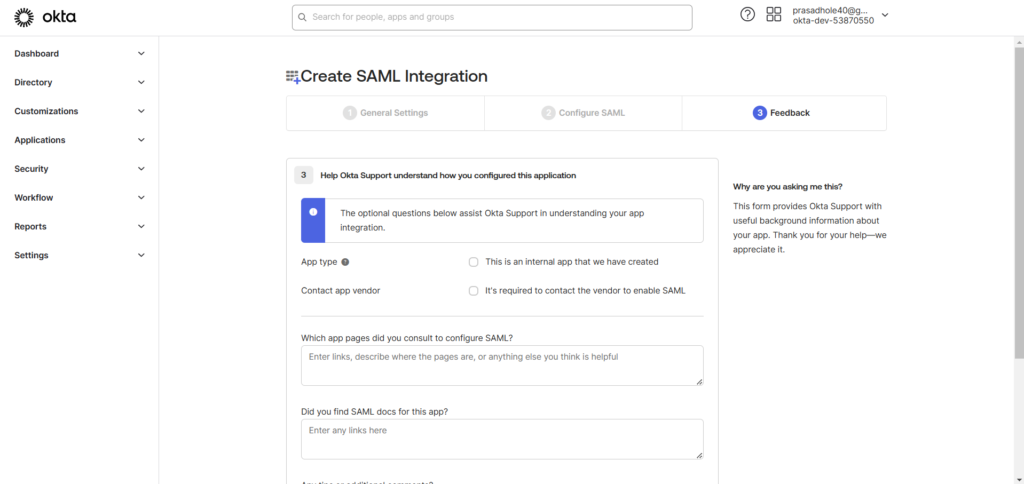
Click on Next.

In Feedback, select first checkbox, This is an internal app that we have created and click on Finish.

you will see the Sign On tab.
Under the Assignments tab of your new application, assign users or groups who should have access to Argo CD.
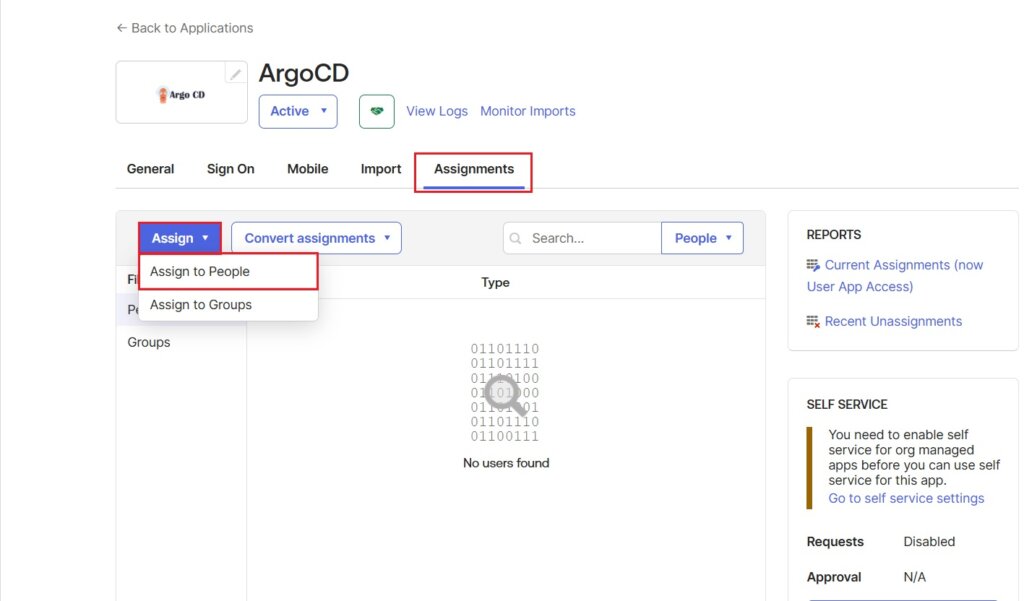
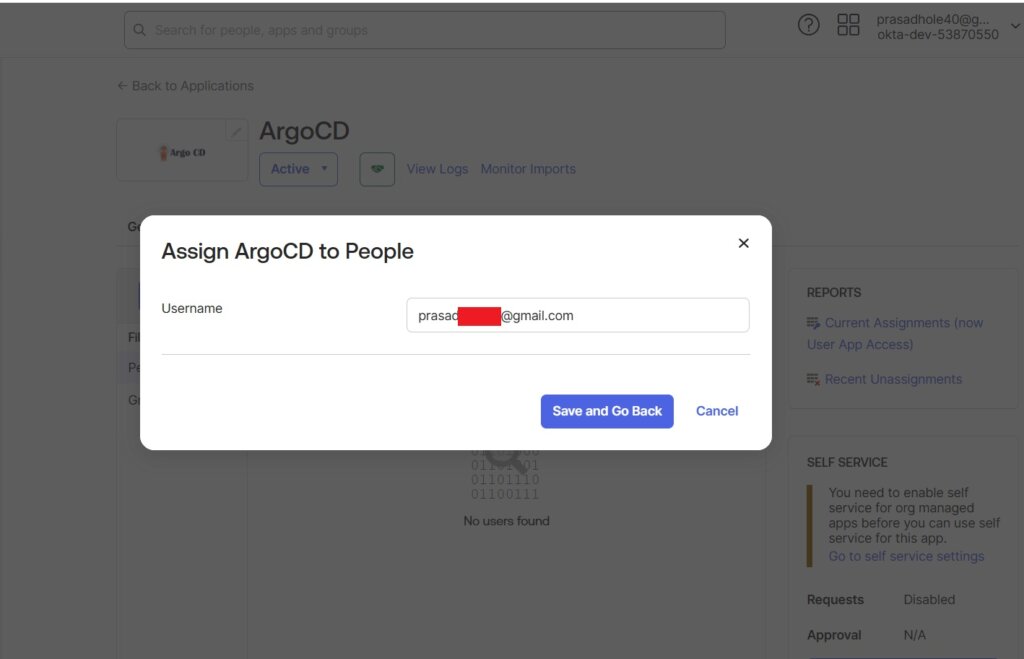
Select people to assign.

click on Save and Go Back.
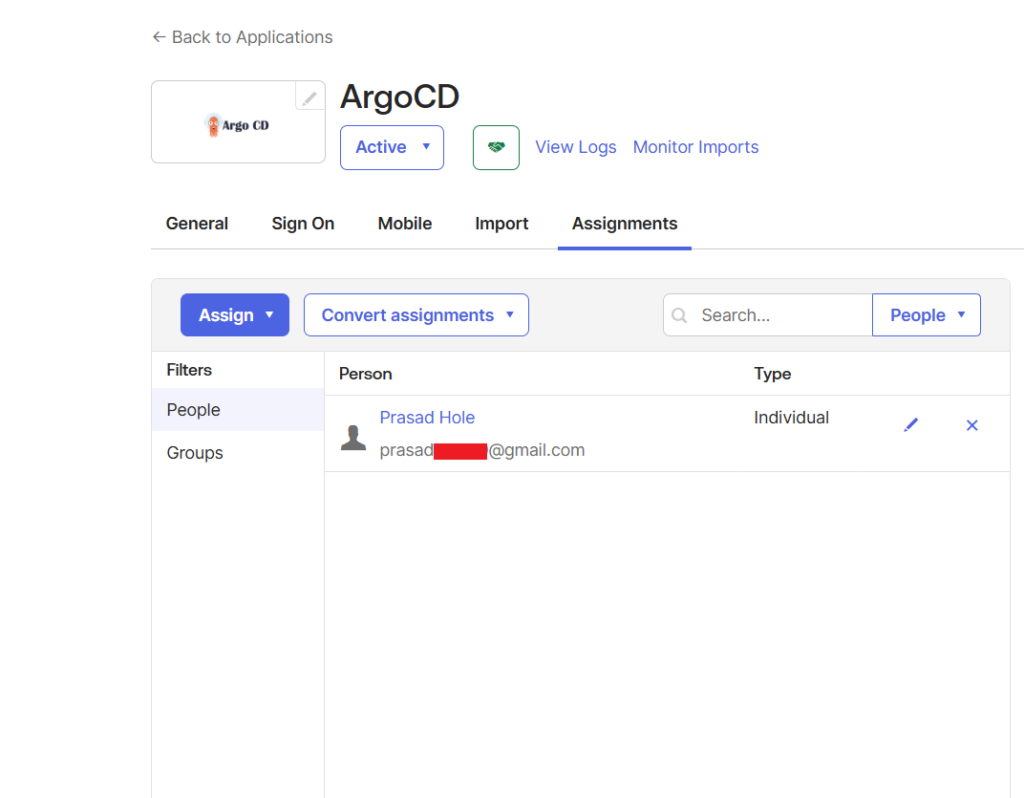
you will see the assigned people.
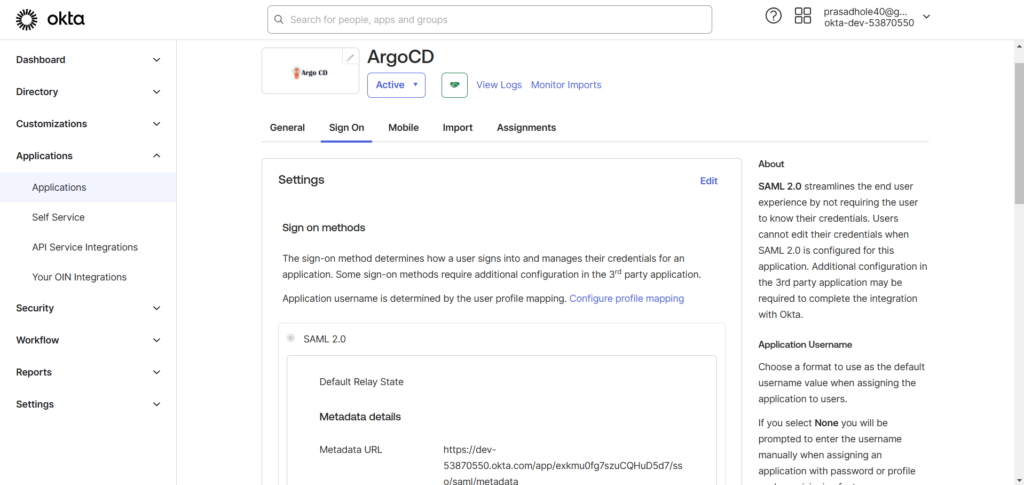
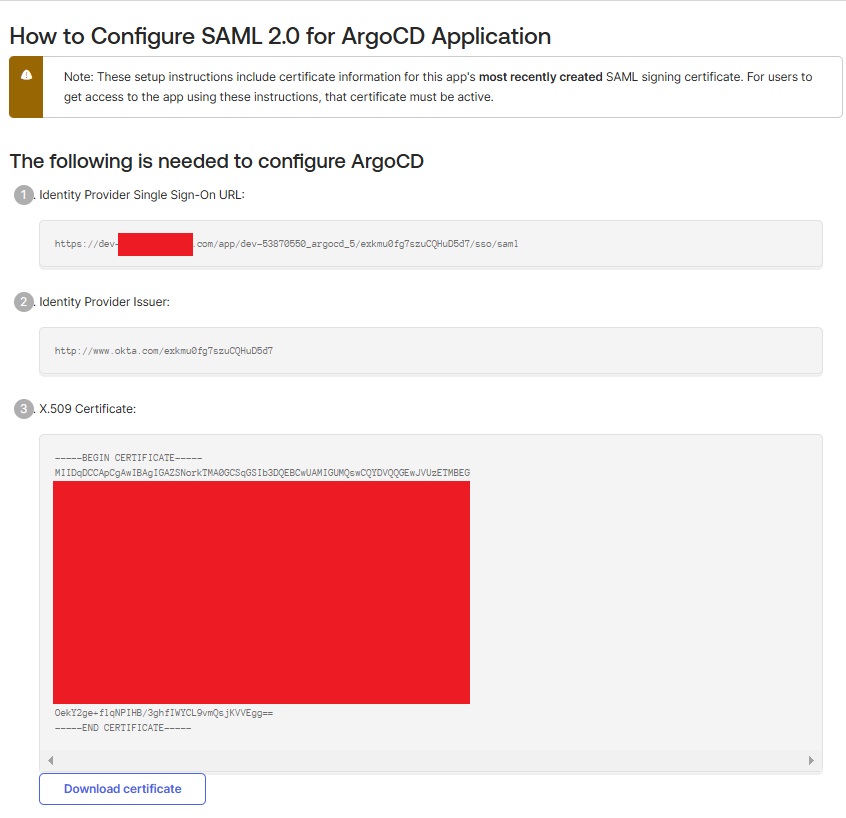
Go to the Sign On tab and and click on View SAML setup instructions.
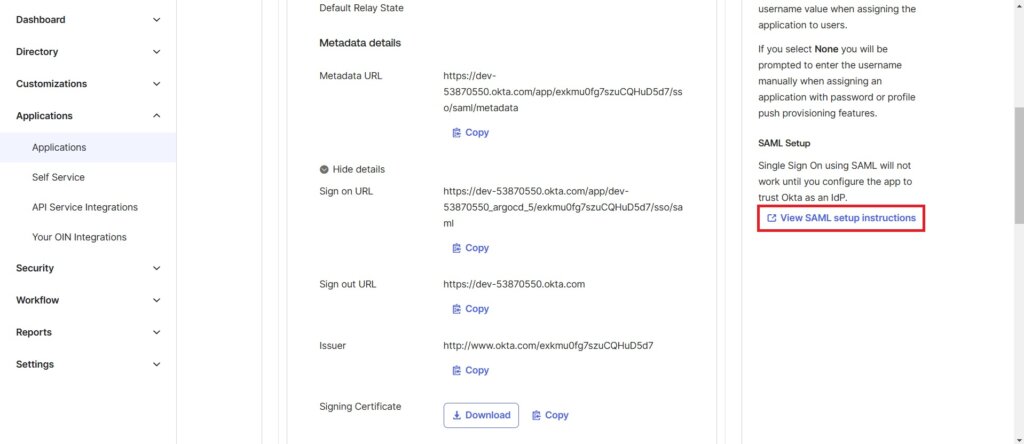
Here you will see the Single Sign-On URL and X.509 Certificate. Copy them for use in Argo CD.
Create a okta.cert file.
nano okta.cert
add the X.509 certificate code which we cpoied.
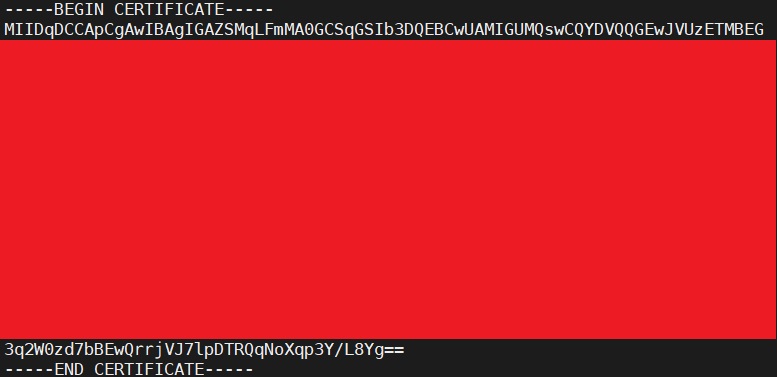
Save the file and exit.
now encode the ca file.
base64 okta.cert -w 0
Copy and store it.
Update the Argo CD ConfigMap to include SAML integration details.
kubectl -n argocd edit configmap argocd-cm
Modify it as shown below.
In the ssoURL give your copied url from okta. also give your redirect url and in caData paste the base64 encoded okta.cert file output.
apiVersion: v1
data:
  dex.config: |-
    connectors:
    - type: saml
      name: okta
      id: okta
      config:
        ssoURL: https://dev-43370880.okta.com/app/dev-43370880_argocd_8/exko550u54Y1ryIef5d7/sso/saml
        redirectURI: https://arg.devopshint.xyz/api/dex/callback
        usernameAttr: email
        emailAttr: email
        groupsAttr: group
        caData: "LS0tLS1CRUdJTiBDRVJUSUZJQ0FURS0tLS0tCk1JSURxRENDQXBDZ0F3SUJBZ0lHQVpZQUlNbGVNQTBHQ1NxR1NJYjNEUUVCQ3dVQU1JR1VNUXN3Q1FZRFZRUUdFd0pWVXpFVE1CRUcKQTFVRUNBd0tRMkZzYVdadmNtNXBZVEVXTUJRR0ExVUVCd3dOVTJGdUlFWnlZVzVqYVhOamJ6RU5NQXNHQTFVRUNnd0VUMnQwWVRFVQpNQklHQTFVRUN3d0xVMU5QVUhKdmRtbGtaWEl4RlRBVEJnTlZCQU1NREdSbGRpMDBNek0zTURnNE1ERWNNQm9HQ1NxR1NJYjNEUUVKCkFSWU5hVzVtYjBCdmEzUmhMbU52YlRBZUZ3MHlOVEEwTURRd09USTJOVEJhRncwek5UQTBNRFF3T1RJM05UQmFNSUdVTVFzd0NRWUQKVlFRR0V3SlZVekVUTUJFR0ExVUVDQXdLUTJGc2FXWnZjbTVwWVRFV01CUUdBMVVFQnd3TlUyRnVJRVp5WVc1amFYTmpiekVOTUFzRwpBMVVFQ2d3RVQydDBZVEVVTUJJR0ExVUVDd3dMVTFOUFVISnZkbWxrWlhJeEZUQVRCZ05WQkFNTURHUmxkaTAwTXpNM01EZzRNREVjCk1Cb0dDU3FHU0liM0RRRUpBUllOYVc1bWIwQnZhM1JoTG1OdmJUQ0NBU0l3RFFZSktvWklodmNOQVFFQkJRQURnZ0VQQURDQ0FRb0MKZ2dFQkFQaUlCakpjV044Z1ZXQ09hSG9kR2Rscm5PMndTOW1KY2Q2K3UzVEx0L2J2VkxhUCsvNDFZNHZMdDFRTFdXNUJIbzl2ekJpWQo4OGZ1NUQ3YnVDTU52M1RIUDJKZWh6dnl6Q0FkQTVqTE0zNmxjZ3dSOXZNVGtnbDlIM1NuZUV1WjIyNjBiVUVLbVYwT2FMWm9JZmIwCk5XcUFVTTZIY013ZEFOUmJhQWVQdGJxaHF6NlFzZXhMd3BlbVk5WHh0WmtyVWRuOGZIUFpmTEdOVXNWVXIyeE5NRGNzd1ZIbSs1MUQKM2RINGxQcGVIQ0I0RVA1YWhnczNuMHk1NnpvK1lnZXdNSG5NbkdFaG1IVUpDUE5jSFpBSGlUNklMSnEzOVI3WnpVeW9UWUxOeHg0NQo3VWtjTEE3bjgvRzA1Q0g5S2xCa3BBSTRGV2JoNDdZdjM1TXFOY3FsK1g4Q0F3RUFBVEFOQmdrcWhraUc5dzBCQVFzRkFBT0NBUUVBCmJRS1poY0swQ3VwTnBZMGZKTU91T1VZdVdMamVhNWlLUDVhUTFRdWQzNzAxdWZVdzNqM09ocDJOSSsyRzBhdW0rMCtZcWxZcXYrem8KdFd6RE14Sm9BV05oS1g4TEpzNVh5b3hkZURtSW1Idmo4b1pPN0t4ekE5bTk3NWp1N3d4eVFKcGtESEtIR2lWZnh2anB5UTZiTUw2Ygp3cVhPRy9oWnF2T21iME0vbDk2ekpLY013QXNscG9yM0VTU0hUc01SUFRtNDlsTkQ5UXJ3SEdRWFhWdUlocUJmVFA5NDJjU0dSU1oxCkR6aDE0bFdIWTlkR2dqazZyRTJmUXA2aE9UKzFyZHdtMkh2eU1pV1JQVFVmV2dzQkhQL2IxN3lkRENFTm5tVkI4TTBTcmNQTDBYbTYKbXZhd0ZETVhraHNENkNabjN3dzdlMEJ2Tkw0b1BnczZ0dk1rUGc9PQotLS0tLUVORCBDRVJUSUZJQ0FURS0tLS0tCg=="
  url: https://arg.devopshint.xyz
kind: ConfigMap
metadata:
  annotations:
    kubectl.kubernetes.io/last-applied-configuration: |
      {"apiVersion":"v1","kind":"ConfigMap","metadata":{"annotations":{},"labels":{"app.kubernetes.io/name":"argocd-cm","app.kubernetes.io/part-of":"argocd"},"name":"argocd-cm","namespace":"argocd"}}
  creationTimestamp: "2025-04-04T09:21:58Z"
  labels:
    app.kubernetes.io/name: argocd-cm
    app.kubernetes.io/part-of: argocd
  name: argocd-cm
  namespace: argocd
  resourceVersion: "1365"
  uid: 505c5c97-d238-441d-acac-636bf1e894b1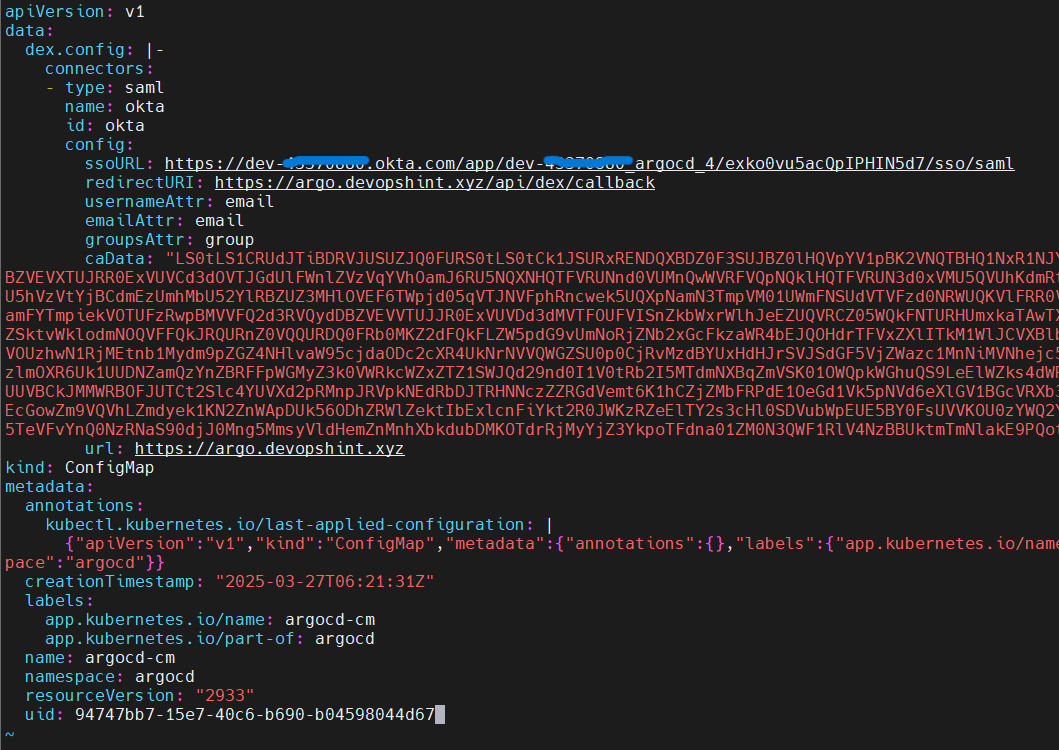
save the file and exit.
Restart the Argo CD server to apply the changes.
kubectl -n argocd rollout restart deployment argocd-server
Run the kubectl port-forward command:
kubectl port-forward svc/argocd-server -n argocd 8080:443
Now open your web browser and run https://<your-domain-name>
You’ll see the “LOG IN VIA OKTA” button on the login page.
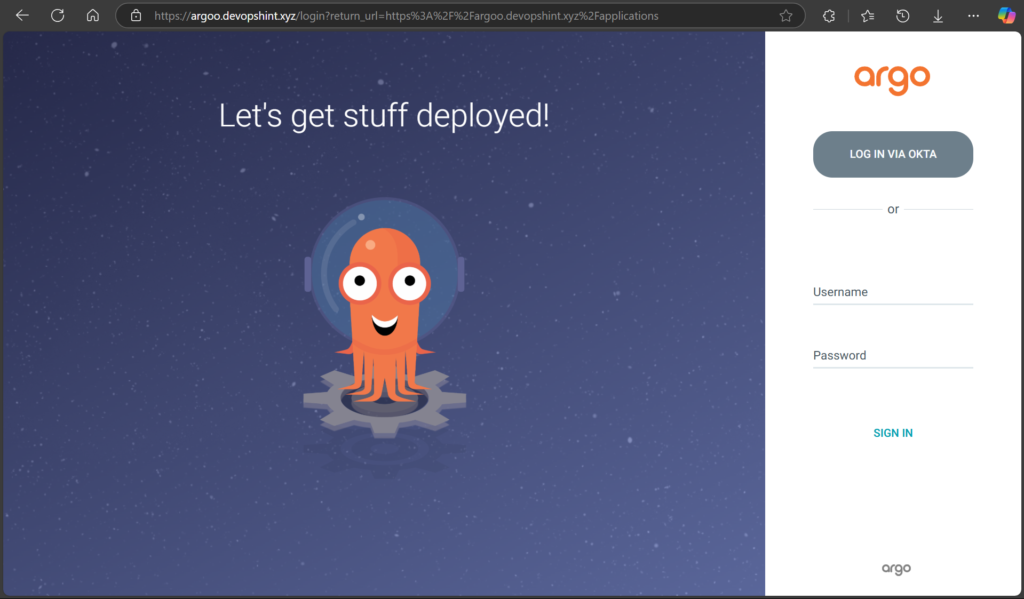
Now click the LOG IN VIA OKTA button. Once logged in, you’ll be redirected to the Argo CD dashboard.
You can view the SSL Certificate by clicking on lock icon beside the https and then connection is secure and then certificate icon:

With Okta SSO, your team now enjoys automatic authentication and direct access to Argo CD, eliminating the need for manual logins. By managing user assignments centrally in Okta, you ensure secure, streamlined, and user-friendly access to your Kubernetes resources.
Conclusion:
Integrating Okta SSO with Argo CD streamlines authentication, making it secure, efficient, and user-friendly. This setup not only enhances security by leveraging centralized authentication policies but also simplifies access management for administrators. By following these steps, you can ensure a smoother, more productive experience for your team while reducing the complexities of managing multiple user accounts.
With Okta SSO in place, Argo CD becomes a more scalable solution for organizations aiming to maintain strong security and efficient workflows in their DevOps pipelines.
Related Articles:
Decoupling CI from CD with ArgoCD Image Updater
Reference: