In this article, We are going to perform SonarQube Integration with Jenkins for Code Analysis.
Table of Contents
Introduction
SonarQube is an opensource web based tool to manage code quality and code analysis. It is most widely used in continuous code inspection which performs reviews of code to detect bugs, code smells and vulnerability issues of programming languages such as PHP, C#, JavaScript, C/C++ and Java , Also tracks statistics and creates charts that enable developers to quickly identify problems in their code.
Prerequisites
- SSH access with sudo privileges
- Preinstalled Jenkins
Follow below articles to Install Jenkins and SonarQube if not installed.
How to Install SonarQube on Ubuntu 18.04/16.04 LTS
How to Install Jenkins on Ubuntu 18.04/16.04 LTS
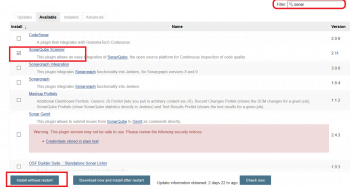
Step 1: Install SonarQube Scanner Plugin for Jenkins
First login to Jenkins with UserName and Password , Go to Manage Jenkins -> Manage Plugins -> Available -> Search for SonarQube Scanner ->
Install SonarQube Scanner plugin in Jenkins as shown below.
Step 2: Configure SonarQube Scanner in Global Tool Configuration
Next Configure SonarQube Scanner in Global Tool Configuration using below steps
Go to Mange Jenkins -> Global Tool Configuration -> Scroll for SonarQube Scanner -> click on Add sonar scanner ->
Give the name , select SonarQube Scanner version and click on Apply.

If you have already installed SonarQube Scanner on your then give installation path of SonarQube Scanner as shown below,
Step 3: SonarQube Integration with Jenkins for Code Analysis
First genrate or copy SonarQube Authentication Token From SoanarQube Server
Login to SonarQube as a admin using http://<SonarQube_Server_IP/Name>:9000
Go To My Account > Security > Generate Token , copy and paste token in notepad
Now Add the SonarQube details in Jenkins, So you can check code analysis report on SonarQube Server.
Go to Manage Jenkins -> Configure system -> SonarQube Server section -> Click on Add SonarQube -> Name it -> SonarQube server section > Add SonarQube > Enter Name , Server URL and Authentication Token of SonarQube Server

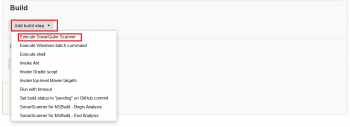
Step 4: Create a Jenkins Job to SonarQube Code Analysis
Go to your Jenkins Job , under build section click on Add Build Step -> click on Execute SonarQube Scanner.
Go to Analysis Properties and paste the below lines as per your project .
sonar.projectKey=FOSSTechNix
sonar.projectName=JavaProjectDemo
sonar.projectVersion=4.0
sonar.sources=/var/lib/jenkins/workspace/$JOB_NAME/<PROJECT_NAME>/src
Conclusion
In this article, We have covered, SonarQube Integration with Jenkins for Code Analysis
Related Articles
How to Install SonarQube on CentOS 7
How to install Jenkins on CentOS 8