This guide will show you how to install Apache2 on Ubuntu 24.04 LTS. Whether a beginner or an experienced user, you’ll learn to set up a fully functional web server and create virtual hosts to manage multiple sites efficiently.
Apache HTTP Server, or Apache2, is one of the most popular web servers worldwide, renowned for its flexibility and open-source nature. It powers a large number of websites and provides the necessary tools and stability for hosting everything from basic sites to complex web applications.
Table of Contents
Prerequisites
- Ubuntu 24.04 LTS with minimal installation
- SSH Access with admin privileges
Install Apache2 on Ubuntu 24.04 LTS
Install Apache Web Server:
sudo apt install apache2 -ystart it:
sudo systemctl start apache2
Verify the installation:
sudo systemctl status apache2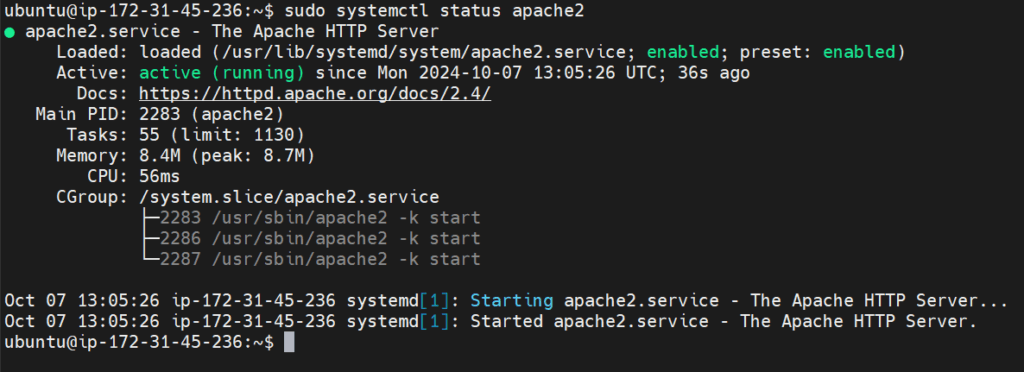
Create a Directory for Your Web Application
By default, the Apache web root is located in /var/www/html. Create a directory for your application there:
sudo mkdir /var/www/html/myappSet Permissions for the Directory
To avoid permission issues when adding files, assign ownership of the directory to your user:
sudo chown -R $USER:$USER /var/www/html/myappCreate a Simple HTML Page
Navigate to your app directory and create a simple index.html file:
cd /var/www/html/myapp
nano index.html
Add this basic HTML code to the file:
<!DOCTYPE html>
<html>
<head>
    <title>My Simple Web Application</title>
</head>
<body>
    <h1>Welcome to My Web App!</h1>
    <p>This is a simple web application running on an Apache server.</p>
</body>
</html>
Configure Apache2 to Serve the Application
If you want Apache to serve this web app as the default page or under a specific domain, configure a virtual host. First, create a new configuration file:
sudo nano /etc/apache2/sites-available/myapp.confAdd the following content, updating paths and domains as necessary:
<VirtualHost *:80>
    ServerAdmin webmaster@localhost
    DocumentRoot /var/www/html/myapp

    ErrorLog ${APACHE_LOG_DIR}/error.log
    CustomLog ${APACHE_LOG_DIR}/access.log combined

    <Directory /var/www/html/myapp>
        Options Indexes FollowSymLinks
        AllowOverride None
        Require all granted
    </Directory>
</VirtualHost>
Save and close the file. Enable the new configuration:
sudo a2ensite myapp.conf
Reload the server:
sudo systemctl reload apache2Restart Apache to apply the changes:
sudo systemctl restart apache2Setting Apache2 to Listen on Custom Ports
Apache2 defaults to port 80 for HTTP and port 443 for HTTPS. To configure additional listening ports, follow these steps.
Modify the Ports Configuration File:
sudo nano /etc/apache2/ports.confSpecify the ports you want to add:
Listen 8080
Update your virtual host file to listen on the new port:
sudo nano /etc/apache2/sites-available/000-default.confAdd the content below to the file:
<VirtualHost *:8080>

ServerAdmin [email protected]

ServerName example.com

DocumentRoot /var/www/example.com/public_html

ErrorLog ${APACHE_LOG_DIR}/error.log

CustomLog ${APACHE_LOG_DIR}/access.log combined

</VirtualHost>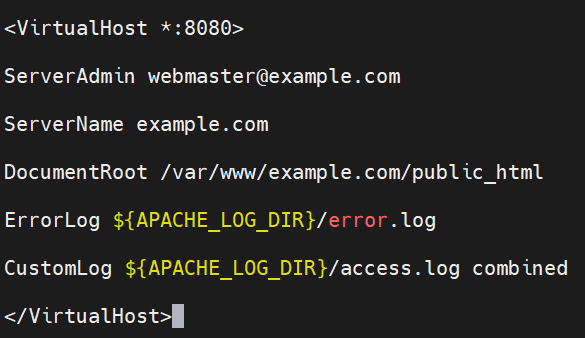
Restart Apache to apply the changes:
sudo systemctl restart apache2Setting Up Firewall Rules for Apache2 Traffic
Configure the firewall to allow Apache traffic
Enable the firewall:
sudo ufw enableAllow both HTTP and HTTPS traffic through the firewall
sudo ufw allow 'Apache Full'
Verify the firewall settings
sudo ufw status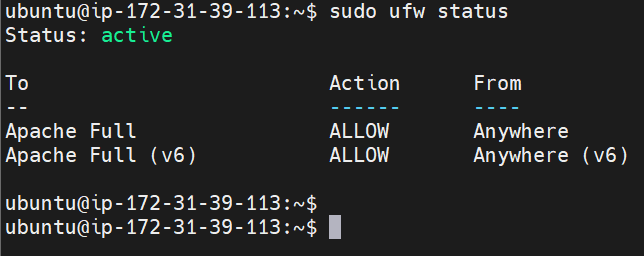
Conclusion:
In this article, we covered the installation and configuration of the Apache web server on Ubuntu 24.04. By setting up virtual hosts, you can efficiently manage multiple websites on a single server. With Apache’s robust features, you’re now equipped to host and serve your web applications. Explore further configurations and optimizations to enhance your server’s performance and security.
Related Articles:
How to Install Apache2 on Ubuntu 22.04 LTS
Reference:
sudo apt install apache2
Reading package lists… Done
Building dependency tree… Done
Reading state information… Done
Some packages could not be installed. This may mean that you have
requested an impossible situation or if you are using the unstable
distribution that some required packages have not yet been created
or been moved out of Incoming.
The following information may help to resolve the situation:
The following packages have unmet dependencies.
apache2-bin : Depends: libaprutil1-dbd-sqlite3 but it is not installable or
libaprutil1-dbd-mysql but it is not installable or
libaprutil1-dbd-odbc but it is not installable or
libaprutil1-dbd-pgsql but it is not installable or
libaprutil1-dbd-freetds but it is not installable
Depends: libaprutil1-ldap but it is not installable
Depends: libaprutil1t64 (>= 1.6.0) but it is not installable
apache2-utils : Depends: libaprutil1t64 (>= 1.5.0) but it is not installable
E: Unable to correct problems, you have held broken packages.
i am getting that error