In this article we are going to cover How to Install Elasticsearch 8 on Ubuntu 20.04 LTS,Configure Elasticsearch on Ubuntu 20.04 LTS and Uninstall Elasticsearch from Ubuntu.
Table of Contents
Introduction
Elasticsearch provides near real-time search and analytics for all types of data. Whether you have structured or unstructured text, numerical data, or geospatial data, Elasticsearch can efficiently store and index it in a way that supports fast searches.
Prerequisites
- Ubuntu Server with 20.04/18.04/16.04 LTS
- Java 8 or higher version
- 2 CPU and 4 GB RAM
- Open Ports 9200
Update the system packages
sudo apt update
Install the apt-transport-https package to access repository over HTTPS
sudo apt install apt-transport-https
#1.Install OpenJDK on Ubuntu
Lets install OpenJDK 11 on ubuntu using below commands.
sudo apt install openjdk-11-jdk
Lets verify java version
java --version
Output:
openjdk 11.0.14.1 2022-02-08
OpenJDK Runtime Environment (build 11.0.14.1+1-Ubuntu-0ubuntu1.20.04)
OpenJDK 64-Bit Server VM (build 11.0.14.1+1-Ubuntu-0ubuntu1.20.04, mixed mode, sharing)
#2.Setting the JAVA_HOME Environment Variables
To define the environment variable open the below file:
sudo nano /etc/environment
Paste the below variable into the file:
JAVA_HOME="/usr/lib/jvm/java-11-openjdk-amd64"
Load the environment variable using below command
source /etc/environment
Lets verify JAVA_HOME variable
echo $JAVA_HOME
Output:
/usr/lib/jvm/java-11-openjdk-amd64
#3.Install ElasticSearch 8 on Ubuntu 20.04 LTS
Download and install the public signing key, If you want download latest Elasticsearch then visit Elastic Stack Official download page.
wget -qO - https://artifacts.elastic.co/GPG-KEY-elasticsearch | sudo gpg --dearmor -o /usr/share/keyrings/elasticsearch-keyring.gpg
Save the repository definition to /etc/apt/sources.list.d/elastic-8.x.list:
echo "deb [signed-by=/usr/share/keyrings/elasticsearch-keyring.gpg] https://artifacts.elastic.co/packages/8.x/apt stable main" | sudo tee /etc/apt/sources.list.d/elastic-8.x.list
You can install the Elasticsearch using below command:
sudo apt-get update
sudo apt-get install elasticsearch
Start elacticsearch services
sudo systemctl start elasticsearch
Enable elacticsearch at system startup
sudo systemctl enable elasticsearch
To check the status of elasticsearch
sudo systemctl status elasticsearch
Output:
● elasticsearch.service - Elasticsearch
     Loaded: loaded (/lib/systemd/system/elasticsearch.service; enabled; vendor preset: enabled)
     Active: active (running) since Thu 2022-04-21 06:57:31 UTC; 9s ago
       Docs: https://www.elastic.co
   Main PID: 17266 (java)
      Tasks: 68 (limit: 4693)
     Memory: 2.3G
     CGroup: /system.slice/elasticsearch.service
             ├─17266 /usr/share/elasticsearch/jdk/bin/java -Xshare:auto -Des.networkaddress.cache.ttl=60 -Des.networkaddress.cache.neg>
             └─17539 /usr/share/elasticsearch/modules/x-pack-ml/platform/linux-x86_64/bin/controller

Apr 21 06:57:12 ip-172-31-4-2 systemd[1]: Starting Elasticsearch...
Apr 21 06:57:31 ip-172-31-4-2 systemd[1]: Started Elasticsearch.
#4.Configure Elasticsearch on Ubuntu 20.04 LTS
Let’s make changes in below configuration file
sudo nano /etc/elasticsearch/elasticsearch.yml
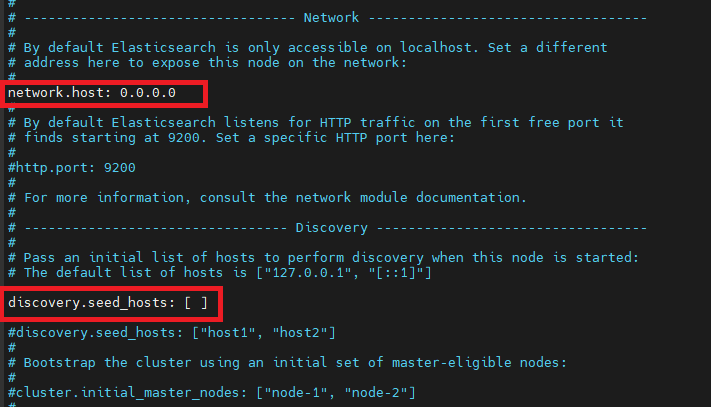
Go to Network section and uncomment network.host and replace your system IP with
network.host: 0.0.0.0
And you need to add this line discovery.seed_hosts: [ ] in discovery section as shown in below:
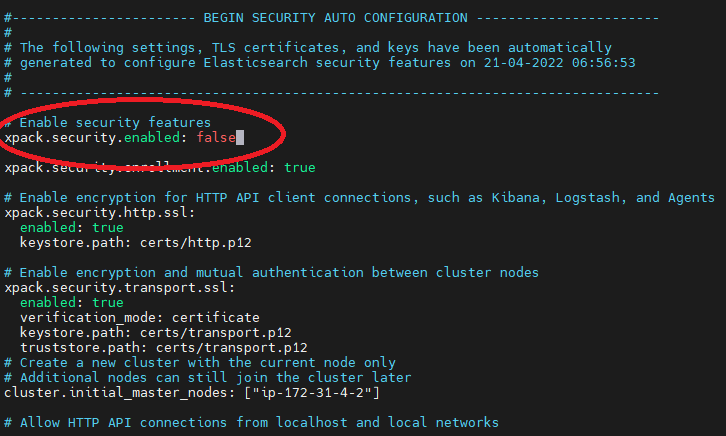
Then second step is go to the BEGIN SECURITY AUTO CONFIGURATION and here you need to replace this true with false as shown in below:
Error: elasticsearch “curl: (52) Empty reply from server” on port 9200
Solution:
Open the Elasticsearch configuration file
sudo nano /etc/elasticsearch/elasticsearch.yml
Change xpack.security.enabled: tru
xpack.security.enabled: false
After changing in configuration file you need to restart so run the below command:
sudo systemctl restart elasticsearch
#5.Access ElasticSearch on Ubuntu
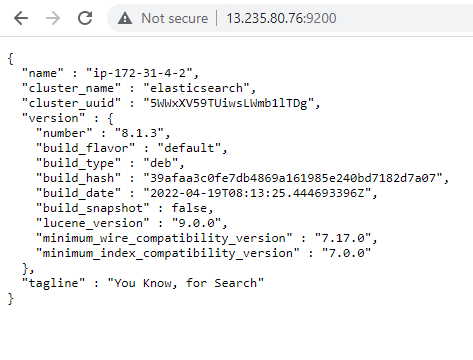
Lets test Elasticsearch using curl command by sending HTTP request
curl -X GET "localhost:9200"
Output:
{
  "name" : "ip-172-31-4-2",
  "cluster_name" : "elasticsearch",
  "cluster_uuid" : "5WWxXV59TUiwsLWmb1lTDg",
  "version" : {
    "number" : "8.1.3",
    "build_flavor" : "default",
    "build_type" : "deb",
    "build_hash" : "39afaa3c0fe7db4869a161985e240bd7182d7a07",
    "build_date" : "2022-04-19T08:13:25.444693396Z",
    "build_snapshot" : false,
    "lucene_version" : "9.0.0",
    "minimum_wire_compatibility_version" : "7.17.0",
    "minimum_index_compatibility_version" : "7.0.0"
  },
  "tagline" : "You Know, for Search"
}
You can access using browser
http://systemIP:9200
In this article we have covered How to Install Elasticsearch 8 on Ubuntu 20.04 LTS.
#6.Uninstall Elasticsearch on Ubuntu
If you wants to uninstall elasticsearch then you run the below commands:
sudo apt-get --purge autoremove elasticsearch
sudo apt-get remove --purge elasticsearch
sudo rm -rf /etc/elasticsearch
Conclusion:
In this article we have covered How to Install Elasticsearch 8 on Ubuntu 20.04 LTS,Configure Elasticsearch on Ubuntu 20.04 LTS and Uninstall Elasticsearch from Ubuntu.
Related Articles:
Thank you. I’ve been failing to install Elastic Search until now, but thanks to you, I succeeded!
Changing xpack.security.enabled to ‘false’ is very bad idea – the whole security stack is disabled, e.g. changing password for elastic user, changing tokens for Kibana etc…
Thank you so much for this tutorial content. It helped me to install elastic search on my store
Thank you so much for tutorial.
Good one, Thanks,