In this article we are going to cover ELK that means How to Install Elastic Stack 8 on Ubuntu 20.04 LTS
Table of Contents
Prerequisites
- Ubuntu Server with 20.04/18.04/16.04 LTS
- Java 8 or higher version
- 2 CPU and 4 GB RAM
Update the system packages
sudo apt update
Install the apt-transport-https package to access repository over HTTPS
sudo apt install apt-transport-https
#1. Install Java on Ubuntu
Lets install OpenJDK 11 on ubuntu using below commands.
sudo apt install openjdk-11-jdk
Lets verify java version
java --version
Output:
openjdk 11.0.14.1 2022-02-08
OpenJDK Runtime Environment (build 11.0.14.1+1-Ubuntu-0ubuntu1.20.04)
OpenJDK 64-Bit Server VM (build 11.0.14.1+1-Ubuntu-0ubuntu1.20.04, mixed mode, sharing)
#2.Setting the JAVA_HOME Environment Variables
To define the environment variable open the below file:
sudo nano /etc/environment
Paste the below variable into the file:
JAVA_HOME="/usr/lib/jvm/java-11-openjdk-amd64"
Load the environment variable using below command
source /etc/environment
Lets verify JAVA_HOME variable
echo $JAVA_HOME
Output:
/usr/lib/jvm/java-11-openjdk-amd64
How to Install Elastic Stack 8 on Ubuntu 20.04 LTS
#3.Install ElasticSearch 8 on Ubuntu
Download and install the public signing key:
wget -qO - https://artifacts.elastic.co/GPG-KEY-elasticsearch | sudo gpg --dearmor -o /usr/share/keyrings/elasticsearch-keyring.gpg
Save the repository definition to /etc/apt/sources.list.d/elastic-8.x.list:
echo "deb [signed-by=/usr/share/keyrings/elasticsearch-keyring.gpg] https://artifacts.elastic.co/packages/8.x/apt stable main" | sudo tee /etc/apt/sources.list.d/elastic-8.x.list
You can install the Elasticsearch using below command:
sudo apt-get update
sudo apt-get install elasticsearch
Start elacticsearch services
sudo systemctl start elasticsearch
Enable elacticsearch at system startup
sudo systemctl enable elasticsearch
To check the status of elasticsearch
sudo systemctl status elasticsearch
Output:
● elasticsearch.service - Elasticsearch
     Loaded: loaded (/lib/systemd/system/elasticsearch.service; enabled; vendor preset: enabled)
     Active: active (running) since Thu 2022-04-21 06:57:31 UTC; 9s ago
       Docs: https://www.elastic.co
   Main PID: 17266 (java)
      Tasks: 68 (limit: 4693)
     Memory: 2.3G
     CGroup: /system.slice/elasticsearch.service
             ├─17266 /usr/share/elasticsearch/jdk/bin/java -Xshare:auto -Des.networkaddress.cache.ttl=60 -Des.networkaddress.cache.neg>
             └─17539 /usr/share/elasticsearch/modules/x-pack-ml/platform/linux-x86_64/bin/controller

Apr 21 06:57:12 ip-172-31-4-2 systemd[1]: Starting Elasticsearch...
Apr 21 06:57:31 ip-172-31-4-2 systemd[1]: Started Elasticsearch.
#4.Configure Elasticsearch on Ubuntu
Let’s make changes in below configuration file
sudo nano /etc/elasticsearch/elasticsearch.yml
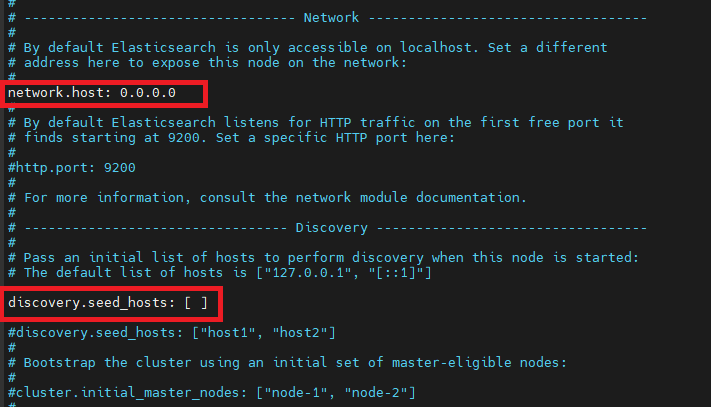
Go to Network section and uncomment network.host and replace your system IP with
network.host: 0.0.0.0
And you need to add this line discovery.seed_hosts: [ ] in discovery section as shown in below:
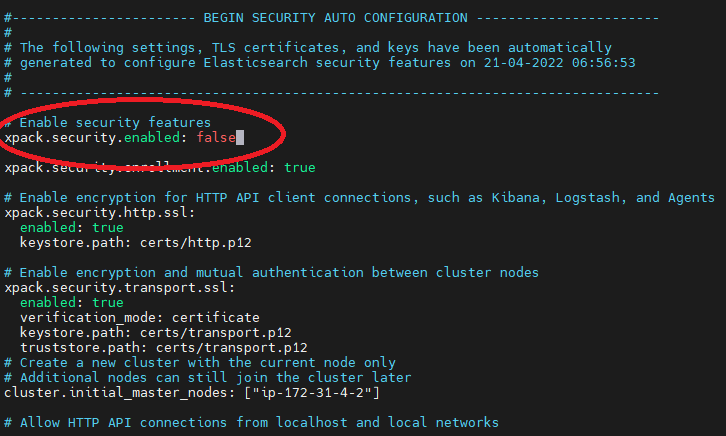
Then second step is go to the BEGIN SECURITY AUTO CONFIGURATION and here you need to replace this true with false as shown in below:
xpack.security.enabled: false
After changing in configuration file you need to restart so run the below command:
sudo systemctl restart elasticsearch
#5.Testing Elasticsearch
Lets test Elasticsearch using curl command by sending HTTP request
curl -X GET "localhost:9200"
Output:
{
  "name" : "ip-172-31-4-2",
  "cluster_name" : "elasticsearch",
  "cluster_uuid" : "5WWxXV59TUiwsLWmb1lTDg",
  "version" : {
    "number" : "8.1.3",
    "build_flavor" : "default",
    "build_type" : "deb",
    "build_hash" : "39afaa3c0fe7db4869a161985e240bd7182d7a07",
    "build_date" : "2022-04-19T08:13:25.444693396Z",
    "build_snapshot" : false,
    "lucene_version" : "9.0.0",
    "minimum_wire_compatibility_version" : "7.17.0",
    "minimum_index_compatibility_version" : "7.0.0"
  },
  "tagline" : "You Know, for Search"
}
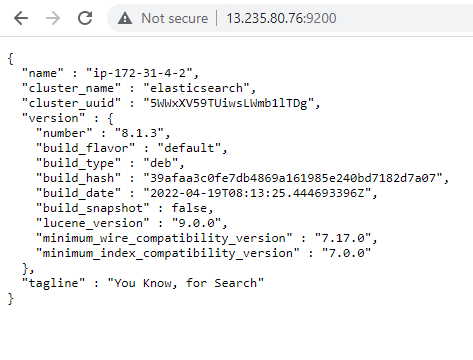
You can access using browser
http://systemIP:9200
Output:
#6.Install Logstash on Ubuntu
Logstash is a tool that collects data from different sources. The data it collects is parsed by Kibana and stored in Elasticsearch.
Install Logstash using following command:
sudo apt-get install logstash
Start the Logstash service:
sudo systemctl start logstash
Enable the Logstash service:
sudo systemctl enable logstash
To check the status of the service, run the following command:
sudo systemctl status logstash
Output:
● logstash.service - logstash
     Loaded: loaded (/etc/systemd/system/logstash.service; enabled; vendor preset: enabled)
     Active: active (running) since Fri 2022-04-22 10:14:14 UTC; 22s ago
   Main PID: 1423 (java)
      Tasks: 16 (limit: 4693)
     Memory: 489.2M
     CGroup: /system.slice/logstash.service
             └─1423 /usr/share/logstash/jdk/bin/java -Xms1g -Xmx1g -XX:+UseConcMarkSweepGC -XX:CMSInitiatingOccupancyFraction=75 -XX:+>

Apr 22 10:14:14 ip-172-31-3-46 systemd[1]: Started logstash.
Apr 22 10:14:14 ip-172-31-3-46 logstash[1423]: Using bundled JDK: /usr/share/logstash/jdk
#7.Configure logstash on Ubuntu
There is no any changes as of now
sudo nano /etc/logstash/logstash.yml
#8.Install Kibana on Ubuntu
It is recommended to install Kibana next. Kibana is a graphical user interface for parsing and interpreting collected log files.
Run the following command to install Kibana:
sudo apt-get install kibana
Start the Kibana service:
sudo systemctl start kibana
Enable the Kibana service:
sudo systemctl enable kibana
Let’s check the status of kibana:
sudo systemctl status kibana
Output:
● kibana.service - Kibana
     Loaded: loaded (/lib/systemd/system/kibana.service; enabled; vendor preset: enabled)
     Active: active (running) since Fri 2022-04-22 10:12:06 UTC; 17min ago
       Docs: https://www.elastic.co
   Main PID: 442 (node)
      Tasks: 11 (limit: 4693)
     Memory: 553.3M
     CGroup: /system.slice/kibana.service
             └─442 /usr/share/kibana/bin/../node/bin/node /usr/share/kibana/bin/../src/cli/dist

Apr 22 10:13:15 ip-172-31-3-46 kibana[442]: [2022-04-22T10:13:15.240+00:00][INFO ][plugins.ruleRegistry] Installed resources for index>
Apr 22 10:13:15 ip-172-31-3-46 kibana[442]: [2022-04-22T10:13:15.254+00:00][INFO ][plugins.ruleRegistry] Installed resources for index>
#9.Configure Kibana on Ubuntu
open the kibana.yml configuration file for editing:
sudo nano /etc/kibana/kibana.yml
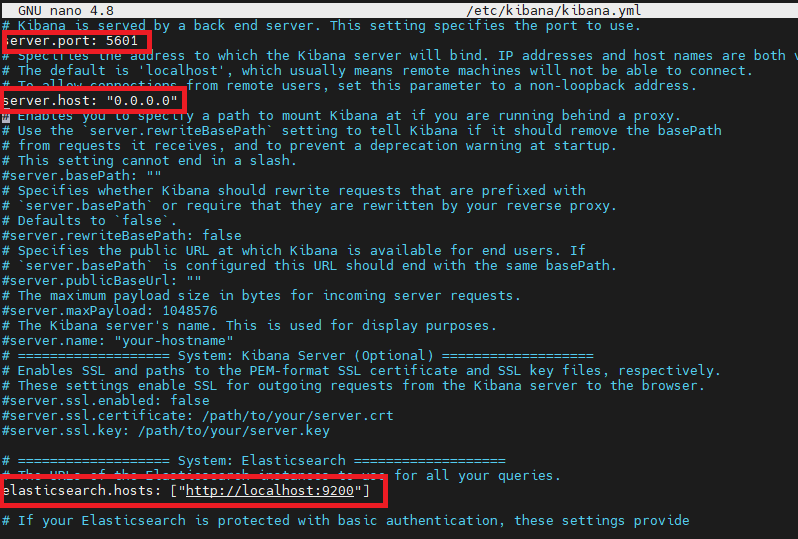
Uncomment this below lines and localhost replace with 0.0.0.0 (means any ip_address):
server.port: 5601
server.host: "localhost"
elasticsearch.hosts: ["http://localhost:9200"]
After changing configuration file you need to restart kibana
sudo systemctl restart kibana
#10.Testing Kibana
To access Kibana, open a web browser and browse to the following address:
http://ip_address:5601
Kibana dashboard:

#11.Install Filebeat on Ubuntu
Filebeat is a lightweight plugin used to collect and ship log files. It is the most commonly used Beats module. One of Filebeat’s major advantages is that it slows down its pace if the Logstash service is overwhelmed with data.
Install Filebeat using following command:
sudo apt-get install filebeat
#12.Configure Filebeat on Ubuntu
Filebeat, by default, sends data to Elasticsearch. Filebeat can also be configured to send event data to Logstash.
Open configuration file using below command:
sudo nano /etc/filebeat/filebeat.yml
Under the Elasticsearch output section, comment out the following lines:
# output.elasticsearch
# Array of hosts to connect to.
# hosts: ["localhost:9200"]
Under the Logstash output section, uncomment in the following two lines:
output.logstash
hosts: ["localhost:5044"]

Enable the Filebeat system module:
sudo filebeat modules enable system
Load the index template:
sudo filebeat setup --index-management -E output.logstash.enabled=false -E 'output.elasticsearch.hosts=["ip_address:9200"]'
Output:
Overwriting ILM policy is disabled. Set `setup.ilm.overwrite: true` for enabling.

Index setup finished.
Start and enable the Filebeat service:
sudo systemctl start filebeat
sudo systemctl enable filebeat
sudo systemctl restart filebeat
sudo systemctl status filebeat
Verify Elasticsearch Reception of Data:
curl -XGET http://ip_address:9200/_cat/indices?v
Output:
health status index                                uuid                   pri rep docs.count docs.deleted store.size pri.store.size
yellow open   .ds-filebeat-8.1.3-2022.04.22-000001 sXxRSgL6QZSyti8uK9RC3w   1   1          0            0       225b           225b
You can access in browser also:
http://ip_address:9200/_cat/indices?v
Output:

Conclusion:
In this article we have covered How to Install Elastic Stack 8 on Ubuntu 20.04 LTS.
Related Articles:
Thank you.. you did a great job
abhi@abhi-virtual-machine:~$ sudo filebeat modules enable system
Error initializing beat: error loading config file: yaml: line 149: could not find expected ‘:’
getting this error after this logstash output removing # and adding # at elsticsearch output
do you have any solution for this?
this is in the #12 Configure filebeat on Ubuntu
Hello Shweta,
This post has been a great help in implementing ELK for my needs. Excellent work.
Thanks
Congratulations and “many thanks”. Finally someone who knows what they’re doing.
how to configure elk 8 when kibana-elasticsearch on one server and filebeat on another server