In this article, we are going to cover Secure Grafana with Nginx, Reverse Proxy and Certbot.
Table of Contents
What is Grafana?
Grafana is an open source tool for performing data analytics, retrieving metrics that make sense of large amounts of data, and monitoring our apps using nice configurable dashboards.
Grafana integrates with a wide range of data sources, including Graphite, Prometheus, Influx DB, ElasticSearch, MySQL, PostgreSQL, and others. When connected to supported data sources, it provides web-based charts, graphs, and alerts.
What is Nginx Web server?
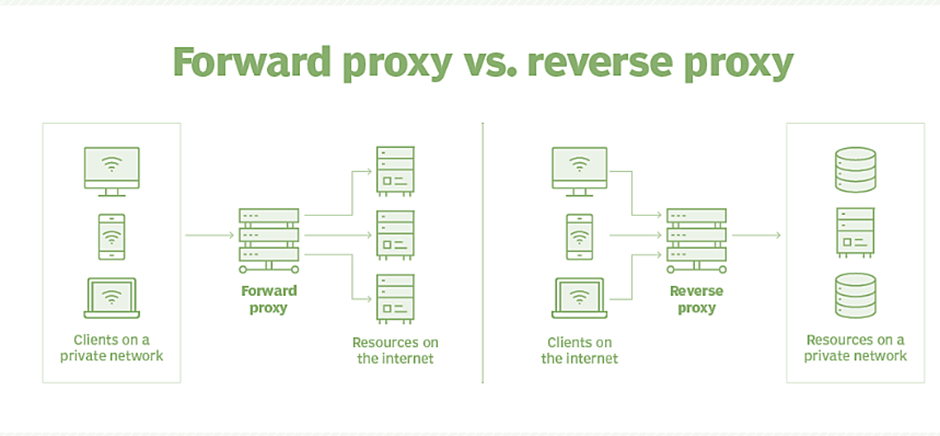
Nginx Web Server: Nginx is a high-performance, open-source web server and reverse proxy server. It excels in serving static content, load balancing, and handling concurrent connections efficiently. Nginx is often used as a front-end proxy server to route requests to backend servers like Node.js or PHP, making it a critical component for optimizing web application performance and security.
Why might someone choose to use Nginx over another web server software ?
Main reasons:
- Nginx is known for its performance and efficiency. It can handle a large number of concurrent connections and has a small memory footprint, which makes it a good choice for high-traffic websites.
- Nginx is also highly scalable. It can be easily configured to handle a large amount of traffic, and it can be easily scaled up or down as needed.
- Nginx is also very versatile. It can be used as a reverse proxy, load balancer, and HTTP cache, which makes it a good choice for a wide range of applications.
- Nginx is also easy to configure and maintain. Its configuration files are simple and straightforward, which makes it easy to manage even for users who are not experienced with web server software.
Prerequisites
- One Ubuntu 22.04 server set up by following the Initial Server Setup Guide for Ubuntu 22.04, including a non-root user with sudo privileges and a firewall configured with ufw.
- A fully registered domain name. This tutorial uses your_domain throughout. You can purchase a domain name on GoDaddy.com, or use the domain registrar of your choice.
- An A record with your_domain pointing to your server’s public IP address.
- Nginx set up by following the How To Install Nginx on Ubuntu 22.04 LTS tutorial, including a server block for your domain.
Steps for Installation of Nginx on Ubuntu 22.04 LTS
Step#1:Install Nginx on Ubuntu 22.04 LTS
To install Nginx, use following command:
sudo apt update

sudo apt install nginx-y

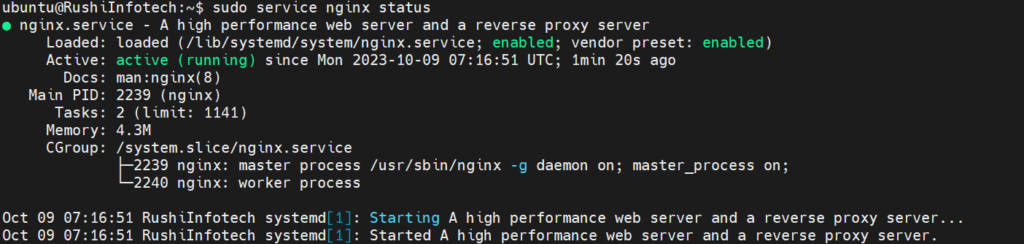
Step#2:Checking your Nginx Web Server
At the end of the installation process, Ubuntu 20.04 starts Nginx. The web server should already be up and running.
Now, we will check whether it is active running or not to check this simply type command:
sudo service status nginx
After installing it, you already have everything you need.
You can point your browser to your server IP address. You should see this page:
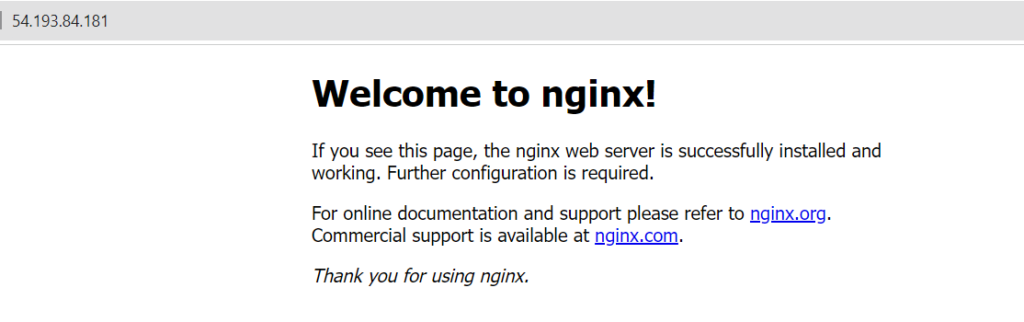
If you see this page, you have successfully installed Nginx on your web server.
Step#4:Creating our own website on Nginx Server
Default page is placed in /var/www/html/ location. You can place your static pages here, or use virtual host and place it other location.
Virtual host is a method of hosting multiple domain names on the same server.
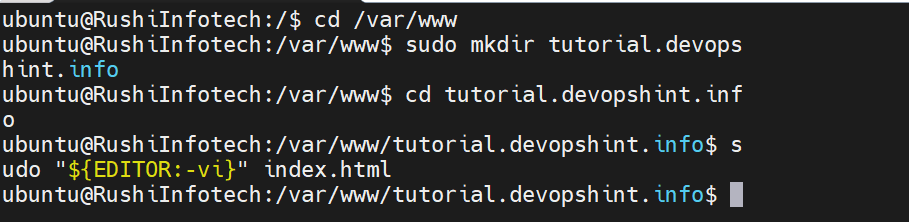
Let’s create simple HTML page in /var/www/tutorial.devopshint.info/ (it can be anything you want). Create index.html file in this location.
cd /var/www
sudo mkdir tutorial.devopshint.info
cd tutorial.devopshint.info
sudo "${EDITOR:-vi}" index.html
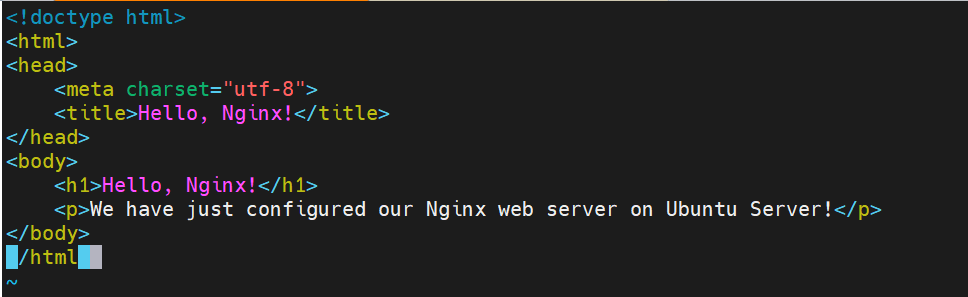
Paste the following to the index.html file:
<!doctype html>
<html>
<head>
    <meta charset="utf-8">
    <title>Hello, Nginx!</title>
</head>
<body>
    <h1>Hello, Nginx!</h1>
    <p>We have just configured our Nginx web server on Ubuntu Server!</p>
</body>
</html>
Save this file. In next step we are going to set up virtual host to make Nginx use pages from this location.
Step#5:Setting up a Server Block(Virtual Host) on Nginx Server
To set up virtual host, we need to create file in /etc/nginx/sites-available/ directory.
For this tutorial, we will make our site available on 80 port.You can change it if you would like to
cd /etc/nginx/sites-available
sudo nano tutorial.devopshint.info
server {
       listen 80;
       listen [::]:80;

       server_name tutorial.devopshint.info;

       root /var/www/tutorial.devopshint.info;
       index index.html;

       location / {
               try_files $uri $uri/ =404;
       }
}
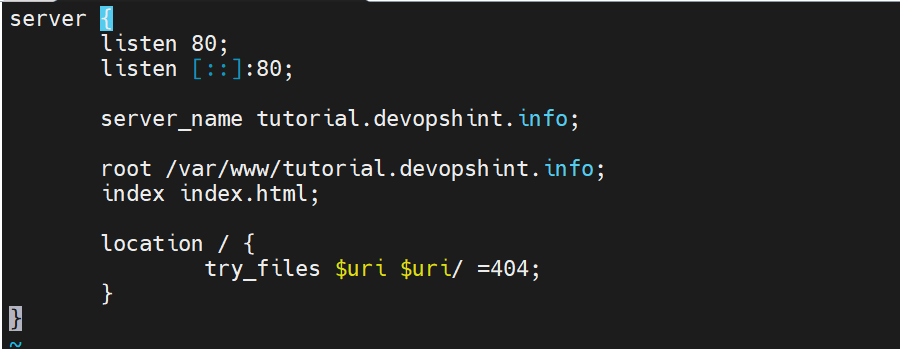
root is a directory where we have placed our .html file. index is used to specify file available when visiting root directory of site. server_name can be anything you want, because you aren’t pointing it to any real domain by now.
Next, let’s enable the file by creating a link from it to the sites-enabled directory, which Nginx reads from during startup:
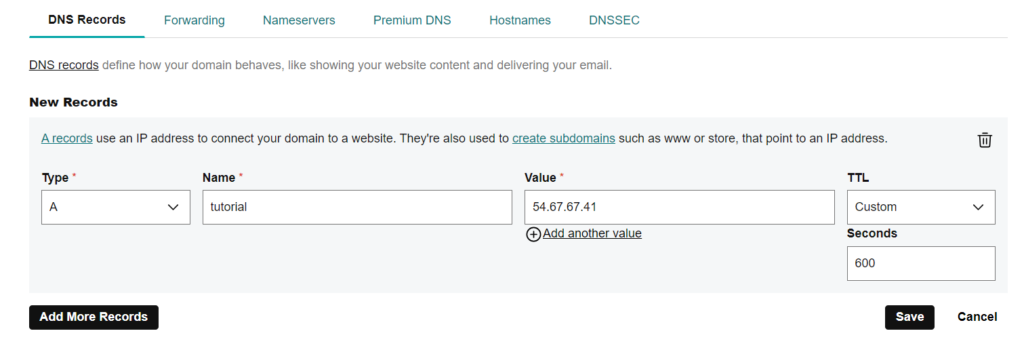
sudo ln -s /etc/nginx/sites-available/tutorial.devopshint.info /etc/nginx/sites-enabled/step#6:Add DNS record on godaddy
Step#7:Activating virtual host and testing results
To make our site working, simply restart Nginx service.
sudo service nginx restart

Let’s check if everything works as it should. Open our newly created site in web browser. Remember that we used :80 port.
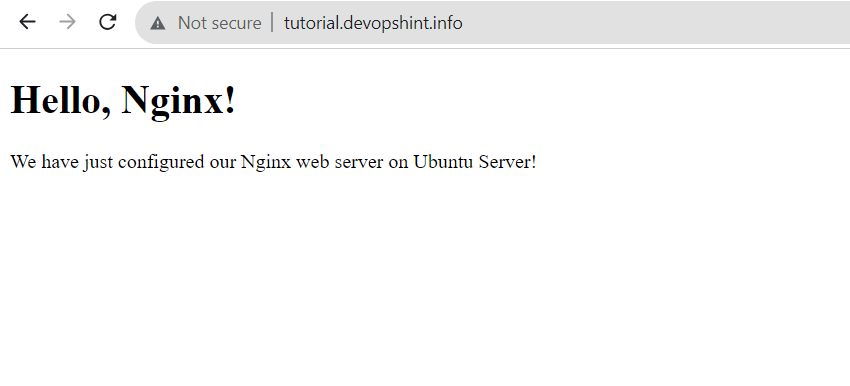
Congratulations! Everything works as it should. We have just configured Nginx web server.
Steps for Installing Grafana on Nginx Server
Step#1:Install Grafana on Ubuntu 22.04 LTS
In the initial phase, your focus will be on deploying Grafana on your Ubuntu 22.04 server. There are two primary approaches for installation – direct download from the official website or utilizing an APT repository.
wget -q -O - https://packages.grafana.com/gpg.key | sudo apt-key add -

Next, add the Grafana repository to your APT sources:
sudo add-apt-repository "deb https://packages.grafana.com/oss/deb stable main"
Refresh your APT cache to update your package lists:
sudo apt update
You can now proceed with the installation:
sudo apt install grafanaOnce Grafana is installed, use systemctl to start the Grafana server:
sudo systemctl start grafana-serverNext, verify that Grafana is running by checking the service’s status:
sudo systemctl status grafana-server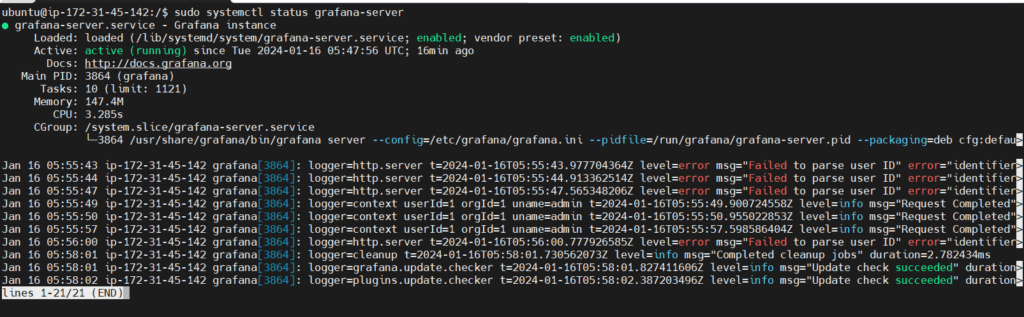
Lastly, enable the service to automatically start Grafana on boot:
sudo systemctl enable grafana-server
Step#2:Setting Up the Reverse Proxy
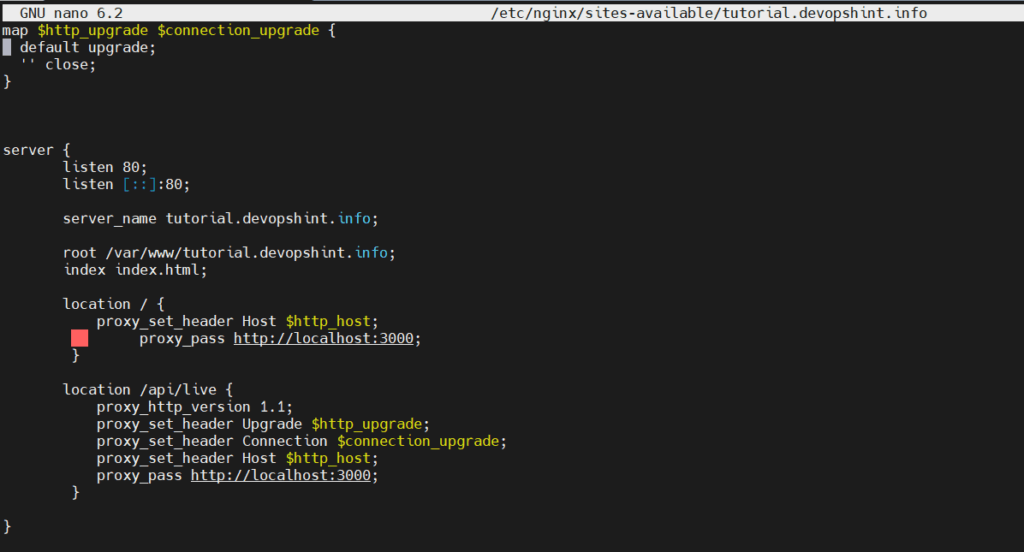
Open the Nginx configuration file you created when you set up the Nginx server block with Let’s Encrypt in the Prerequisites. You can use any text editor, but for this tutorial we’ll use nano:
sudo nano /etc/nginx/sites-available/tutorial.devopshint.info/etc/nginx/sites-available/tutorial.devopshint.info
map $http_upgrade $connection_upgrade {
  default upgrade;
  '' close;
}

server {
       listen 80;
       listen [::]:80;

       server_name tutorial.devopshint.info;

       root /var/www/tutorial.devopshint.info;
       index index.html;

       location / {
           proxy_set_header Host $http_host;
                proxy_pass http://localhost:3000;
        }

       location /api/live {
           proxy_http_version 1.1;
           proxy_set_header Upgrade $http_upgrade;
           proxy_set_header Connection $connection_upgrade;
           proxy_set_header Host $http_host;
           proxy_pass http://localhost:3000;
        }

}
Once you’re done, save and close the file by pressing CTRL+X, Y, and then ENTER if you’re using nano.
Now, test the new settings to make sure everything is configured correctly:
sudo nginx -t
You will receive the following output:
Outputnginx: the configuration file /etc/nginx/nginx.conf syntax is ok
nginx: configuration file /etc/nginx/nginx.conf test is successful
Finally, activate the changes by reloading Nginx:
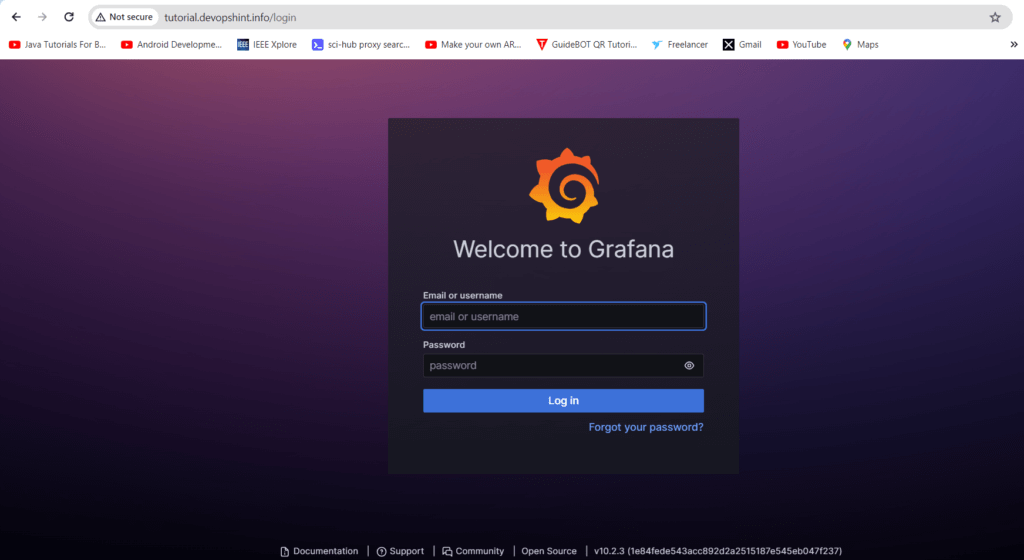
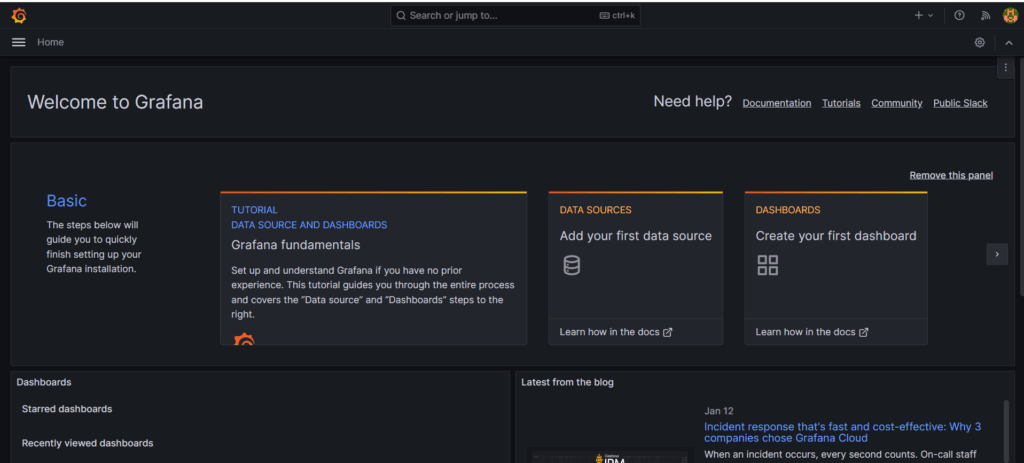
sudo systemctl reload nginxYou can now access the default Grafana login screen by pointing your web browser to https://your_domain. If you’re unable to reach Grafana, verify that your firewall is set to allow traffic on port 443 and then re-trace the previous instructions.
Step#3:Access Grafana Login Page
Access the grafana login page by entering http://your_domain_name on web browser url.
http://your_domain_name
Secure Domain on Nginx with Certbot
Let’s Encrypt is a Certificate Authority (CA) that provides an easy way to obtain and install free TLS/SSL certificates, thereby enabling encrypted HTTPS on web servers. It simplifies the process by providing a software client, Certbot, that attempts to automate most (if not all) of the required steps. Currently, the entire process of obtaining and installing a certificate is fully automated on both Apache and Nginx.
Steps for Securing Domian on Nginx with Lets’s Encrypt
Step#1:Installing Certbot on Ubuntu
The first step to using Let’s Encrypt to obtain an SSL certificate is to install the Certbot software on your server.
Install Certbot and it’s Nginx plugin with apt:
sudo apt install certbot python3-certbot-nginxStep#2:Confirming Nginx’s Configuration
Certbot needs to be able to find the correct server block in your Nginx configuration for it to be able to automatically configure SSL. Specifically, it does this by looking for a server_name directive that matches the domain you request a certificate for.
To check, open the configuration file for your domain using nano or your favorite text editor:
sudo nano /etc/nginx/sites-available/tutorial.devopshint.infoIf it doesn’t, update it to match. Then save the file, quit your editor, and verify the syntax of your configuration edits:
sudo nginx -t
If you get an error, reopen the server block file and check for any typos or missing characters. Once your configuration file’s syntax is correct, reload Nginx to load the new configuration:
sudo systemctl reload nginxCertbot can now find the correct server block and update it automatically.
Next, let’s update the firewall to allow HTTPS traffic.
Step#3:Allowing HTTPS Through the Firewall
If you have the ufw firewall enabled, as recommended by the prerequisite guides, you’ll need to adjust the settings to allow for HTTPS traffic. Luckily, Nginx registers a few profiles with ufw upon installation.
You can see the current setting by typing:
sudo ufw status
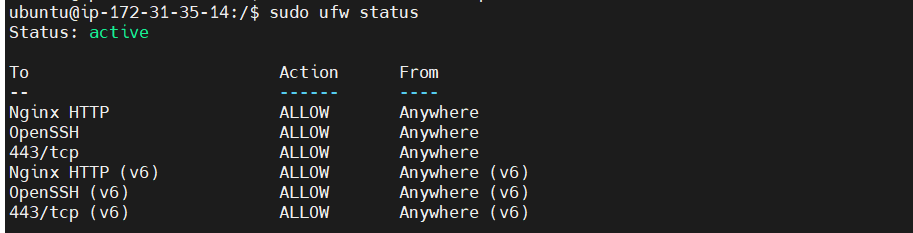
sudo ufw enable
sudo ufw allow 'Nginx Full'
sudo ufw allow "OpenSSH'
sudo ufw allow 443/tcp
Step#4:Obtaining an SSL Certificate
Certbot provides a variety of ways to obtain SSL certificates through plugins. The Nginx plugin will take care of reconfiguring Nginx and reloading the config whenever necessary. To use this plugin, type the following:
sudo certbot --nginx -d tutorial.devopshint.info -d tutorial.devopshint.info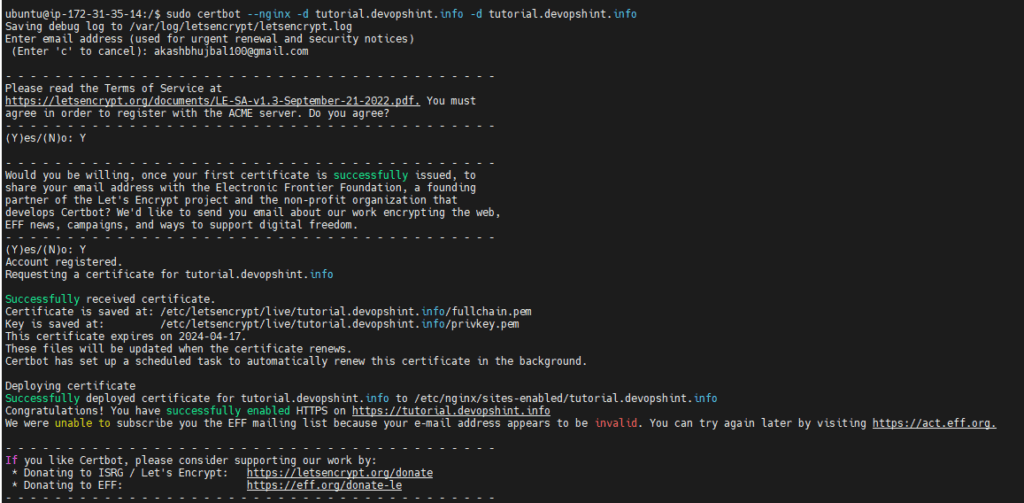
Step#5:Verifying Certbot Auto-Renewal
Let’s Encrypt’s certificates are only valid for ninety days. This is to encourage users to automate their certificate renewal process. The certbot package we installed takes care of this for us by adding a systemd timer that will run twice a day and automatically renew any certificate that’s within thirty days of expiration.
You can query the status of the timer with systemctl:
sudo systemctl status certbot.timer
To test the renewal process, you can do a dry run with certbot:
sudo certbot renew --dry-runIf you see no errors, you’re all set. When necessary, Certbot will renew your certificates and reload Nginx to pick up the changes. If the automated renewal process ever fails, Let’s Encrypt will send a message to the email you specified, warning you when your certificate is about to expire.
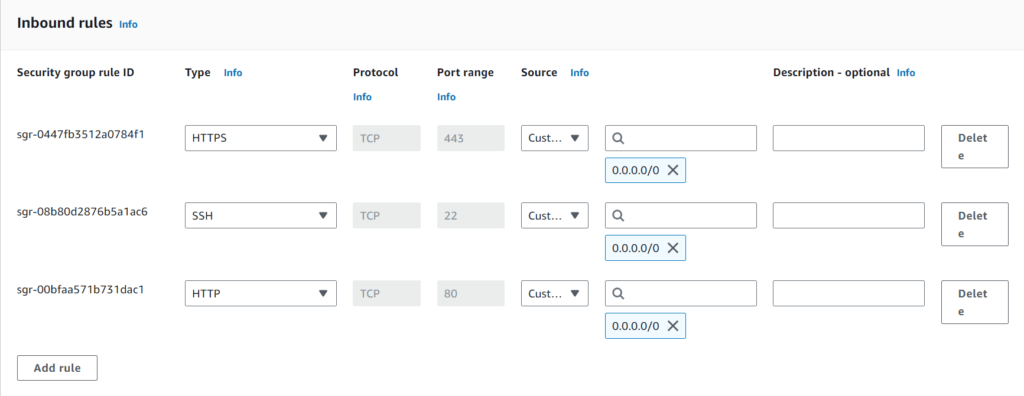
Step#6:Update the Security Inbound Rules
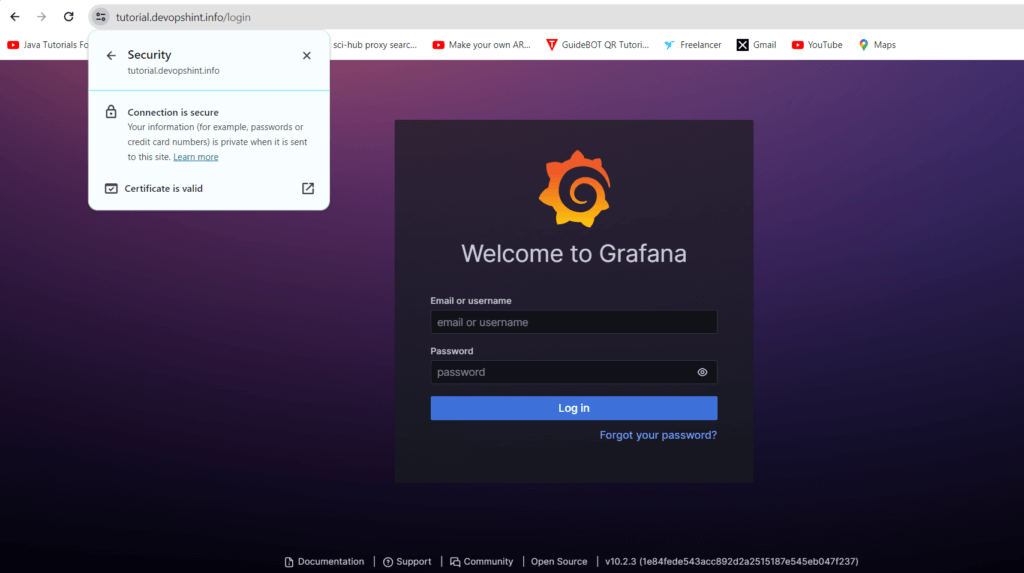
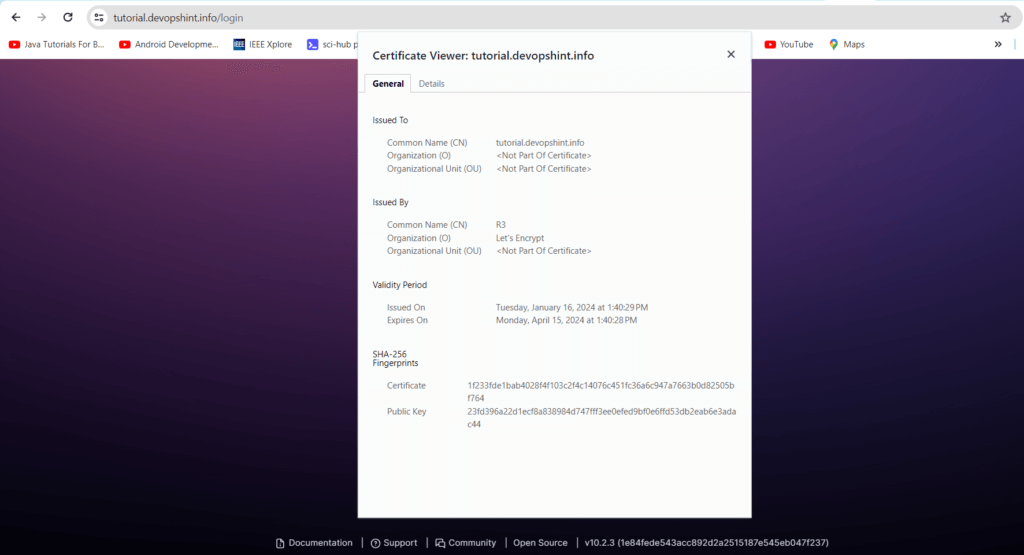
Step#7:Check Your Domain SSL Let’s Encrypt Certificate on Browser
Conclusion:
In conclusion, this tutorial empowers you to efficiently deploy and secure Grafana on Ubuntu 22.04 LTS using Nginx. By following these steps, you enhance your monitoring capabilities with Grafana while ensuring a robust and secure environment, combining effective data visualization with Nginx’s added layer of protection.
Related Articles:
How to Install Prometheus on Ubuntu 22.04 LTS
Reference: