In this article, we’ll provide a step-by-step tutorial for setting up an AWS VPC Transit Gateway with multiple VPCs within the same region, facilitating seamless network connectivity management.

Table of Contents
Prerequisites
Before you begin, ensure you have the following:
- An AWS account with the necessary permissions to create and manage VPC resources.
- Knowledge of AWS VPC concepts such as VPCs, subnets, route tables, and security groups.
- Familiarity with AWS IAM roles and policies.
What is AWS VPC?
AWS VPC (Virtual Private Cloud) is a service that lets you create a private network in the AWS cloud, isolated from other networks. It allows you to define your virtual network environment, including IP addresses, subnets, routing tables, and network gateways, giving you control over network configuration and security.
What is AWS Transit Gateway?
AWS Transit Gateway is a service that simplifies network connectivity for multiple Amazon Virtual Private Clouds (VPCs) and on-premises networks. It acts as a hub that allows you to connect VPCs and VPN connections, enabling centralized management of network routing and traffic between these resources. This simplifies network architecture, improves scalability, and reduces operational complexity by providing a single gateway for routing traffic across multiple networks.
Example:
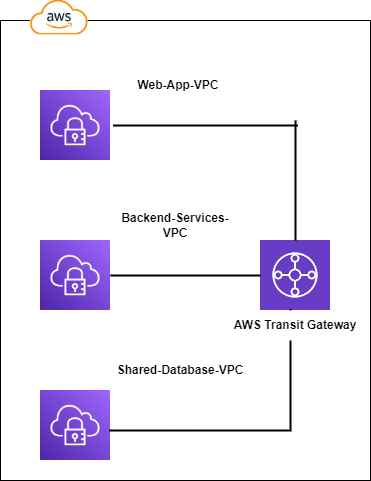
- VPC 1: This VPC hosts a web application that needs to communicate with backend services in VPC 2 and also needs access to a shared database in VPC 3.
- VPC 2: This VPC contains backend services such as application servers, databases, and message queues that support the web application in VPC 1.
- VPC 3: This VPC hosts a shared database that is used by multiple applications and services, including the web application in VPC 1.
Using AWS Transit Gateway:
- You deploy an AWS Transit Gateway in Region A.
- You attach all three VPCs (VPC 1, VPC 2, and VPC 3) to the Transit Gateway.
- You configure route tables in the Transit Gateway to allow communication between these VPCs.
- The web application in VPC 1 can now securely communicate with backend services in VPC 2 through the Transit Gateway without requiring direct peering connections.
- Similarly, the web application can access the shared database in VPC 3 via the Transit Gateway.
- You can also connect on-premises networks or other VPCs from different regions to the Transit Gateway, enabling centralized network connectivity management.
This setup simplifies network architecture, reduces the number of peering connections, and provides a scalable and centralized solution for managing network traffic between multiple VPCs and external networks.
Benefits of using AWS VPC Transit Gateway
- Centralized Traffic Management: Transit Gateway acts as a central hub, simplifying route updates and management compared to managing individual VPC peering connections.
- Improved Scalability: Easily connect multiple VPCs to the Transit Gateway, enabling communication across complex network architectures without cumbersome peering configurations.
- Enhanced Security: Manage security policies at the Transit Gateway level, providing a central point to control allowed communication flows between attached VPCs.
- Simplified Route Management: Transit Gateway automates traffic routing between VPCs, reducing the need for manual route table updates in each peered VPC.
Uses Cases for AWS VPC Transit Gateway
- Manage Many VPCs Easily: Connect numerous VPCs to a central hub, simplifying communication and ditching complex peering setups.
- Secure Shared Services: Create a central VPC with resources like databases, accessible by other VPCs through the Transit Gateway for secure sharing.
- Centralized Security: Define communication policies between VPCs at the Transit Gateway level, boosting overall network security.
- Connect Across Regions (Optional): Link VPCs in different regions for geographically distributed applications where resources can communicate seamlessly.
- Hybrid Cloud Integration: Connect VPCs to on-premises resources using Transit Gateway with AWS Direct Connect or VPNs, enabling a secure hybrid cloud environment.
Best practices for configuring AWS VPC Transit Gateway
- Separate Subnet for Attachment: Use a dedicated subnet within each VPC for the Transit Gateway attachment. This subnet should reside in a different Availability Zone than your application subnets for redundancy.
- Shared Network ACL: Create a single Network Access Control List (ACL) and associate it with all subnets used for Transit Gateway attachments across your VPCs. This simplifies management and ensures consistent security policies for inter-VPC traffic.
- Route Table Consistency: Ideally, use the same route table for all subnets attached to the Transit Gateway within a VPC (unless your network design requires separate route tables). This reduces complexity and ensures consistent routing behavior.
- BGP for Connectivity: When attaching VPCs or AWS Direct Connect gateways to the Transit Gateway, enable Border Gateway Protocol (BGP). BGP is a dynamic routing protocol that automatically adjusts traffic flow based on network conditions.
- Route Propagation: Ensure route propagation is enabled for both BGP Site-to-Site VPN connections and AWS Direct Connect gateway attachments. This allows the Transit Gateway to automatically learn about routes from these connections and advertise them to attached VPCs.
Steps for Setting Up AWS VPC Transit Gateway
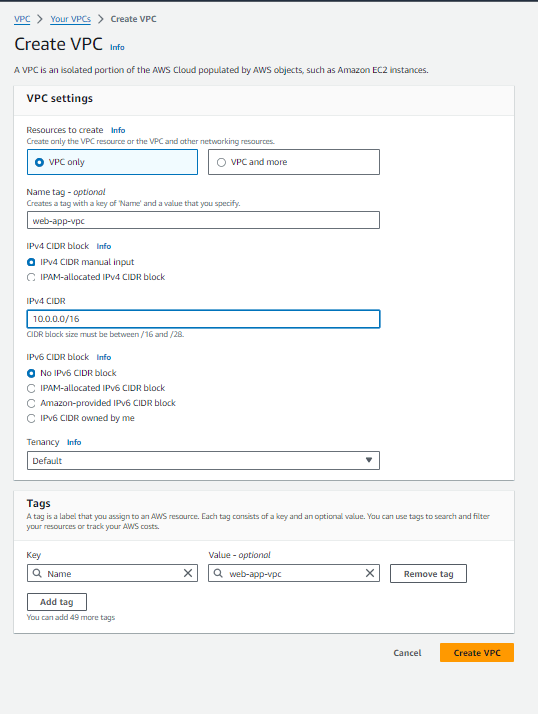
Step#1:Create Web App VPC in Mumbai Region
This step involves creating a Virtual Private Cloud (VPC) in the AWS Mumbai region. You’ll name it “web-app-vpc” and configure it with an IPv4 CIDR block of 10.0.0.0/16.
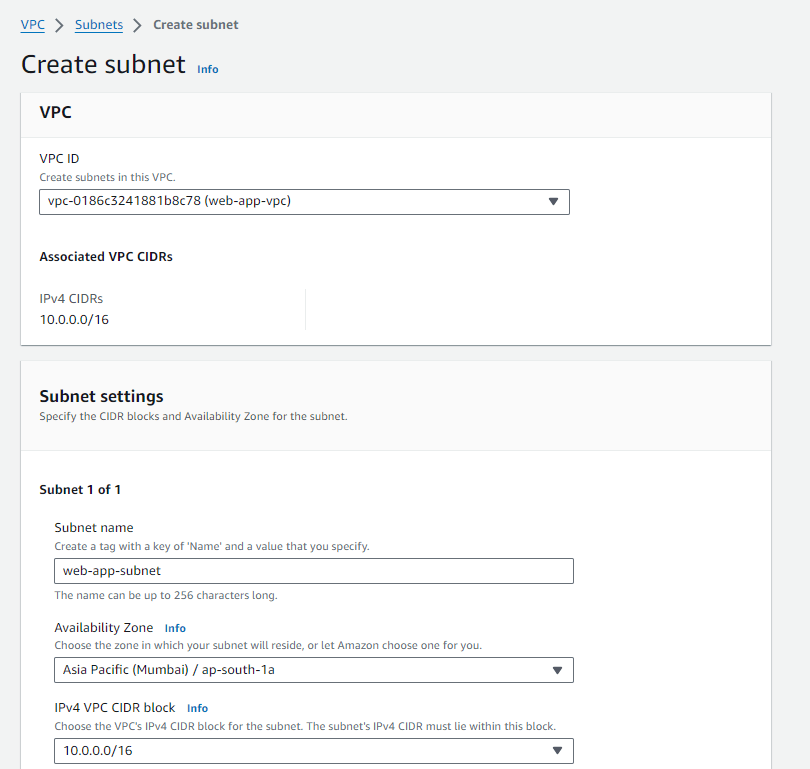
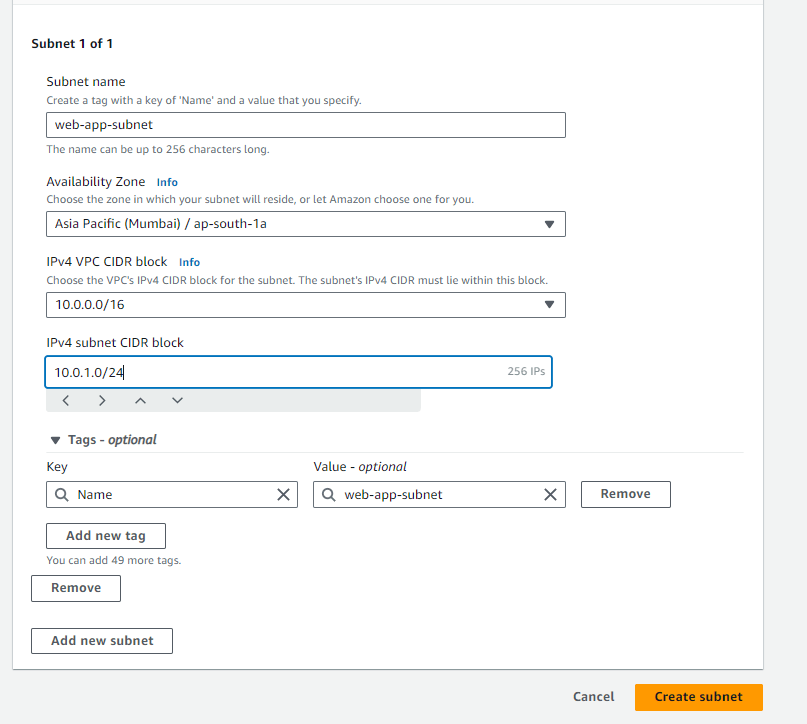
To create a subnet within our VPC ‘web-app-subnet’ in the Mumbai region (ap-south-1a), follow these steps:
- Name of the Subnet: web-app-subnet
- VPC Name:web-app-vpc
- Availability Zone: ap-south-1a
- IPv4 CIDR Block: 10.0.0.0/16
- VPC CIDR Block: 10.0.1.0/24″
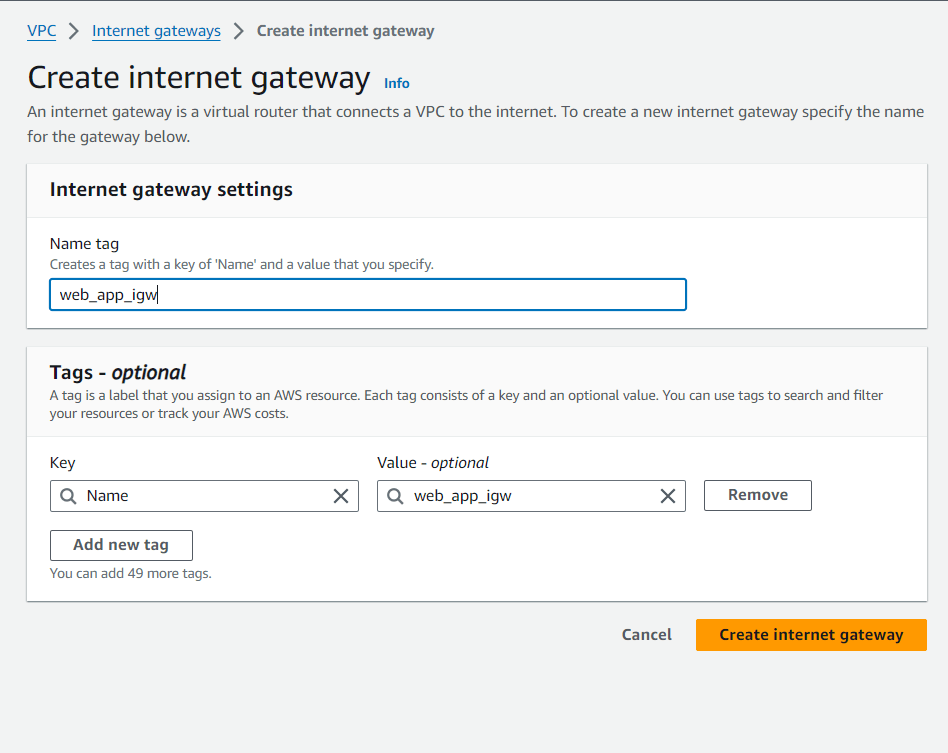
To enable internet connectivity for our VPC ‘web-app-vpc’ in the Mumbai region, follow these steps:
- Select ‘Internet Gateway‘ from the VPC dashboard and click on ‘Create Internet Gateway‘.
- Enter the following details:
- Name:
- Click on ‘Create Internet Gateway’.
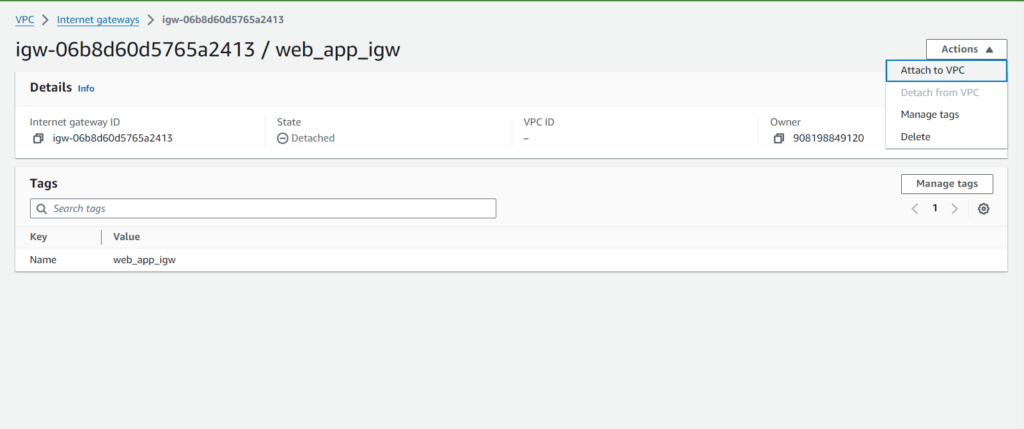
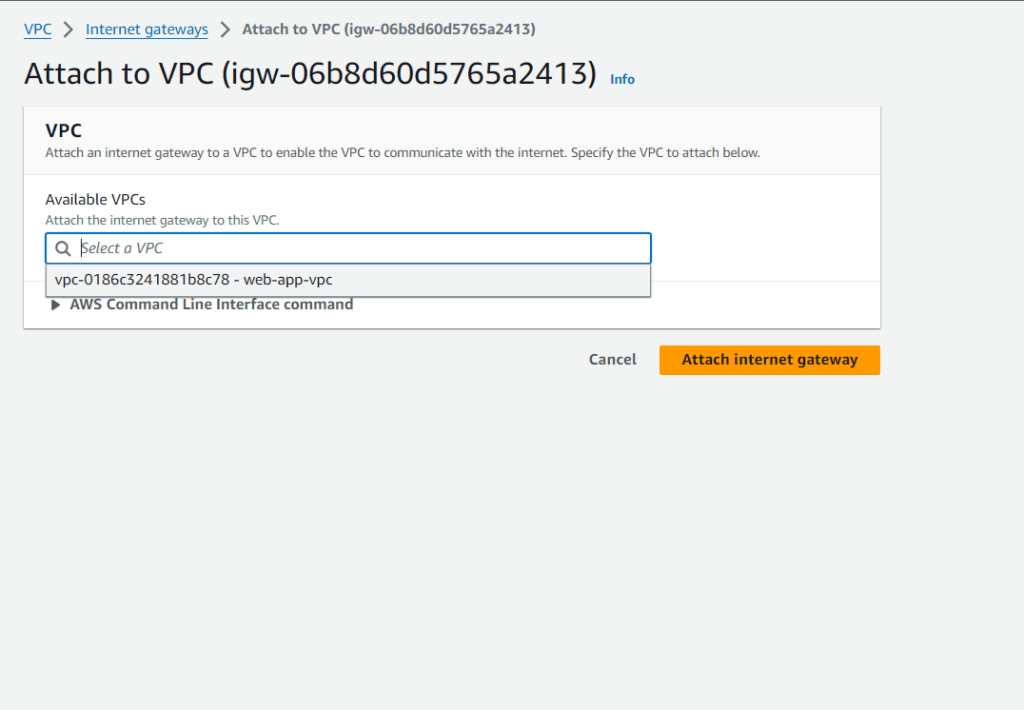
- Next, attach the Internet Gateway to the VPC:
- Select the Internet Gateway ‘web_app_igw‘.
- Click on ‘Actions’ and choose ‘Attach to VPC‘.
- Select ‘web_app_igw‘ as the VPC to attach the Internet Gateway to.
- Confirm the attachment.
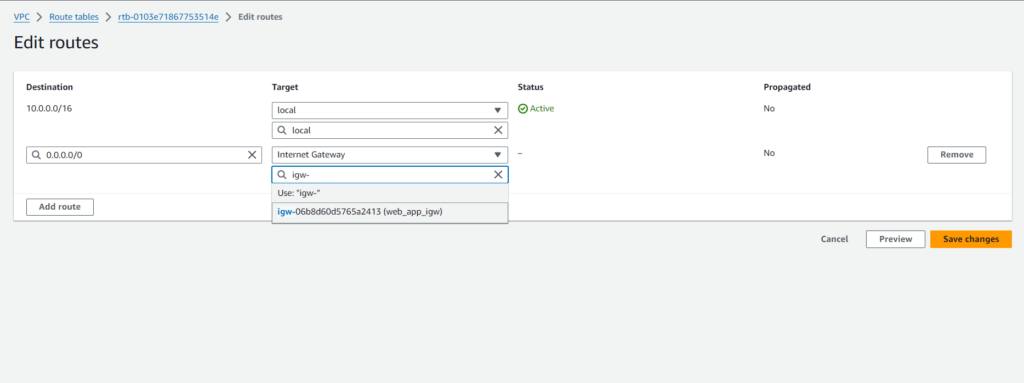
To manage routing within our VPC ‘web-app-vpc‘ in the Mumbai region, let’s configure a route table:
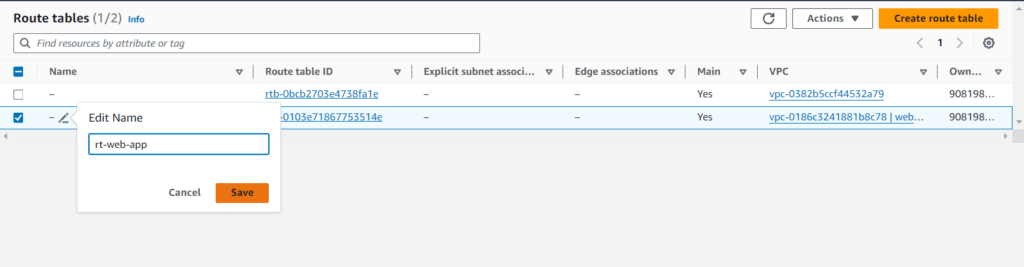
Now, let’s edit the routes in the route table to direct traffic:
- Select the route table ‘rt-web-app‘.
- Click on ‘Routes‘ tab.
- Click on ‘Edit routes‘.
- Add a new route with the following details:
- Destination: 0.0.0.0/0
- Target: Internet Gateway (select the Internet Gateway associated with your VPC).

Step#2:Create Backend Services VPC in Mumbai Region
This step involves creating a Virtual Private Cloud (VPC) in the AWS Mumbai region. You’ll name it “backend-services-vpc” and configure it with an IPv4 CIDR block of 11.0.0.0/16.

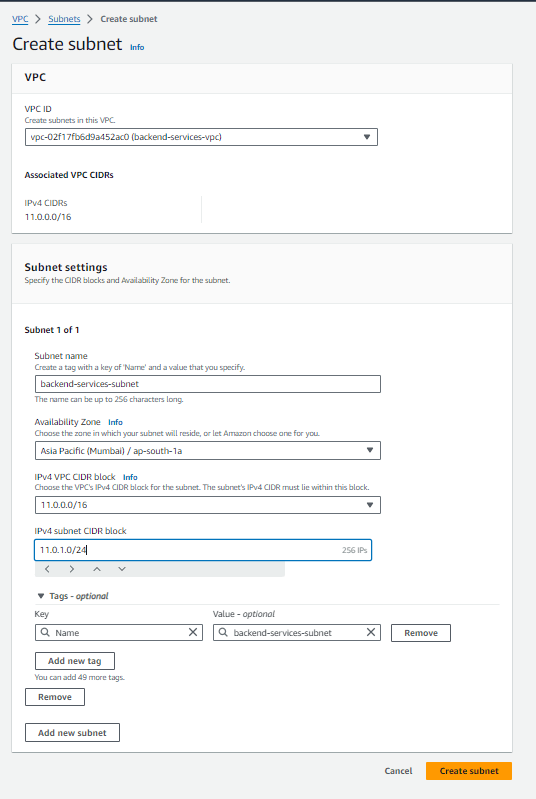
To create a subnet within our VPC ‘backend-services-subnet’ in the Mumbai region (ap-south-1a), follow these steps:
- Name of the Subnet: backend-services-subnet
- VPC Name:backend-services-vpc
- Availability Zone: ap-south-1a
- IPv4 CIDR Block: 11.0.0.0/16
- VPC CIDR Block: 11.0.1.0/24″
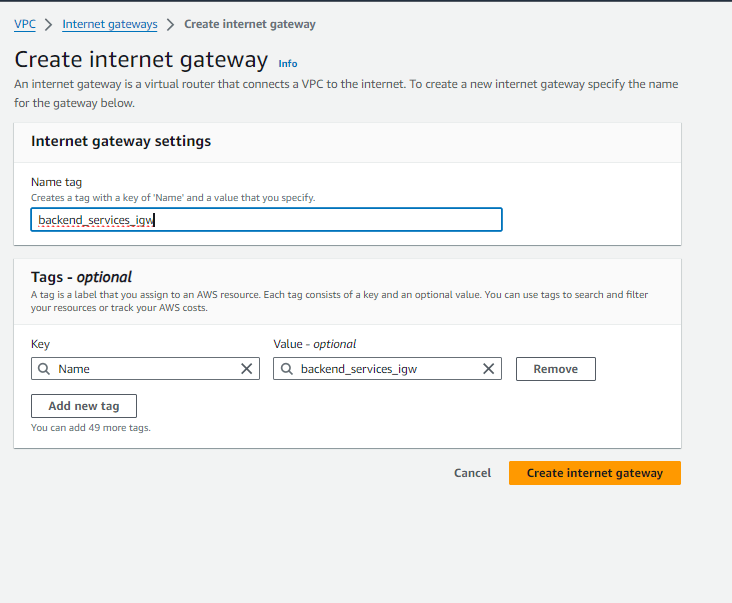
To enable internet connectivity for our VPC ‘backend-services-vpc’ in the Mumbai region, follow these steps:
- Select ‘Internet Gateway‘ from the VPC dashboard and click on ‘Create Internet Gateway‘.
- Enter the following details:
- Name:
- Click on ‘Create Internet Gateway’.
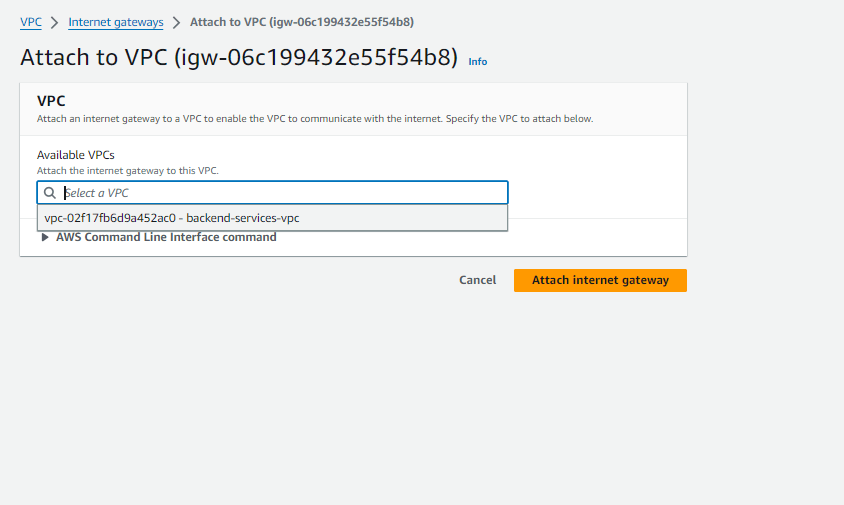
- Next, attach the Internet Gateway to the VPC:
- Select the Internet Gateway ‘backend_services_igw‘.
- Click on ‘Actions’ and choose ‘Attach to VPC‘.
- Select ‘backend_services_igw‘ as the VPC to attach the Internet Gateway to.
- Confirm the attachment.

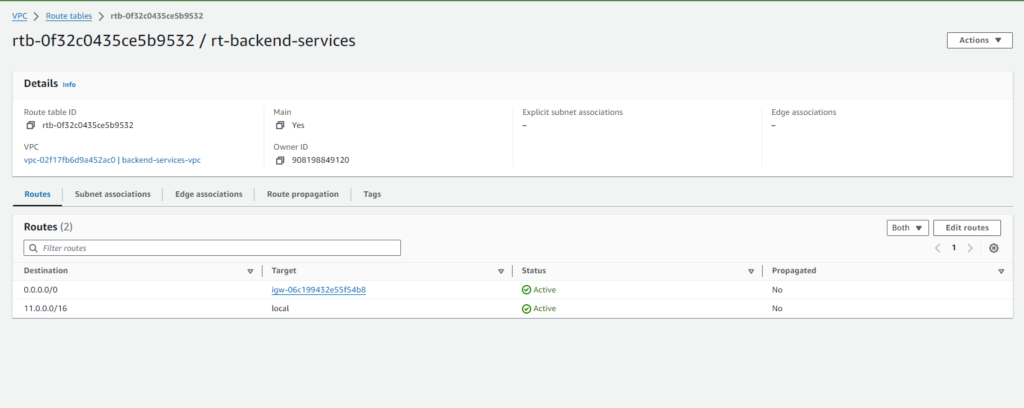
To manage routing within our VPC ‘backend-services-vpc‘ in the Mumbai region, let’s configure a route table:

Now, let’s edit the routes in the route table to direct traffic:
- Select the route table ‘rt-backend-services‘.
- Click on ‘Routes‘ tab.
- Click on ‘Edit routes‘.
- Add a new route with the following details:
- Destination: 0.0.0.0/0
- Target: Internet Gateway (select the Internet Gateway associated with your VPC).
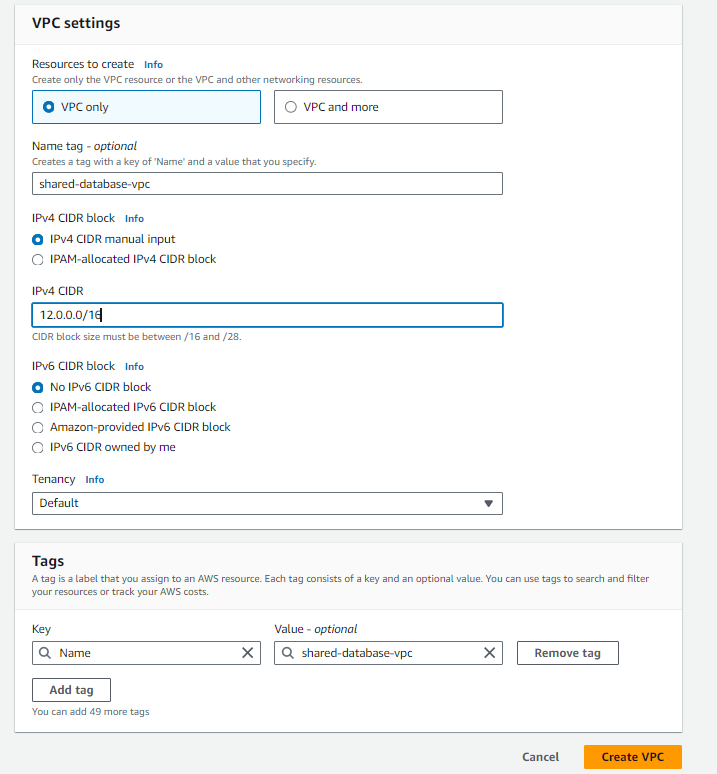
Step#3:Create Shared Database VPC in Mumbai Region
This step involves creating a Virtual Private Cloud (VPC) in the AWS Mumbai region. You’ll name it “shared-database-vpc” and configure it with an IPv4 CIDR block of 12.0.0.0/16.
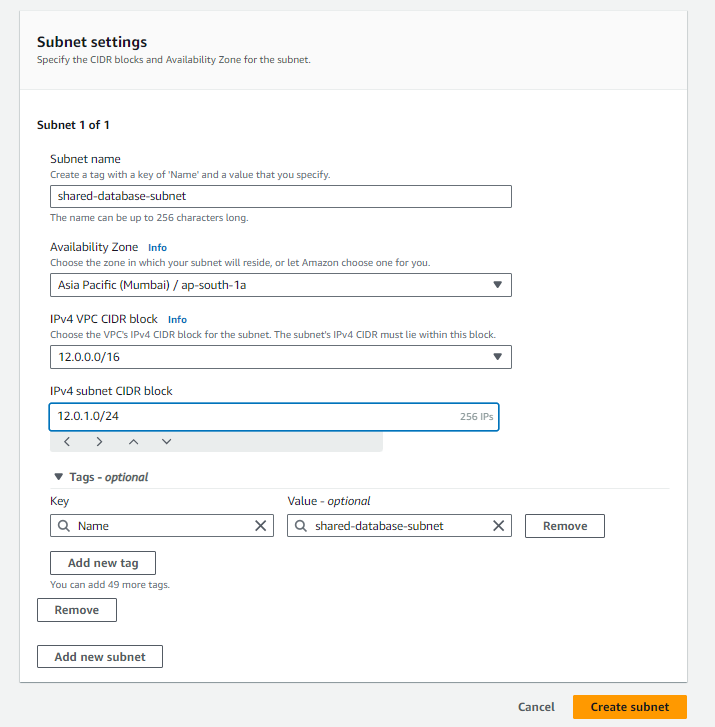
To create a subnet within our VPC ‘backend-services-subnet’ in the Mumbai region (ap-south-1a), follow these steps:
- Name of the Subnet: shared-database-subnet
- VPC Name:shared-database-vpc
- Availability Zone: ap-south-1a
- IPv4 CIDR Block: 12.0.0.0/16
- VPC CIDR Block: 12.0.1.0/24″
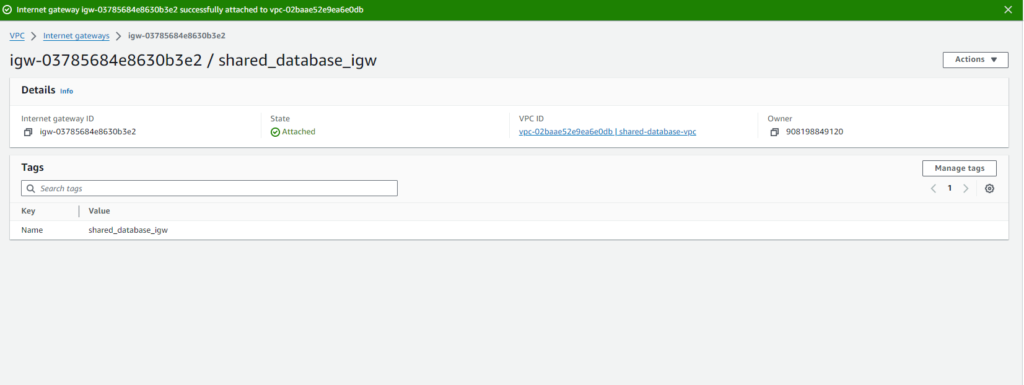
To enable internet connectivity for our VPC ‘backend-services-vpc’ in the Mumbai region, follow these steps:
- Select ‘Internet Gateway‘ from the VPC dashboard and click on ‘Create Internet Gateway‘.
- Enter the following details:
- Name:
- Click on ‘Create Internet Gateway’.
- Next, attach the Internet Gateway to the VPC:
- Select the Internet Gateway ‘shared_database_igw‘.
- Click on ‘Actions’ and choose ‘Attach to VPC‘.
- Select ‘shared_database_igw‘ as the VPC to attach the Internet Gateway to.
- Confirm the attachment.
To manage routing within our VPC ‘shared-database-vpc‘ in the Mumbai region, let’s configure a route table:
Now, let’s edit the routes in the route table to direct traffic:
- Select the route table ‘rt-shared-database‘.
- Click on ‘Routes‘ tab.
- Click on ‘Edit routes‘.
- Add a new route with the following details:
- Destination: 0.0.0.0/0
- Target: Internet Gateway (select the Internet Gateway associated with your VPC).

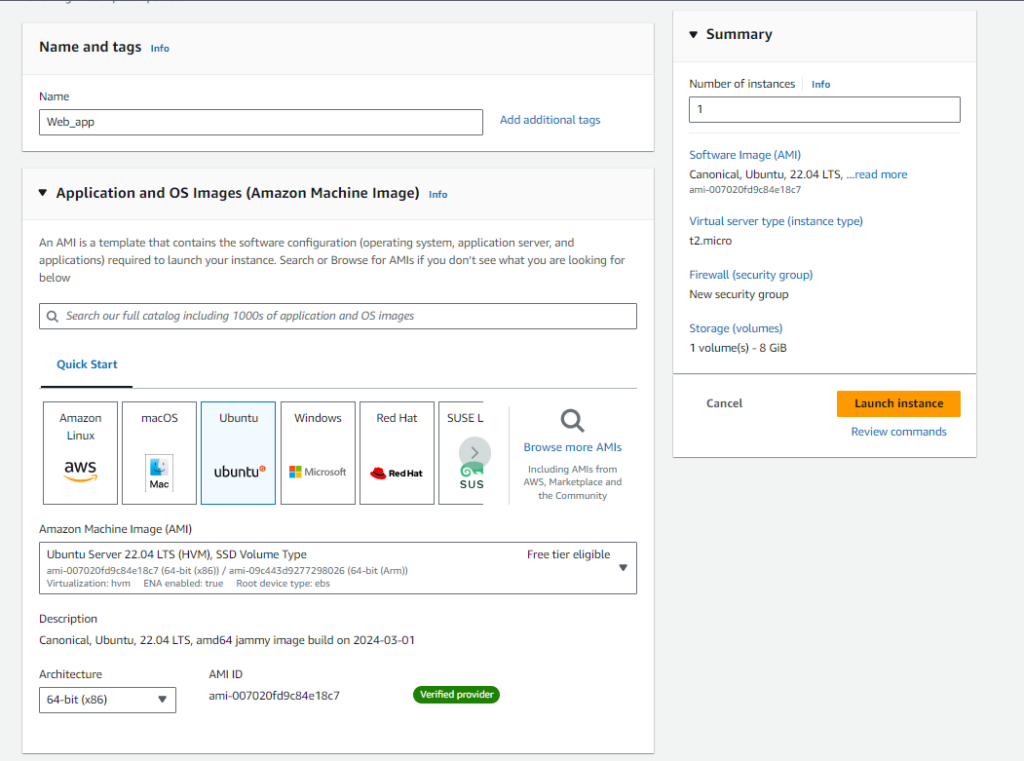
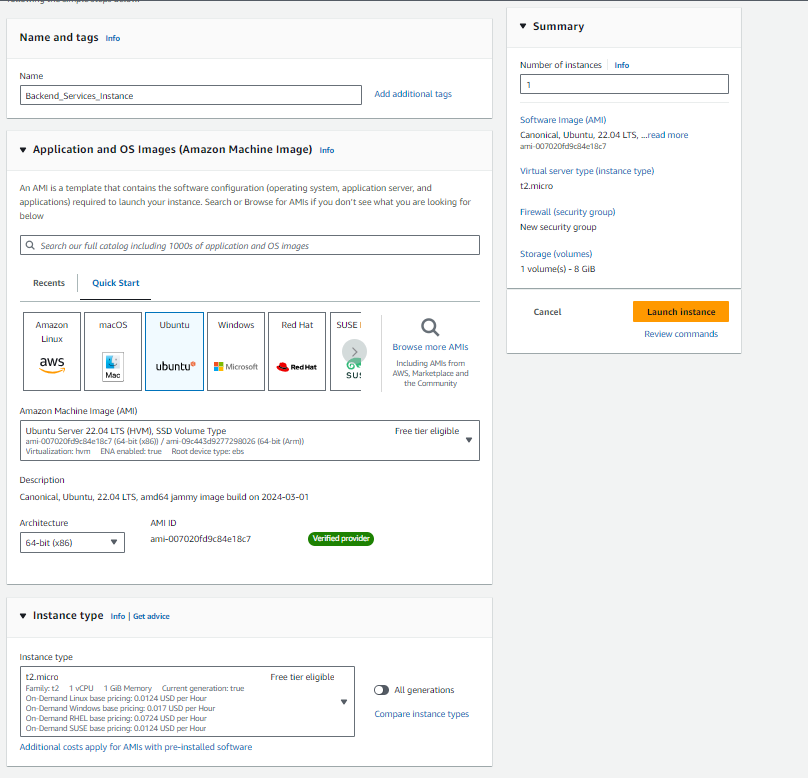
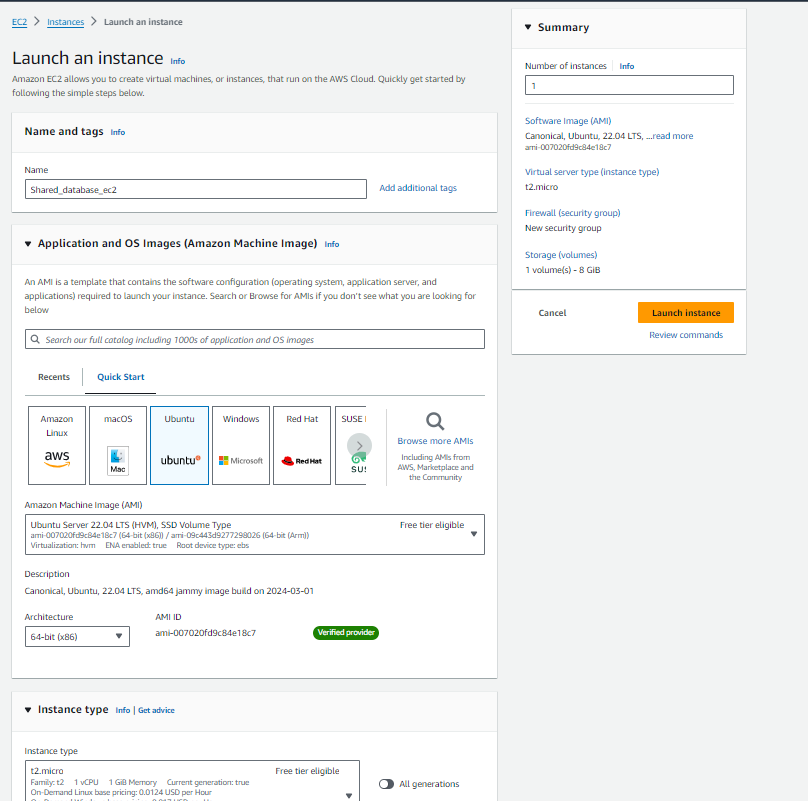
Step#4:Create EC2 Instances in each VPC
These are your virtual servers that will communicate across VPCs.
- Web-App-VPC
To deploy an EC2 instance in our VPC ‘web-app-vpc‘ with Ubuntu as the machine image and t2.micro as the instance type, follow these steps:
- Navigate to the EC2 dashboard and click on ‘Launch Instance’.
- Choose ‘Ubuntu‘ as the machine image and ‘t2.micro‘ as the instance type.
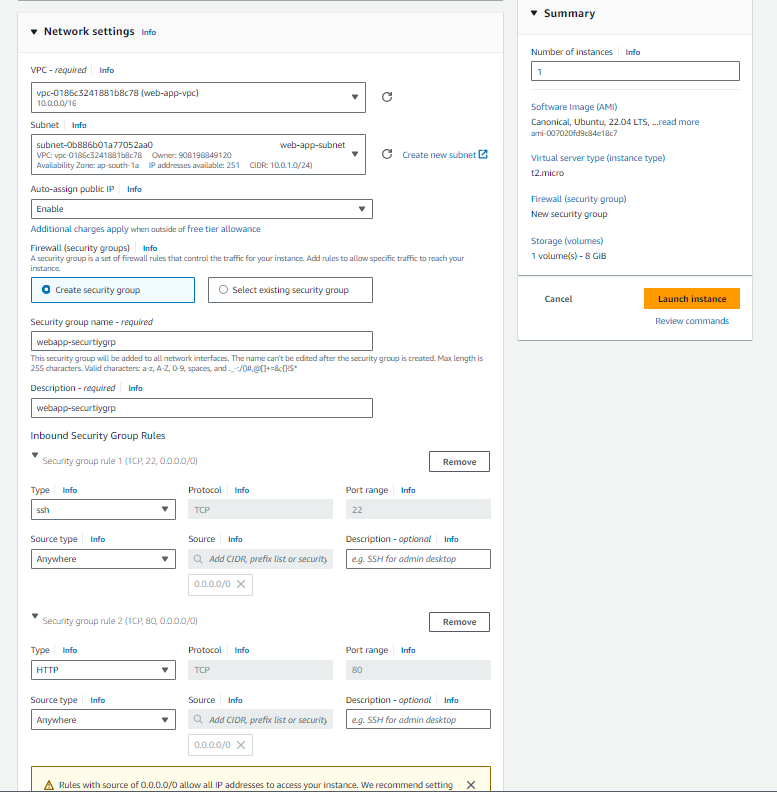
- Select ‘web-app-vpc‘ as the VPC for the instance.
- Enable ‘Auto-assign Public IP‘ for the instance.
- Create a key pair for SSH access.
- Create a security group named ‘webapp-securitygrp‘ with the description ‘webapp-securitygrp‘.
- Configure the security group with the following rules:
- SSH (port 22) from anywhere
- HTTP from anywhere
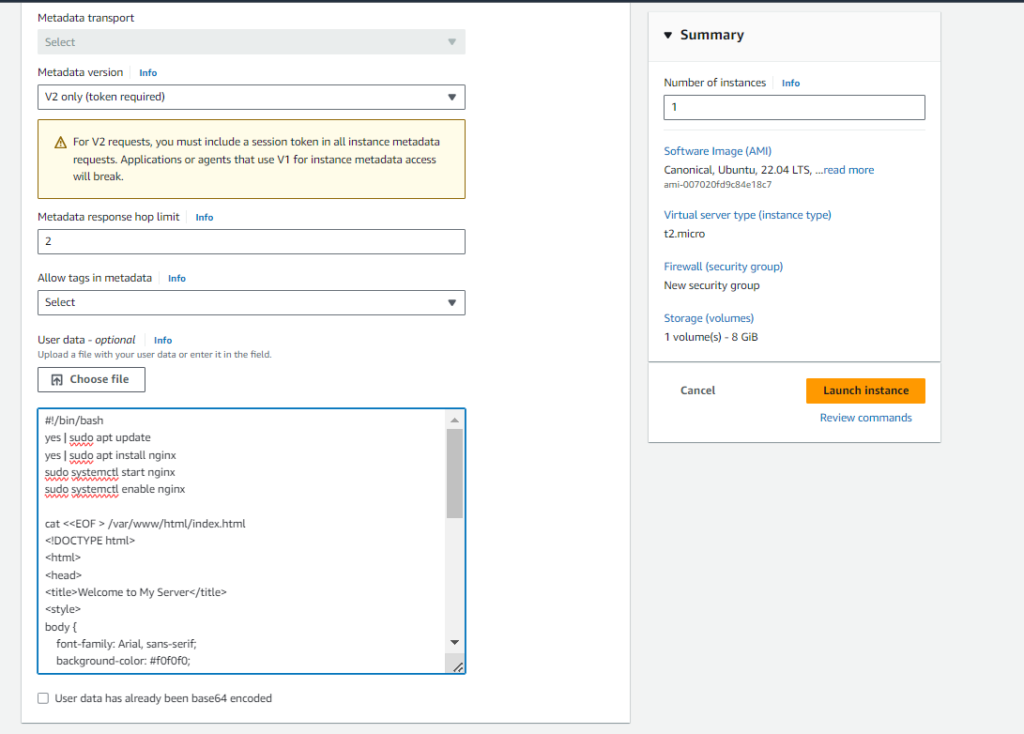
- Select Advance Settings and write below script in the User Data to Install Nginx on our Instance
#!/bin/bash
yes | sudo apt update
yes | sudo apt install nginx
sudo systemctl start nginx
sudo systemctl enable nginx
cat <<EOF > /var/www/html/index.html
<!DOCTYPE html>
<html>
<head>
<title>Welcome to My Server</title>
<style>
body {
font-family: Arial, sans-serif;
background-color: #f0f0f0;
}
.container {
max-width: 800px;
margin: 50px auto;
padding: 20px;
background-color: #fff;
border-radius: 5px;
box-shadow: 0px 0px 10px rgba(0, 0, 0, 0.1);
}
</style>
</head>
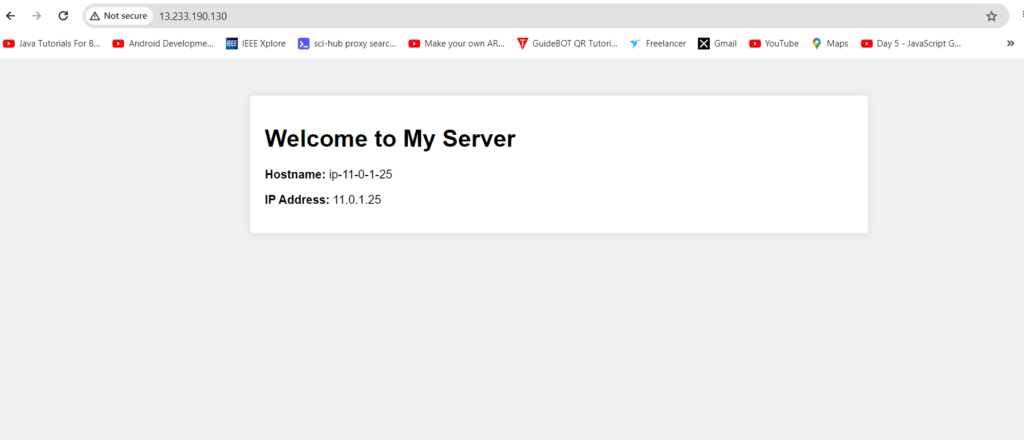
<body>
<div class="container">
<h1>Welcome to My Server</h1>
<p><strong>Hostname:</strong> $(hostname)</p>
<p><strong>IP Address:</strong> $(hostname -I | cut -d" " -f1)</p>
</div>
</body>
</html>
EOF

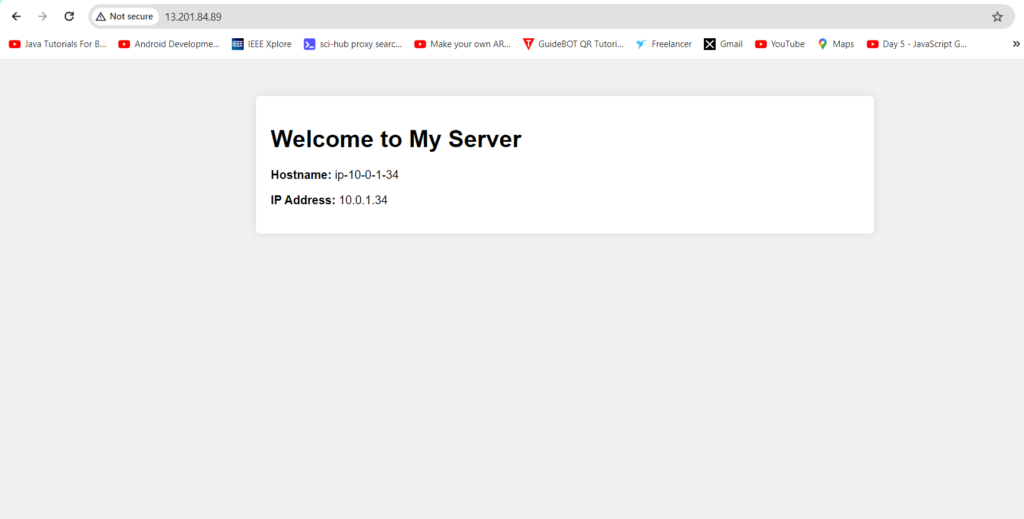
Proceed with launching the EC2 instance to set up the desired configuration for your environment.
- Backend-Services-VPC
To deploy an EC2 instance in our VPC ‘backend-services-vpc‘ with Ubuntu as the machine image and t2.micro as the instance type, follow these steps:
- Navigate to the EC2 dashboard and click on ‘Launch Instance’.
- Choose ‘Ubuntu‘ as the machine image and ‘t2.micro‘ as the instance type.
- Select ‘backend-services-vpc‘ as the VPC for the instance.
- Enable ‘Auto-assign Public IP‘ for the instance.
- Create a key pair for SSH access.
- Create a security group named ‘backendservices-securitygrp‘ with the description ‘backendservices-securitygrp‘.
- Configure the security group with the following rules:
- SSH (port 22) from anywhere
- HTTP from anywhere
- Select Advance Settings and write below script in the User Data to Install Nginx on our Instance
#!/bin/bash
yes | sudo apt update
yes | sudo apt install nginx
sudo systemctl start nginx
sudo systemctl enable nginx

cat <<EOF > /var/www/html/index.html
<!DOCTYPE html>
<html>
<head>
<title>Welcome to My Server</title>
<style>
body {
    font-family: Arial, sans-serif;
    background-color: #f0f0f0;
}
.container {
    max-width: 800px;
    margin: 50px auto;
    padding: 20px;
    background-color: #fff;
    border-radius: 5px;
    box-shadow: 0px 0px 10px rgba(0, 0, 0, 0.1);
}
</style>
</head>
<body>
<div class="container">
    <h1>Welcome to My Server</h1>
    <p><strong>Hostname:</strong> $(hostname)</p>
    <p><strong>IP Address:</strong> $(hostname -I | cut -d" " -f1)</p>
</div>
</body>
</html>
EOF
Enable Auto-assign Public Ip

Proceed with launching the EC2 instance
- Shared-Database-VPC
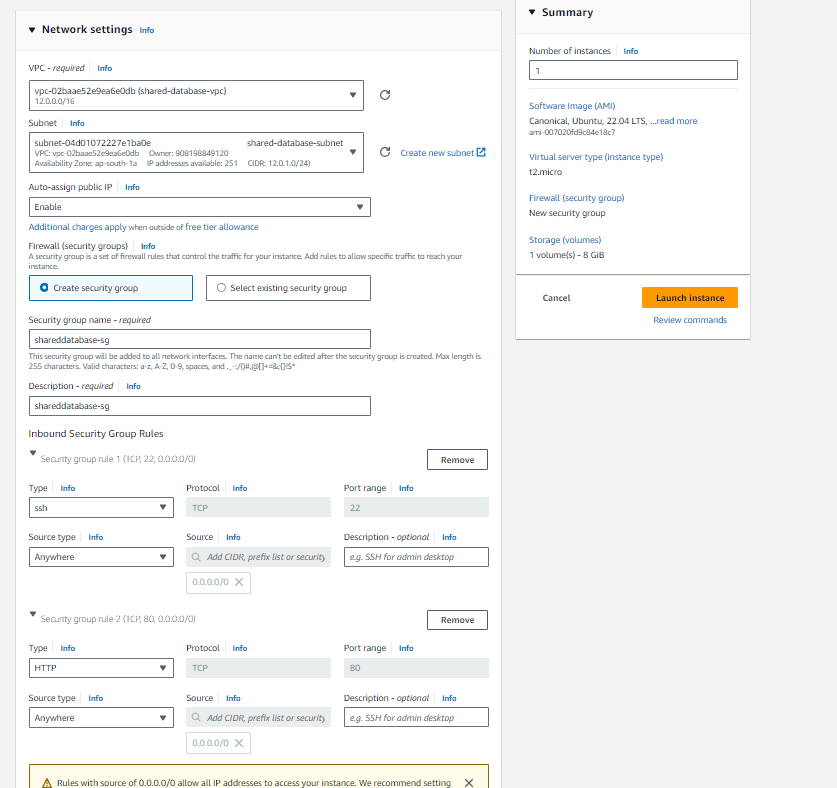
To deploy an EC2 instance in our VPC ‘shared-database-vpc‘ with Ubuntu as the machine image and t2.micro as the instance type, follow these steps:
- Navigate to the EC2 dashboard and click on ‘Launch Instance’.
- Choose ‘Ubuntu‘ as the machine image and ‘t2.micro‘ as the instance type.
- Select ‘shared-database-vpc‘ as the VPC for the instance.
- Enable ‘Auto-assign Public IP‘ for the instance.
- Create a key pair for SSH access.
- Create a security group named ‘shared-database–securitygrp‘ with the description ‘shared-database–securitygrp‘.
- Configure the security group with the following rules:
- SSH (port 22) from anywhere
- HTTP from anywhere
- Select Advance Settings and write below script in the User Data to Install Nginx on our Instance
#!/bin/bash
yes | sudo apt update
yes | sudo apt install nginx
sudo systemctl start nginx
sudo systemctl enable nginx

cat <<EOF > /var/www/html/index.html
<!DOCTYPE html>
<html>
<head>
<title>Welcome to My Server</title>
<style>
body {
    font-family: Arial, sans-serif;
    background-color: #f0f0f0;
}
.container {
    max-width: 800px;
    margin: 50px auto;
    padding: 20px;
    background-color: #fff;
    border-radius: 5px;
    box-shadow: 0px 0px 10px rgba(0, 0, 0, 0.1);
}
</style>
</head>
<body>
<div class="container">
    <h1>Welcome to My Server</h1>
    <p><strong>Hostname:</strong> $(hostname)</p>
    <p><strong>IP Address:</strong> $(hostname -I | cut -d" " -f1)</p>
</div>
</body>
</html>
EOF
Proceed with launching the EC2 instance.


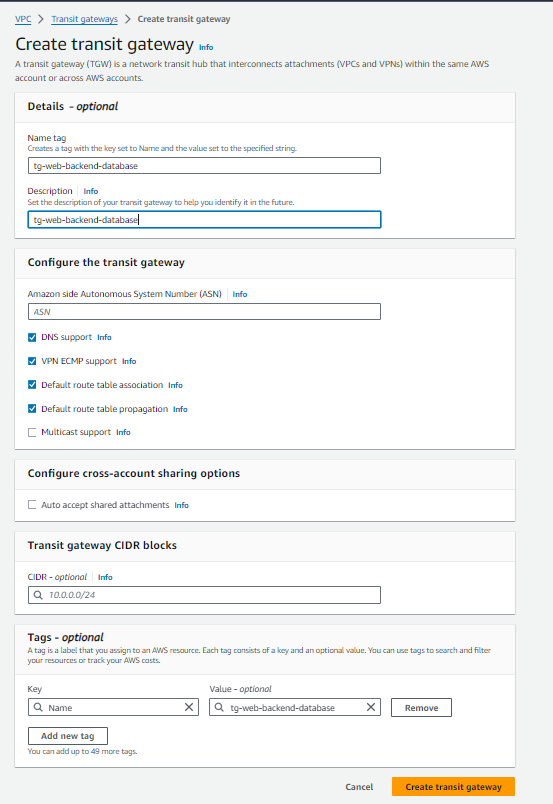
Step#5:Create Transit Gateway in AWS
- Choose a descriptive name like “tg-web-backend-database” and optionally add a tag for further identification.
- Keep the default settings and click “Create Transit Gateway.”
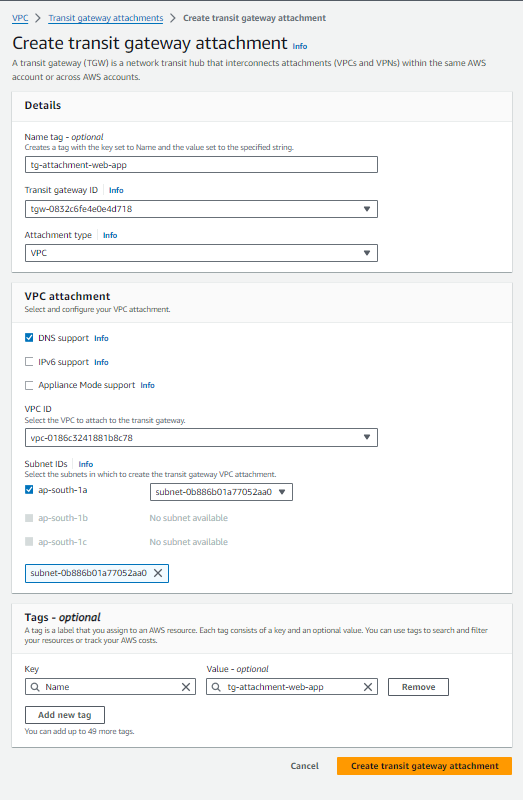
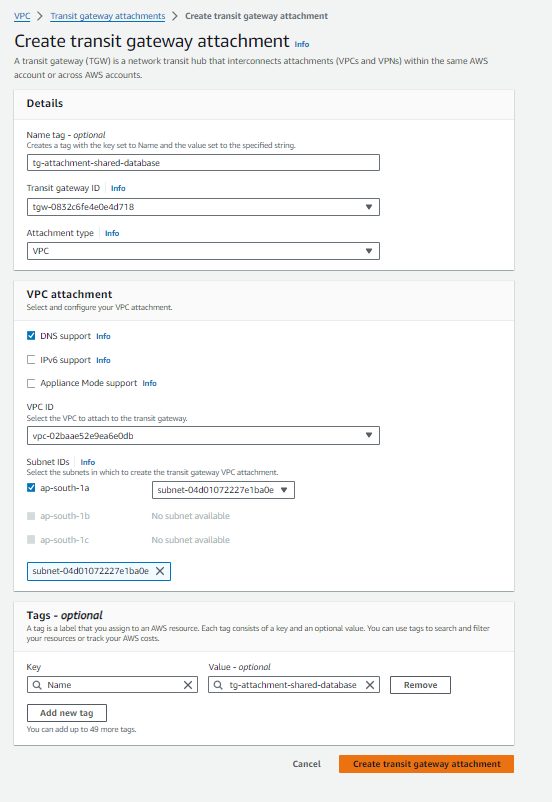
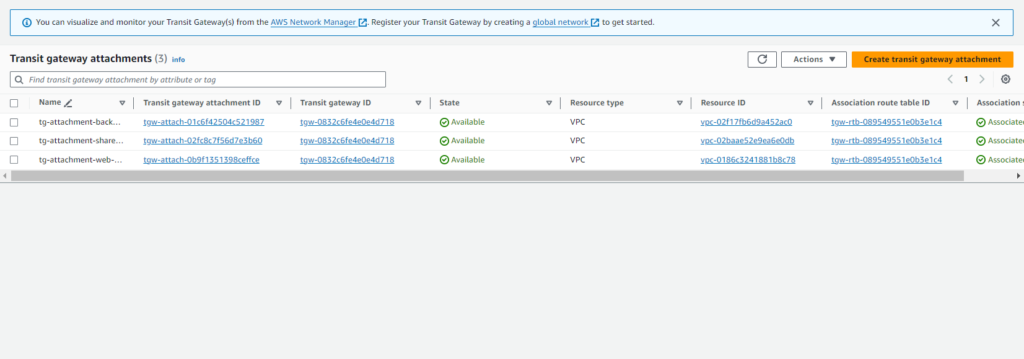
Step#6:Create Transit Gateway Attachment
This step integrates your VPCs, web-app-vpc, backend-services-vpc, shared-database-vpc into the Transit Gateway network, enabling communication with each other.
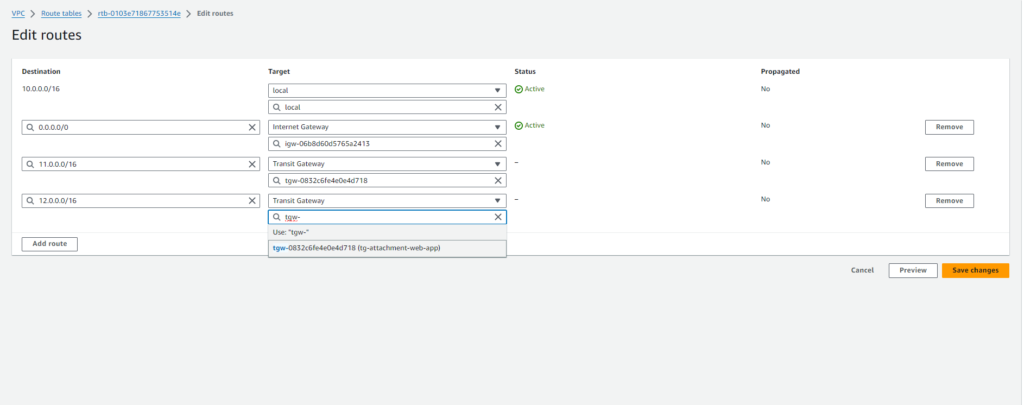
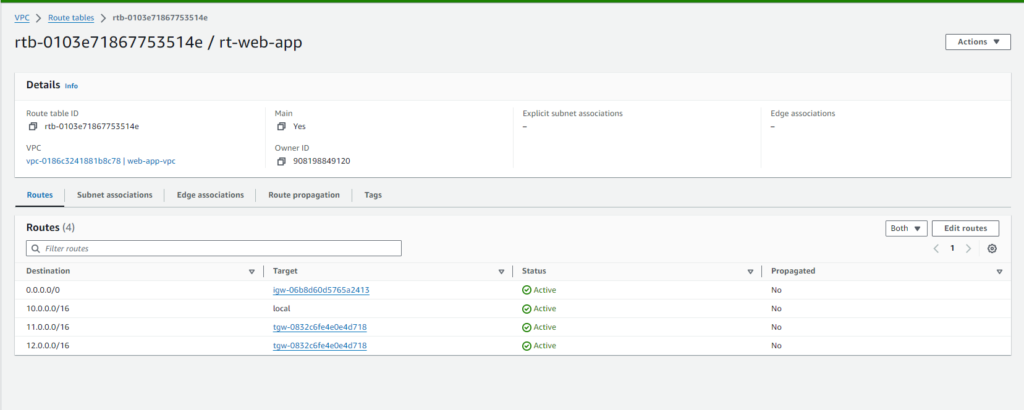
Step#7:Update Route Table for web-app-vpc
Select the Route Table-rt-web-app
- Edit Routes:
- Click “Edit Routes” for the selected route table.
- Click “Add Route.”
- Add Route for VPC 2 (backend-services-vpc):
- In the “Destination” field, enter the CIDR block of VPC 2 (e.g., 11.0.0.0/16).
- In the “Target” field, select the Transit Gateway attachment ID created for web-app-vpc in Step 6.
- Click “Save” to add the route.
- Repeat for VPC 3 (shared-database-vpc):
- Click “Add Route” again.
- In the “Destination” field, enter the CIDR block of VPC 3 (e.g., 12.0.0.0/16).
- In the “Target” field, select the same Transit Gateway attachment ID used previously.
- Click “Save” to add the route.
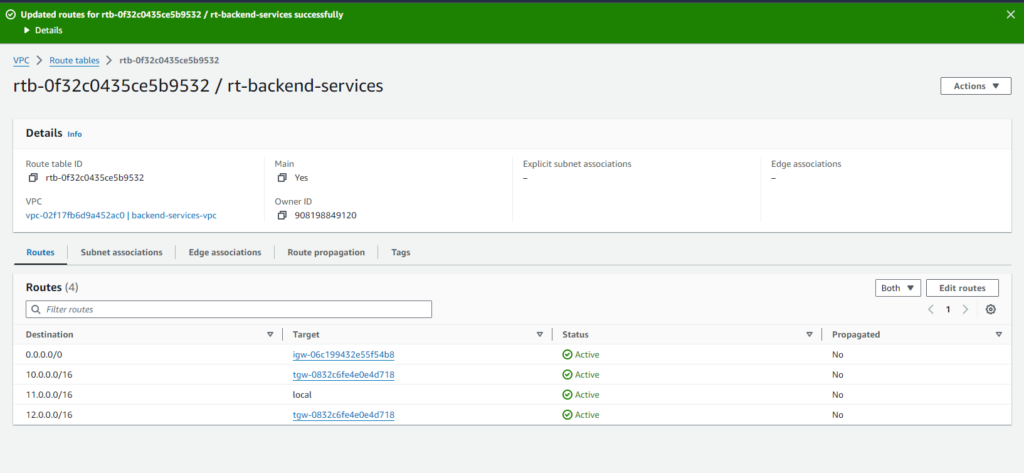
Step#8:Update Route Table for backend-services-vpc
Select the Route Table-rt-backend-services
- Edit Routes:
- Click “Edit Routes” for the selected route table.
- Click “Add Route.”
- Add Route for VPC 1 (web-app-vpc):
- In the “Destination” field, enter the CIDR block of VPC 1 (e.g., 10.0.0.0/16).
- In the “Target” field, select the Transit Gateway attachment ID created for backend-services-vpc in Step 6.
- Click “Save” to add the route.
- Repeat for VPC 3 (shared-database-vpc):
- Click “Add Route” again.
- In the “Destination” field, enter the CIDR block of VPC 3 (e.g., 12.0.0.0/16).
- In the “Target” field, select the same Transit Gateway attachment ID used previously.
- Click “Save” to add the route.
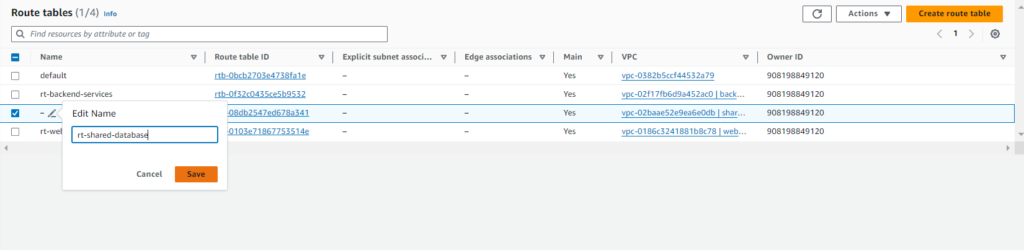
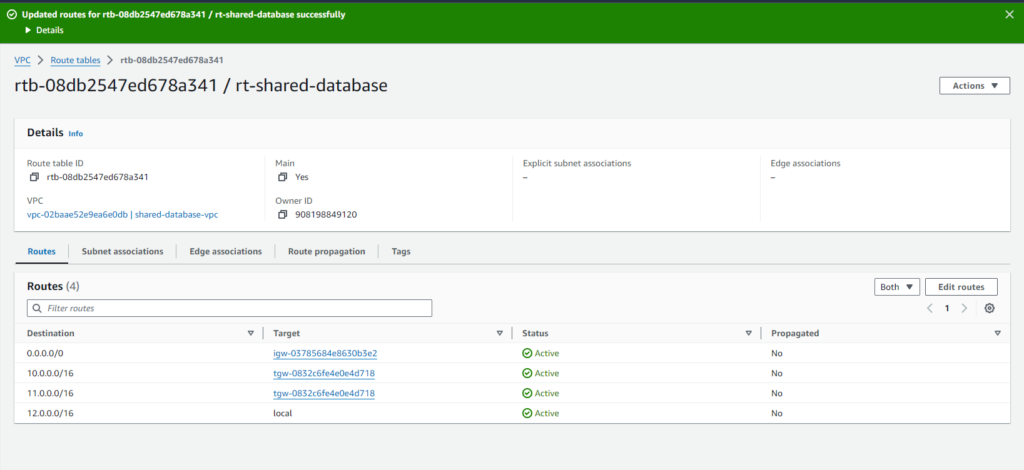
Step#9:Update Route Table for shared-database-vpc
Select the Route Table-rt-shared-database
- Edit Routes:
- Click “Edit Routes” for the selected route table.
- Click “Add Route.”
- Add Route for VPC 1 (web-app-vpc):
- In the “Destination” field, enter the CIDR block of VPC 1 (e.g., 10.0.0.0/16).
- In the “Target” field, select the Transit Gateway attachment ID created for shared-database-vpc in Step 6.
- Click “Save” to add the route.
- Add Route for VPC 2 (backend-services-vpc):
- In the “Destination” field, enter the CIDR block of VPC 2 (e.g., 11.0.0.0/16).
- In the “Target” field, select the Transit Gateway attachment ID created for shared-database-vpc in Step 6.
- Click “Save” to add the route.

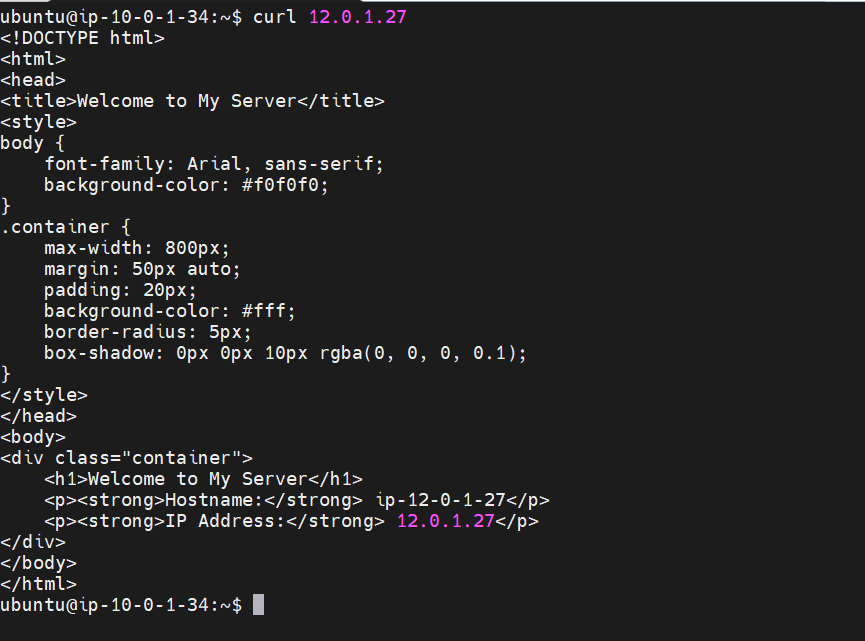
Step#10:Verify Connectivity Between VPCs
This step is optional but highly recommended to confirm successful communication between your VPCs through the Transit Gateway. Here’s how to proceed:
1. Gather Private IPs:
- In the AWS Management Console, navigate to the EC2 service.
- Locate the EC2 instances you launched in each VPC (web-app-vpc, backend-services-vpc, shared-database-vpc).
- Identify Private IPs:
- For each instance, note down its private IP address. You’ll need the private IPs of the backend service instance in backend-services-vpc and the shared database instance in shared-database-vpc.


2. Connect to Web Application Instance (web-app-vpc):
- Use a method like SSH to connect to the EC2 instance launched in web-app-vpc. This is the instance hosting your web application.
3. Test Connectivity with curl:
- Once connected to the web application instance, use the curl command to attempt communication with the backend service and shared database instances in other VPCs.

Conclusion:
In conclusion, setting up an AWS VPC Transit Gateway streamlines network connectivity across VPCs and on-premises networks, enhancing scalability and management efficiency in AWS infrastructure.
Reference:-
For reference visit the official website .
Any queries pls contact us @Fosstechnix.com.
Related Articles: