In this article, we will explore how to set up an AWS Site-to-Site VPN using Terraform, enabling secure and seamless communication between on-premises networks and AWS cloud resources.

Table of Contents
What is Terraform?
- It is an open-source IaaC (Infrastructure as a code) software tool where you define and create resources using providers in the declarative configuration language example JSON.
- With Terraform, You can package and reuse the code in the form of modules.
- It supports a number of cloud infrastructure providers such as AWS, Azure, GCP, IBM Cloud, OCI, etc.
What is AWS Site-to-Site VPN?
AWS Site-to-Site VPN is a secure way to connect your on-premises network (like your office network or data center) to your AWS cloud resources. It’s like building a private tunnel through the internet between your office and AWS, ensuring that your data travels safely and privately.
Example:
Imagine you have a small business with an office network where you store important files and run applications. You also use AWS cloud services like storage and databases. With AWS Site-to-Site VPN, you can securely link your office network to AWS. It’s like having a virtual extension cord that lets your office network access resources in AWS securely, just as if they were all in the same physical location.
Components of VPN
- VPN Tunnel: Secure pathway for data between locations, like a virtual pipeline. Example: Connecting to work from home using VPN.
- Virtual Private Gateway (VPG): Entry point to cloud network, manages VPN connections. Example: AWS VPG for secure connection to VPCs.
- Customer Gateway (CGW): Represents on-premises network in VPN, endpoint for VPN connections. Example: Office router connecting to AWS via VPN.
- Site-to-Site VPN Connection: Secure link between separate networks, like a virtual bridge. Example: Site-to-Site VPN between office network and AWS VPC.
- VPN Configuration: Settings for VPN connections, includes encryption, authentication, and routing details. Example: Configuring VPN parameters on routers for secure communication.
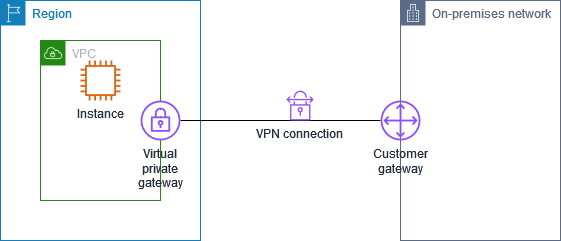
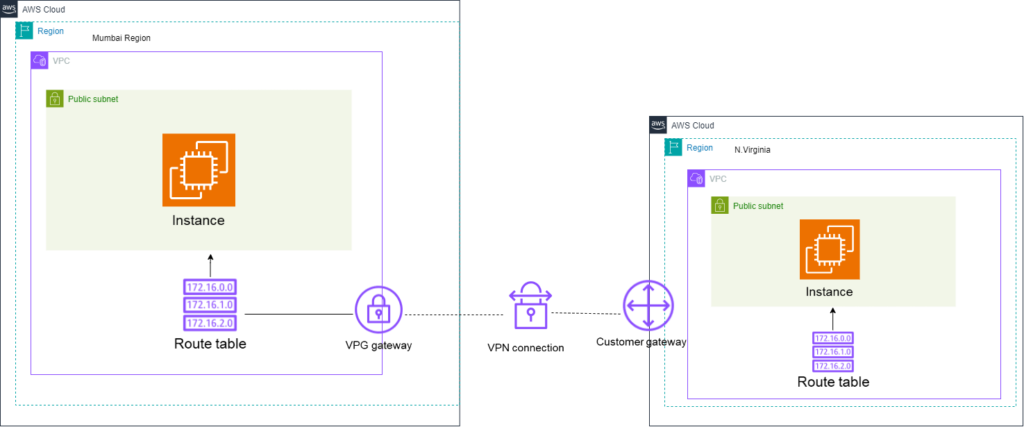
Architecture of Site-to-Site VPN
Prerequisites
- AWS Account: You should have an active AWS account with the necessary permissions to create and manage resources.
- Terraform: Terraform is an infrastructure provisioning tool that you’ll need to install on your local machine.
- Visual Studio Code Editor Installed
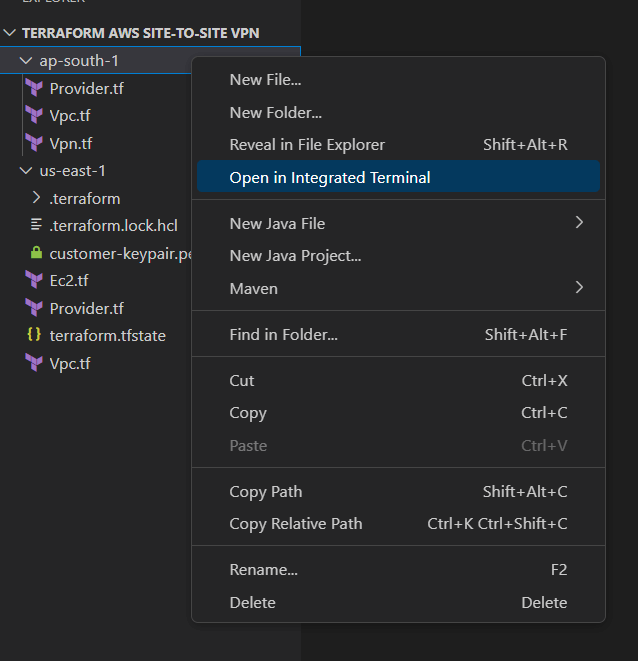
Steps for Setting Up AWS Site-to-Site VPN using Terraform
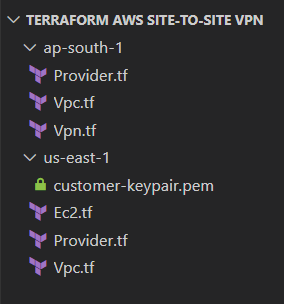
Summary view of the terraform files in VS code:
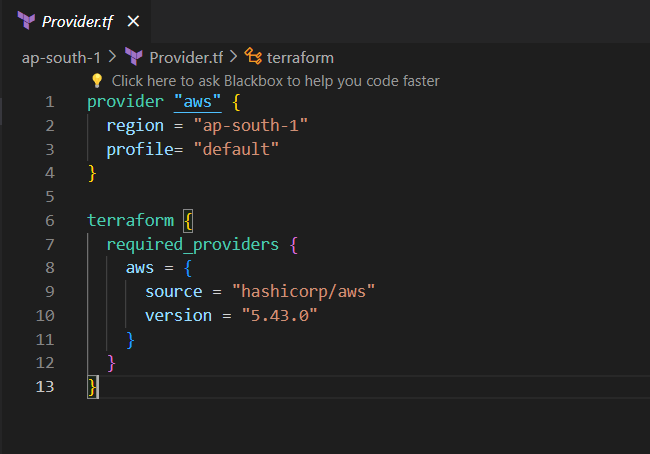
Step#1:Create provider.tf file for Mumbai Region
The provider.tf file in Terraform is a configuration file that specifies the cloud provider and its corresponding plugin that Terraform will use to manage resources in that provider.
Provider.tf
provider "aws" {
  region = "ap-south-1"
  profile= "default"
}

terraform {
  required_providers {
    aws = {
      source = "hashicorp/aws"
      version = "5.43.0"
    }
  }
}
Step#2:Create VPC in Mumbai Region
The Vpc.tf file in Terraform configures an Amazon VPC in Mumbai, defining CIDR blocks, public and private subnets, an internet gateway for external access, route tables, and routes for internet-bound traffic. This step establishes a secure networking environment, enabling controlled communication within the VPC and with external networks.
Vpc.tf
resource "aws_vpc" "AWS_SITE_VPC" {
  cidr_block       = "10.1.0.0/16"


  tags = {
    Name = "AWS_SITE_VPC"
  }
}

resource "aws_subnet" "public_subnet" {
  vpc_id     = aws_vpc.AWS_SITE_VPC.id
  cidr_block = "10.1.0.0/24"
  availability_zone = "ap-south-1a"
  tags = {
    Name = "AWS_SITE_SUBNET"
  }
}

resource "aws_internet_gateway" "AWS_SITE_IGW" {
  vpc_id = aws_vpc.AWS_SITE_VPC.id

  tags = {
    Name = "AWS_SITE_IGW"
  }
}

resource "aws_route_table" "AWS_SITE_ROUTE" {
  vpc_id = aws_vpc.AWS_SITE_VPC.id  # Replace with the actual VPC ID

  tags = {
    Name = "AWS_SITE_ROUTE"
  }
}

resource "aws_route" "internet_route" {
  route_table_id = aws_route_table.AWS_SITE_ROUTE.id
  destination_cidr_block = "0.0.0.0/0"
  gateway_id     = aws_internet_gateway.AWS_SITE_IGW.id # Replace with actual internet gateway ID

  depends_on = [aws_vpc.AWS_SITE_VPC]  # Ensure VPC is created before route
}

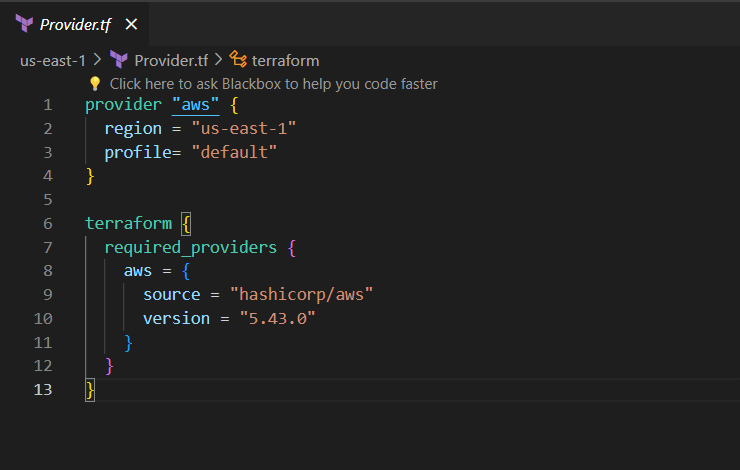
Step#3:Create provider.tf file for N.Virginia Region
Provider.tf
provider "aws" {
  region = "us-east-1"
  profile= "default"
}

terraform {
  required_providers {
    aws = {
      source = "hashicorp/aws"
      version = "5.43.0"
    }
  }
}
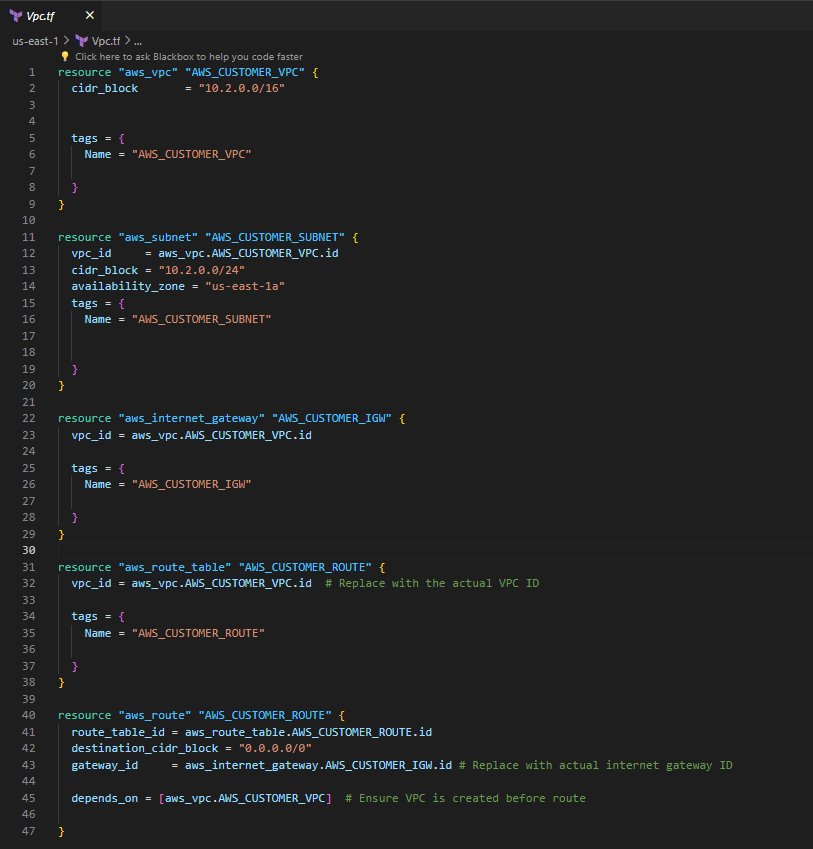
Step#4:Create VPC in N.Virginia Region
Vpc.tf
resource "aws_vpc" "AWS_CUSTOMER_VPC" {
  cidr_block       = "10.2.0.0/16"


  tags = {
    Name = "AWS_CUSTOMER_VPC"

  }
}

resource "aws_subnet" "AWS_CUSTOMER_SUBNET" {
  vpc_id     = aws_vpc.AWS_CUSTOMER_VPC.id
  cidr_block = "10.2.0.0/24"
  availability_zone = "us-east-1a"
  tags = {
    Name = "AWS_CUSTOMER_SUBNET"


  }
}

resource "aws_internet_gateway" "AWS_CUSTOMER_IGW" {
  vpc_id = aws_vpc.AWS_CUSTOMER_VPC.id

  tags = {
    Name = "AWS_CUSTOMER_IGW"

  }
}

resource "aws_route_table" "AWS_CUSTOMER_ROUTE" {
  vpc_id = aws_vpc.AWS_CUSTOMER_VPC.id  # Replace with the actual VPC ID

  tags = {
    Name = "AWS_CUSTOMER_ROUTE"

  }
}

resource "aws_route" "AWS_CUSTOMER_ROUTE" {
  route_table_id = aws_route_table.AWS_CUSTOMER_ROUTE.id
  destination_cidr_block = "0.0.0.0/0"
  gateway_id     = aws_internet_gateway.AWS_CUSTOMER_IGW.id # Replace with actual internet gateway ID

  depends_on = [aws_vpc.AWS_CUSTOMER_VPC]  # Ensure VPC is created before route

}
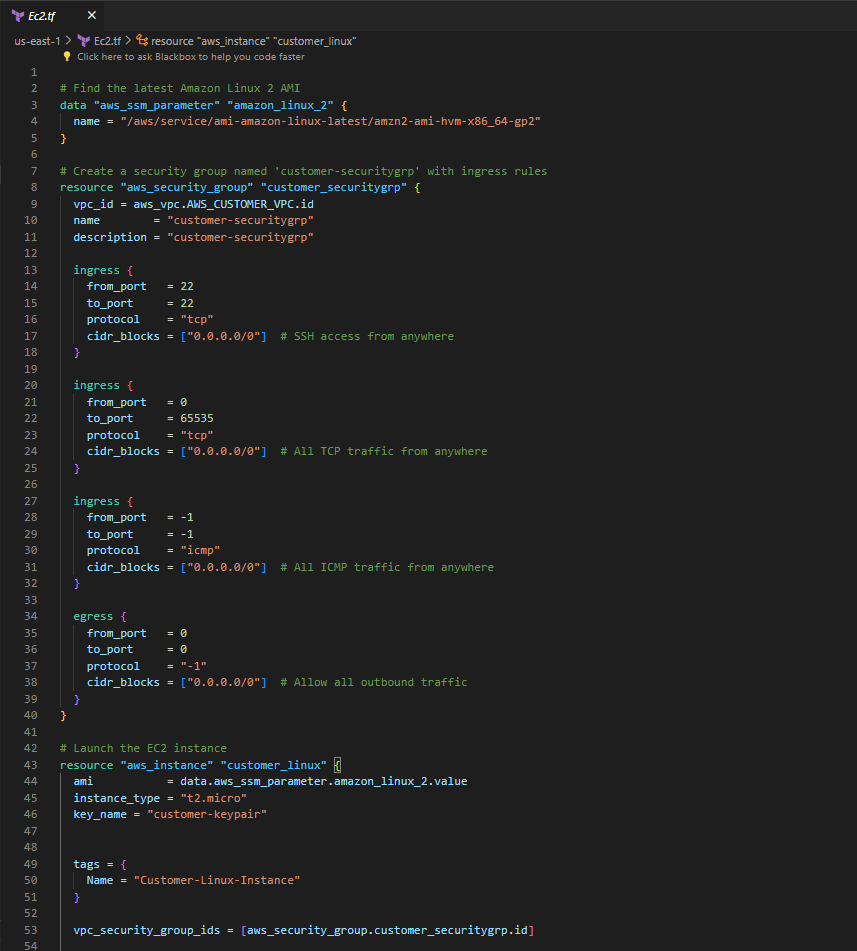
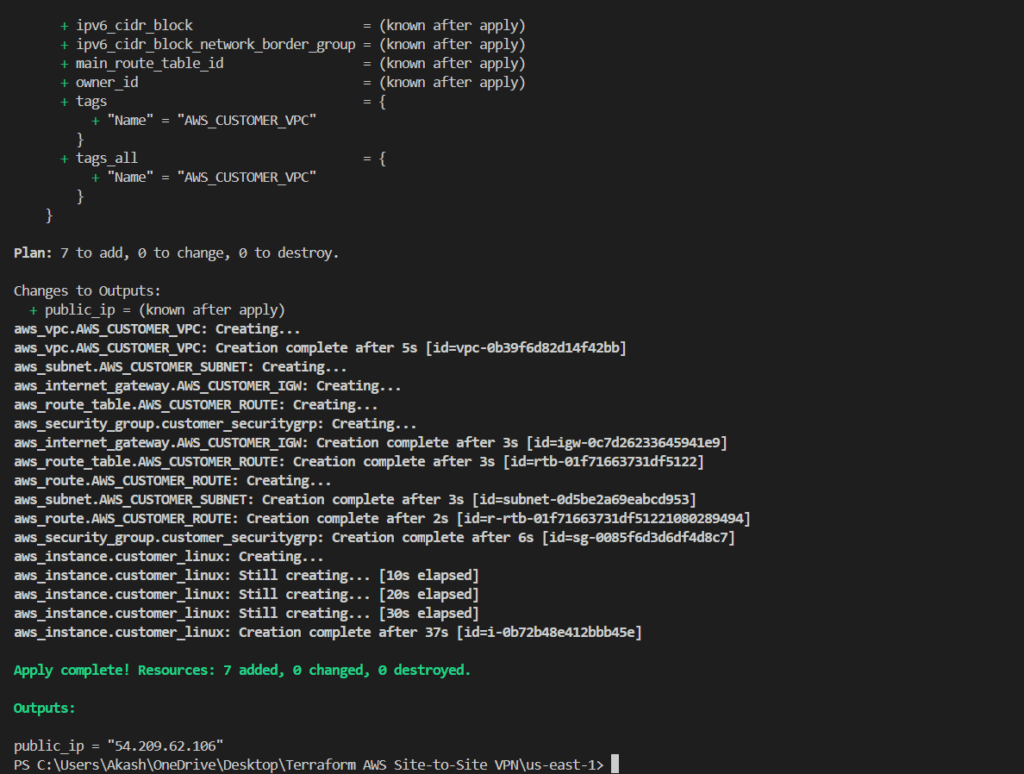
Step#5:Launch Amazon Linux Machine in N.Virginia Region
Deploy Amazon Linux instance in N.Virginia region and configure security groups for SSH, TCP, and ICMP access.
Ec2.tf
# Find the latest Amazon Linux 2 AMI
data "aws_ssm_parameter" "amazon_linux_2" {
name = "/aws/service/ami-amazon-linux-latest/amzn2-ami-hvm-x86_64-gp2"
}
# Create a security group named 'customer-securitygrp' with ingress rules
resource "aws_security_group" "customer_securitygrp" {
vpc_id = aws_vpc.AWS_CUSTOMER_VPC.id
name = "customer-securitygrp"
description = "customer-securitygrp"
ingress {
from_port = 22
to_port = 22
protocol = "tcp"
cidr_blocks = ["0.0.0.0/0"] # SSH access from anywhere
}
ingress {
from_port = 0
to_port = 65535
protocol = "tcp"
cidr_blocks = ["0.0.0.0/0"] # All TCP traffic from anywhere
}
ingress {
from_port = -1
to_port = -1
protocol = "icmp"
cidr_blocks = ["0.0.0.0/0"] # All ICMP traffic from anywhere
}
egress {
from_port = 0
to_port = 0
protocol = "-1"
cidr_blocks = ["0.0.0.0/0"] # Allow all outbound traffic
}
}
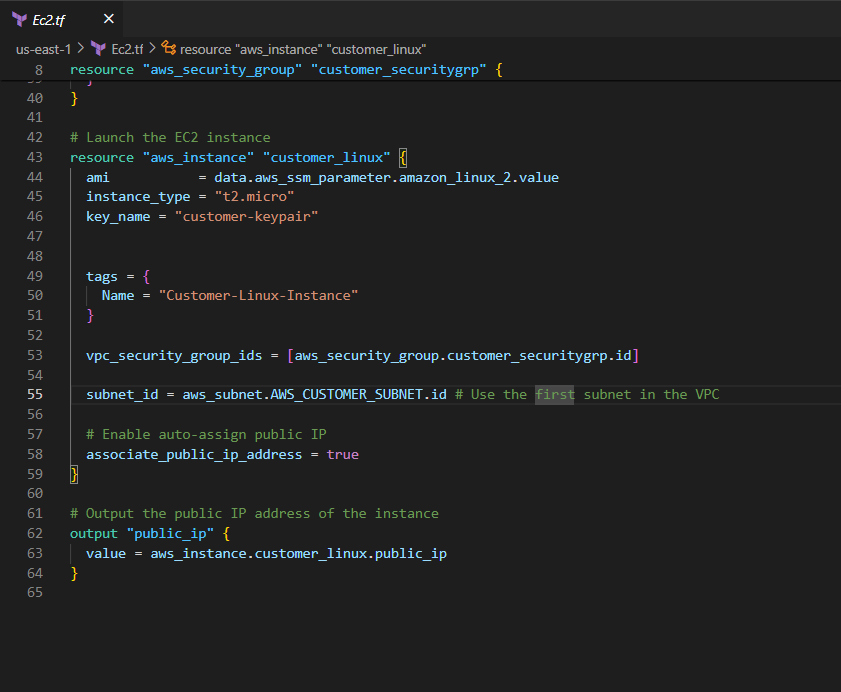
# Launch the EC2 instance
resource "aws_instance" "customer_linux" {
ami = data.aws_ssm_parameter.amazon_linux_2.value
instance_type = "t2.micro"
key_name = "customer-keypair"
tags = {
Name = "Customer-Linux-Instance"
}
vpc_security_group_ids = [aws_security_group.customer_securitygrp.id]
subnet_id = aws_subnet.AWS_CUSTOMER_SUBNET.id # Use the first subnet in the VPC
# Enable auto-assign public IP
associate_public_ip_address = true
}
# Output the public IP address of the instance
output "public_ip" {
value = aws_instance.customer_linux.public_ip
}
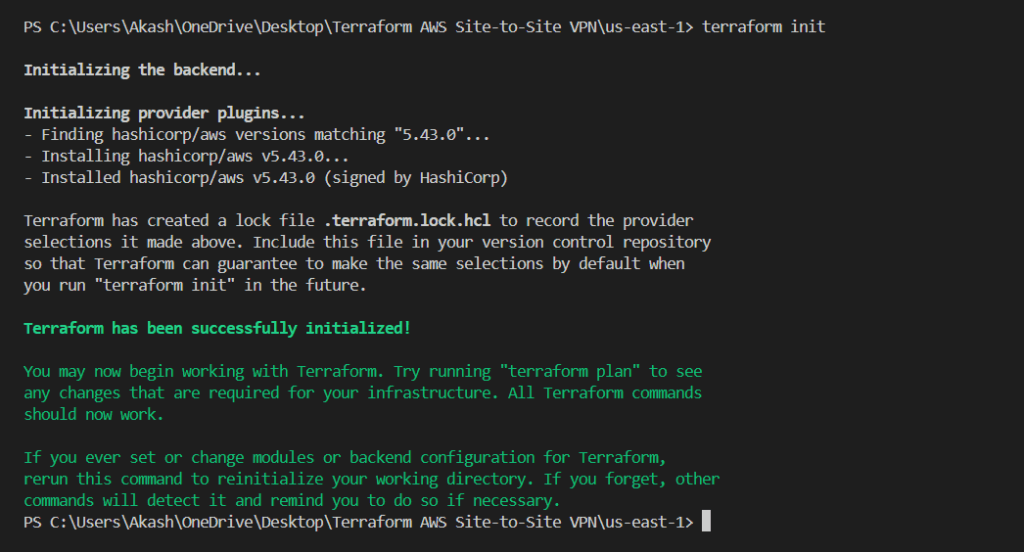
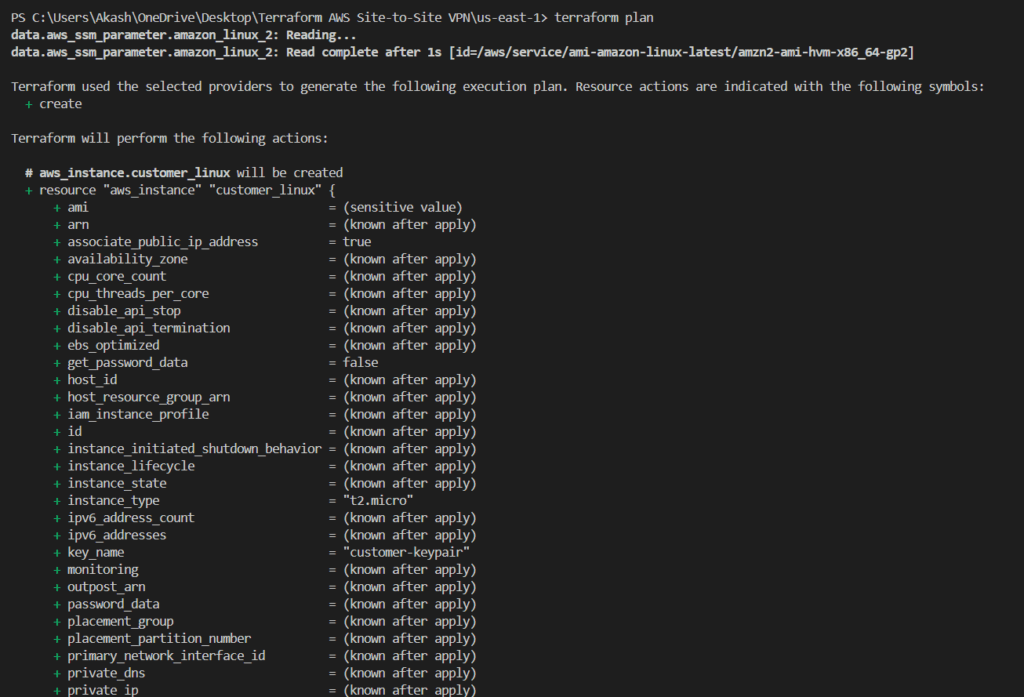
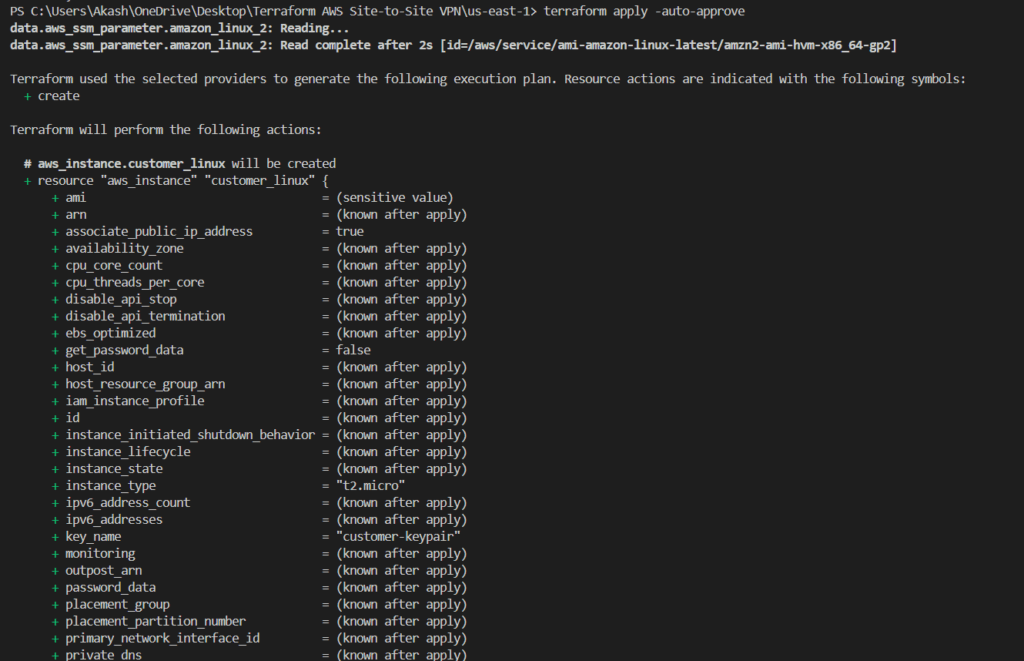
Step#6:Let’s Apply Configuration in N.Virginia Region
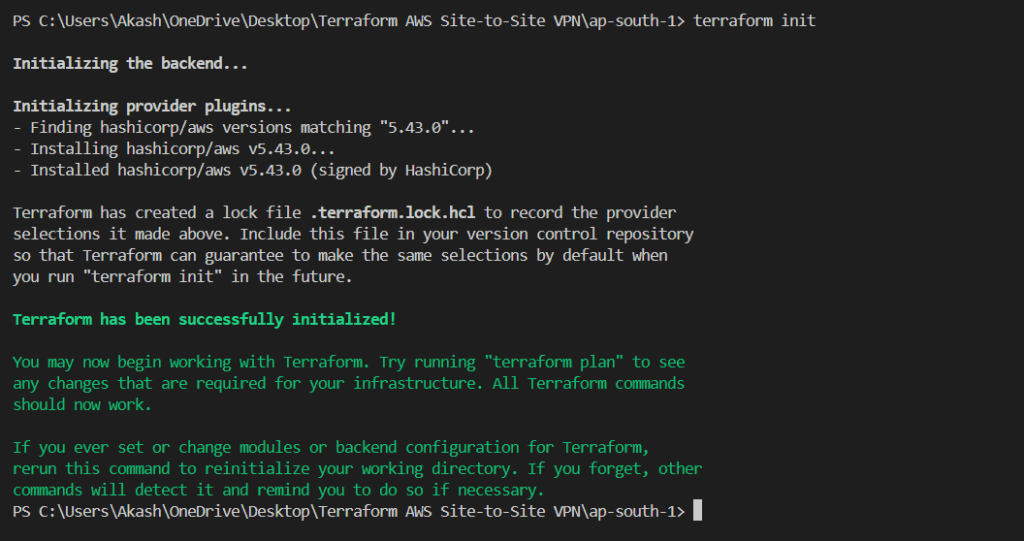
On the command line, run the following commands:
- terraform init
The terraform init the command is used to initialize a new or existing Terraform configuration. This command downloads the required provider plugins and sets up the backend for storing state.
- terraform plan
The terraform plan the command is used to create an execution plan for the Terraform configuration. This command shows what resources Terraform will create, modify, or delete when applied.

- terraform apply
The terraform apply the command is used to apply the Terraform configuration and create or modify resources in the target environment.
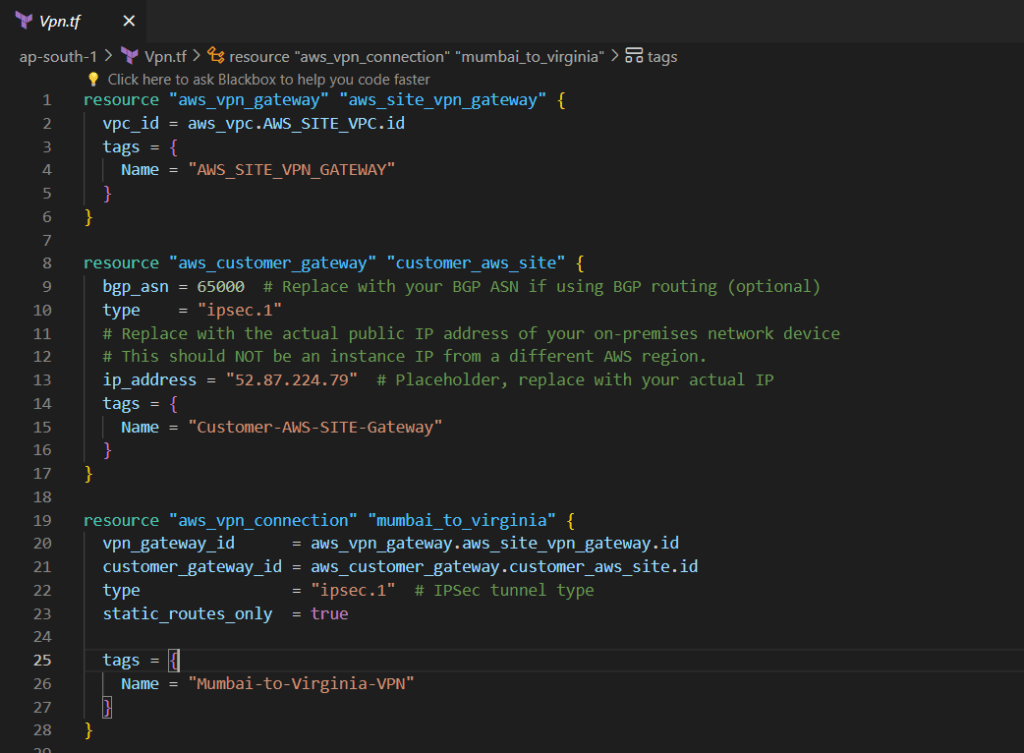
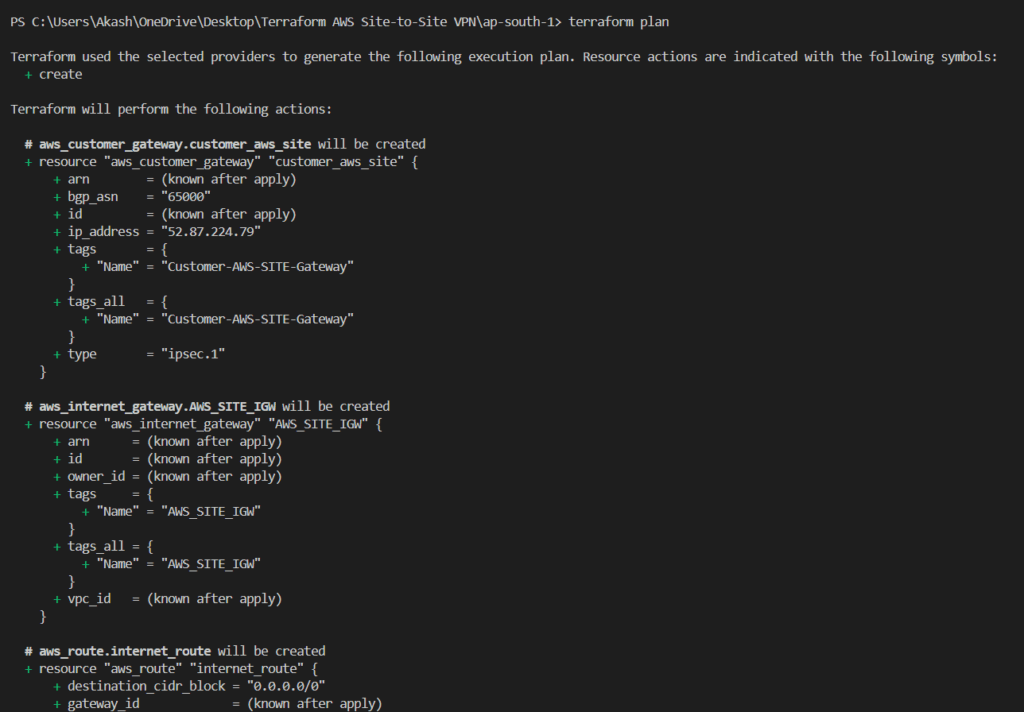
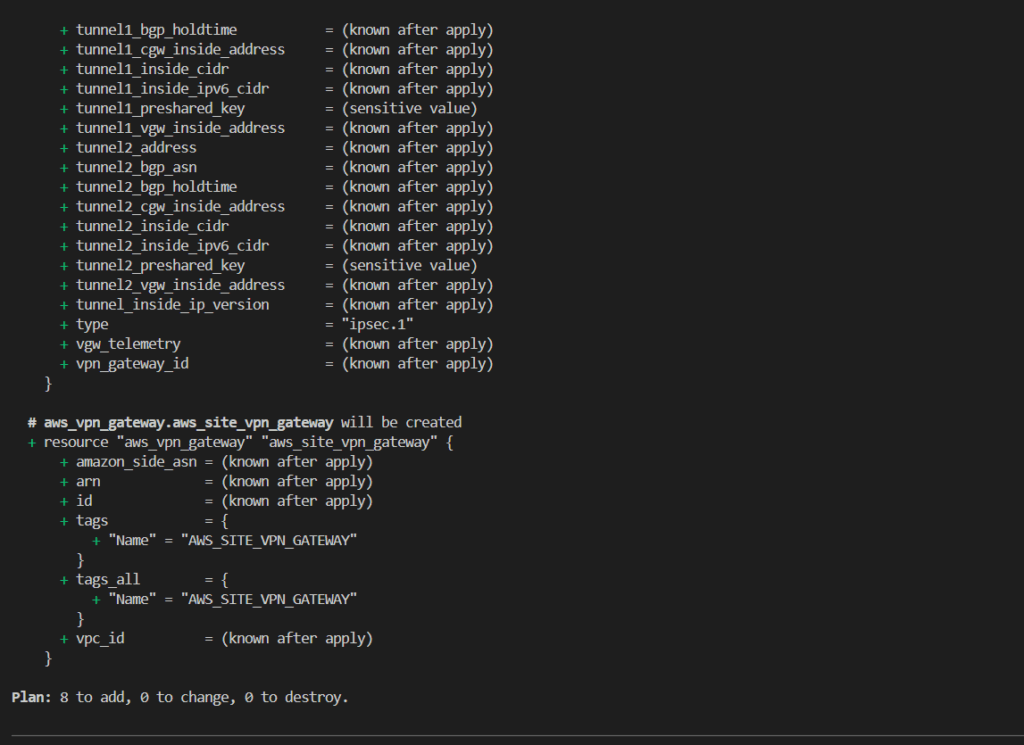
Step#7:Create Site-to-Site VPN Connection in Mumbai Region
This Terraform configuration establishes a VPN infrastructure in the Mumbai region. It includes creating an AWS VPN gateway, defining a customer gateway with IPSec configuration for secure communication, and establishing a VPN connection between Mumbai and Virginia regions for encrypted data transfer.
Note*-Enter our Ip address of the instance launched in N.Virginia Region.
Vpn.tf
resource "aws_vpn_gateway" "aws_site_vpn_gateway" {
  vpc_id = aws_vpc.AWS_SITE_VPC.id
  tags = {
    Name = "AWS_SITE_VPN_GATEWAY"
  }
}

resource "aws_customer_gateway" "customer_aws_site" {
  bgp_asn = 65000  # Replace with your BGP ASN if using BGP routing (optional)
  type    = "ipsec.1"
  ip_address = "52.87.224.79"  # Placeholder, replace with your actual IP
  tags = {
    Name = "Customer-AWS-SITE-Gateway"
  }
}

resource "aws_vpn_connection" "mumbai_to_virginia" {
  vpn_gateway_id      = aws_vpn_gateway.aws_site_vpn_gateway.id
  customer_gateway_id = aws_customer_gateway.customer_aws_site.id
  type                = "ipsec.1"  # IPSec tunnel type
  static_routes_only  = true

  tags = {
    Name = "Mumbai-to-Virginia-VPN"
  }
}
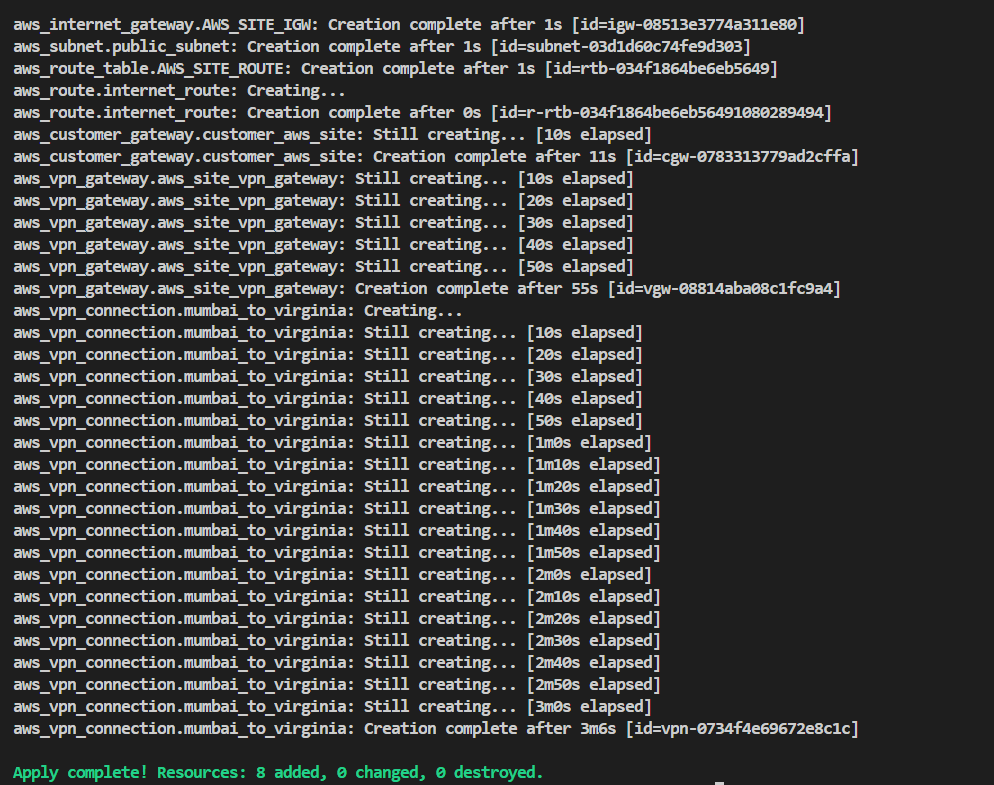
Step#8:Let’s Apply Configuration in Mumbai Region
Let’s run our configuration and make sure everything works correctly. On the command line, run the following commands:
- terraform init
- terraform plan
- terraform apply -auto-approve
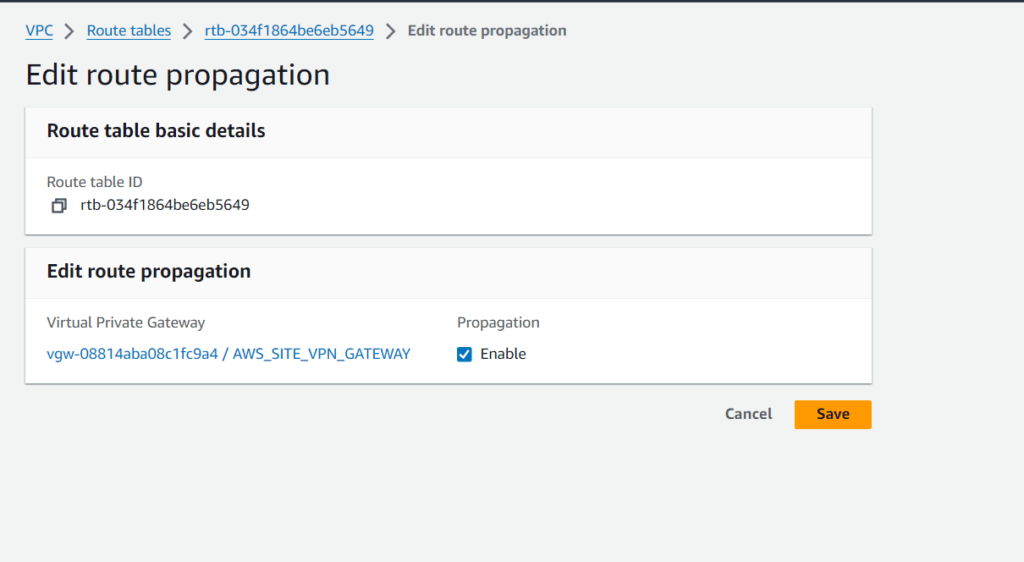
Step#9:Enable Route Propagation in the Mumbai Region
Allow routing between VPCs and on-premises networks by enabling route propagation in Mumbai regions.

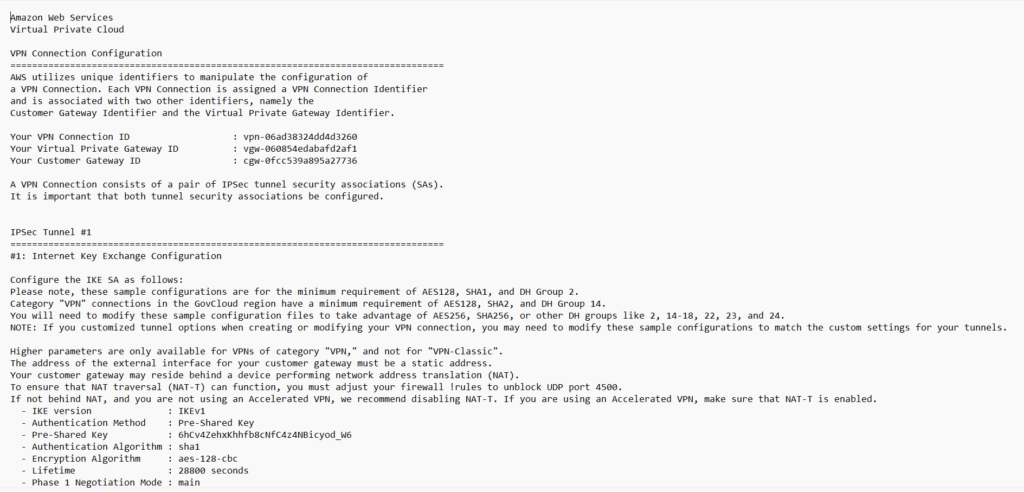
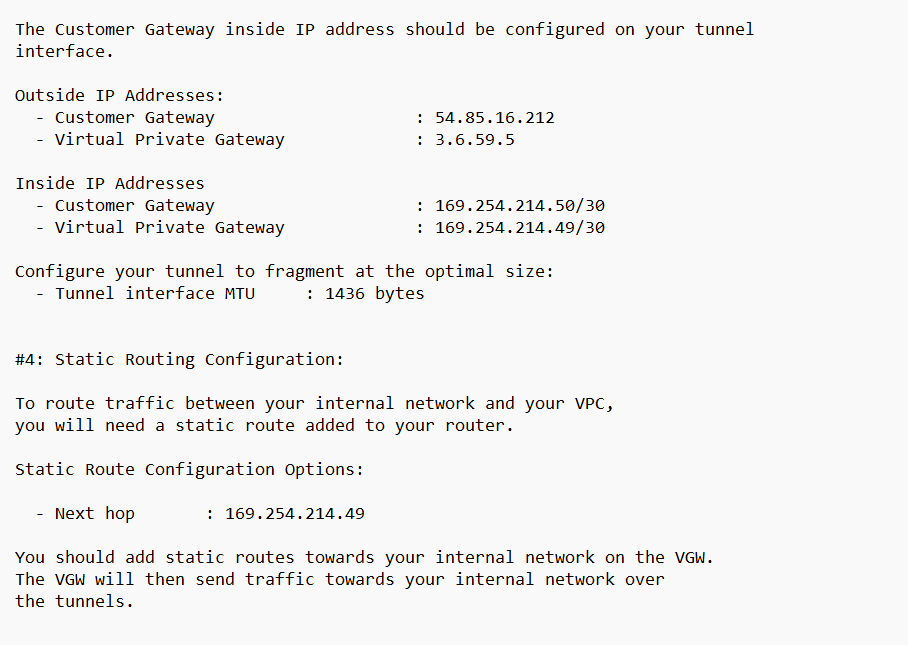
Step#10:Download VPN Configuration
Obtain the Site-to-Site VPN configuration from AWS for setting up your on-premises VPN device.
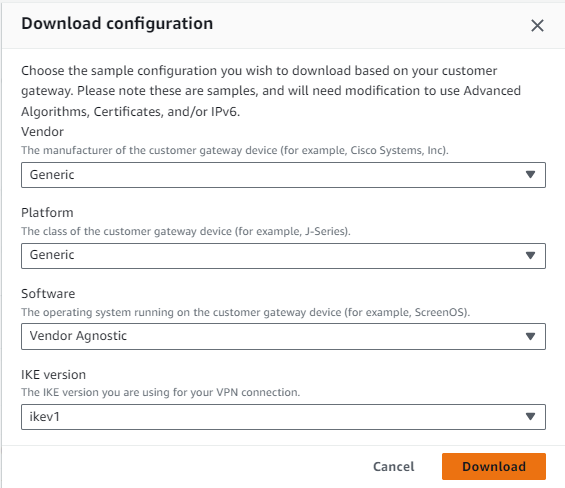
Configuration is opened on Notepad
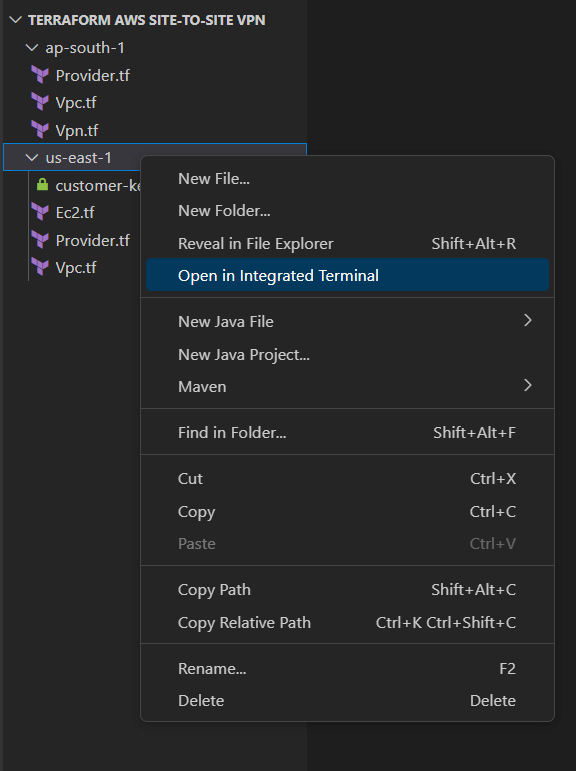
Step#11:Access EC2 Instance launced in N.Virginia Region
Use Mobaxterm/Putty to access the EC2 instance in the N. Virginia region, accessible via the VPN connection.
What is libreswan?
Libreswan is an open-source implementation of the IPsec (Internet Protocol Security) protocol suite for Linux-based systems. It provides secure communication over IP networks by encrypting and authenticating data packets.
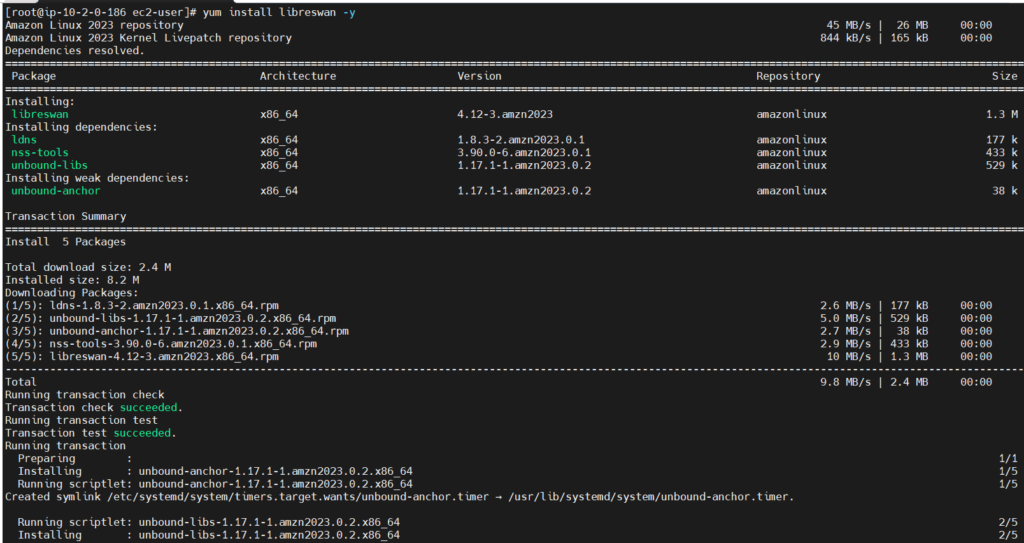
Enter the below commands After Connecting with Ec2 instance:-
- Change to root user:
sudo su
- Install Libreswan:
yum install libreswan -y
- Modify /etc/ipsec.conf:
Ensure the following line is uncommented or add it if not present:
vi /etc/ipsec.conf
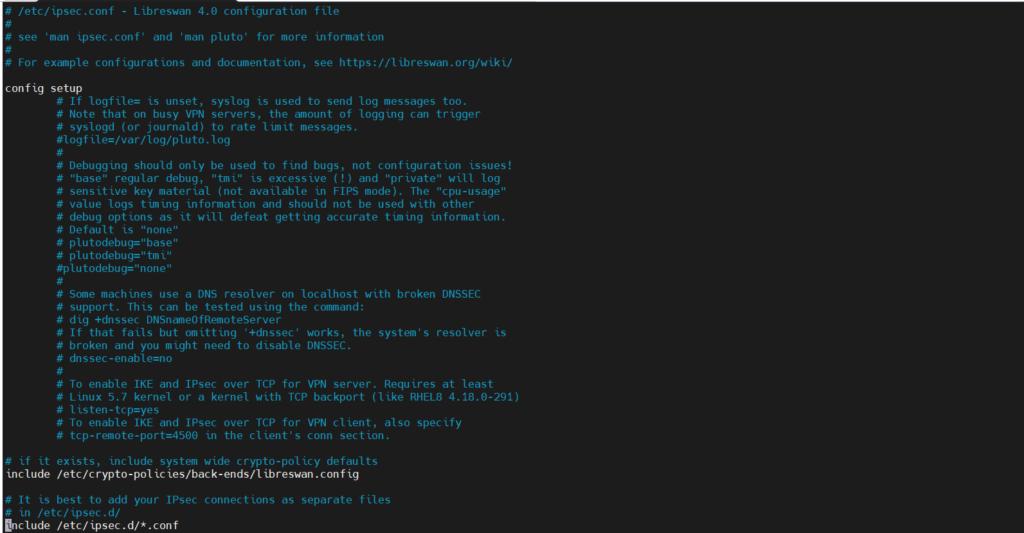
include /etc/ipsec.d/*.conf
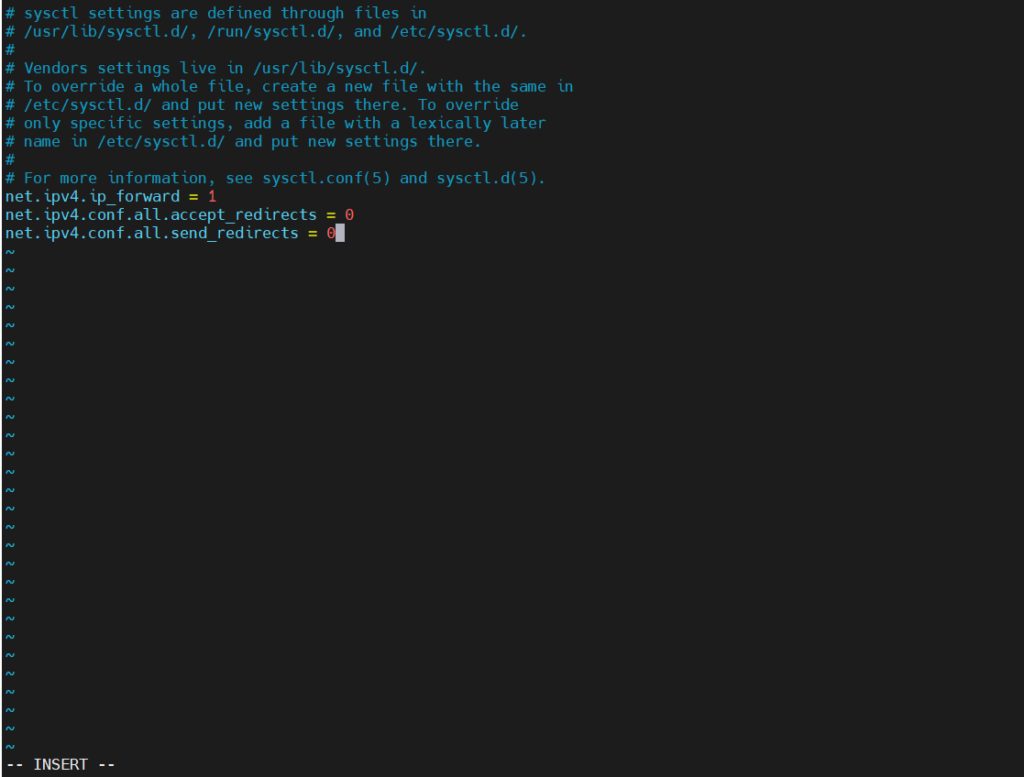
- Update /etc/sysctl.conf:
Edit the /etc/sysctl.conf file and add or modify the following lines:
vi /etc/sysctl.conf
net.ipv4.ip_forward = 1
net.ipv4.conf.all.accept_redirects = 0
net.ipv4.conf.all.send_redirects = 0
- Restart network service:
systemctl restart systemd-networkd
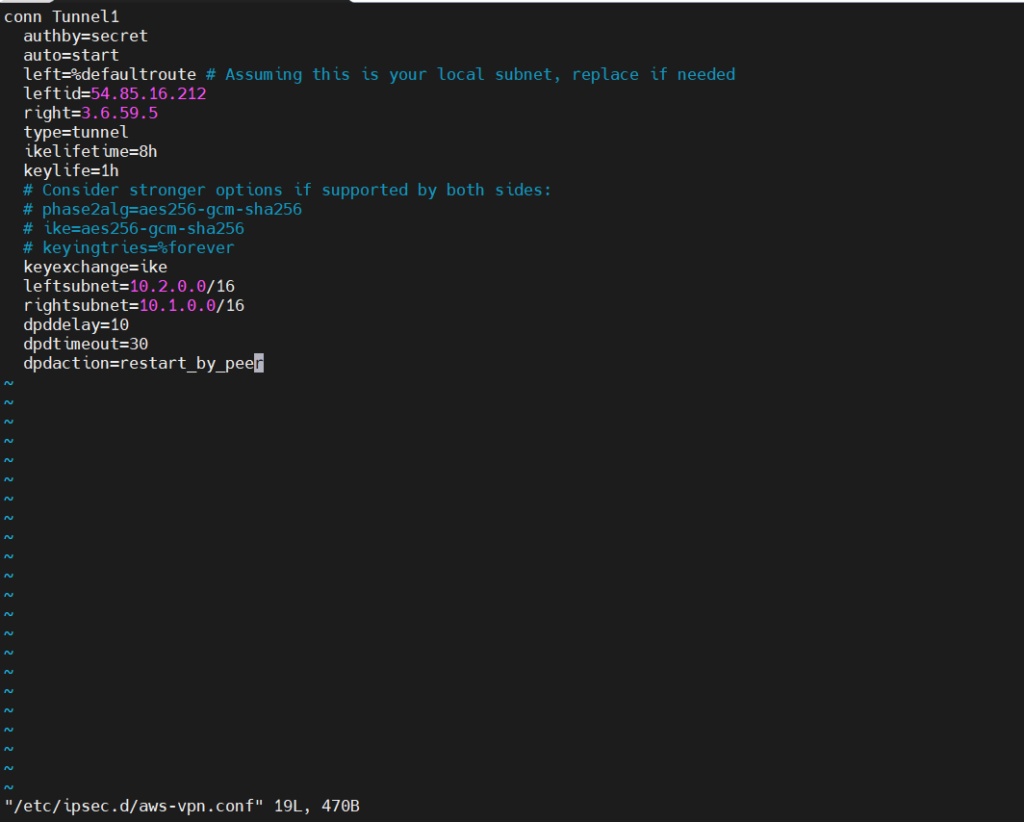
- Create/Edit /etc/ipsec.d/aws-vpn.conf:
vi /etc/ipsec.d/aws-vpn.conf
conn Tunnel1
  authby=secret
  auto=start
  left=%defaultroute # Assuming this is your local subnet, replace if needed
  leftid=54.85.16.212
  right=3.6.59.5
  type=tunnel
  ikelifetime=8h
  keylife=1h
  # Consider stronger options if supported by both sides:
  # phase2alg=aes256-gcm-sha256
  # ike=aes256-gcm-sha256
  # keyingtries=%forever
  keyexchange=ike
  leftsubnet=10.2.0.0/16
  rightsubnet=10.1.0.0/16
  dpddelay=10
  dpdtimeout=30
  dpdaction=restart_by_peer
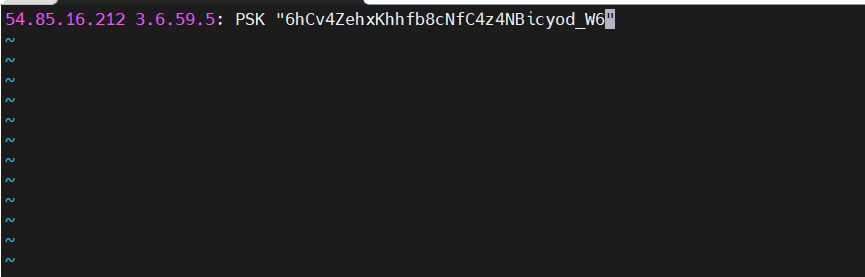
- Create/Edit /etc/ipsec.d/aws-vpn.secrets:
vi /etc/ipsec.d/aws-vpn.secrets
customer_public_ip aws_vgw_public_ip : PSK "shared secret"
54.85.16.212 3.6.59.5: PSK "6hCv4ZehxKhhfb8cNfC4z4NBicyod_W6"
- Commands to enable/start ipsec service:
chkconfig ipsec on

service ipsec start

service ipsec status
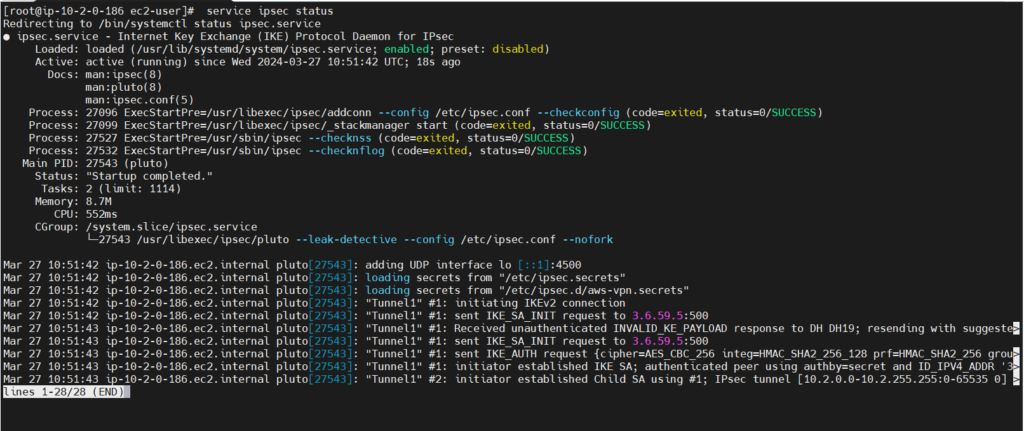
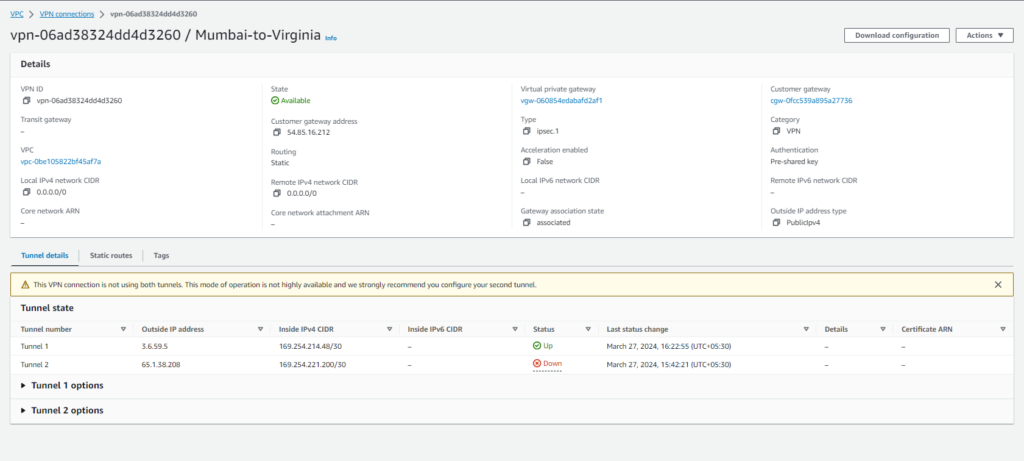
Step#12:Verify Tunnel Status on AWS Console
Check AWS Console to ensure successful VPN tunnel status, confirming connectivity between VPCs.
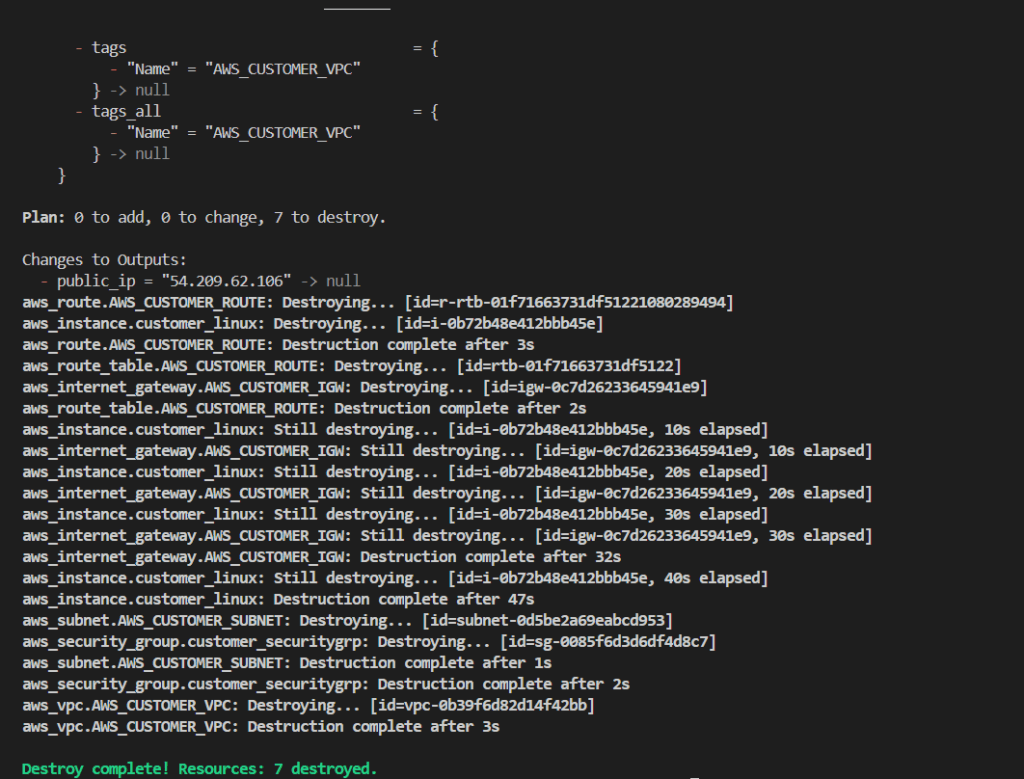
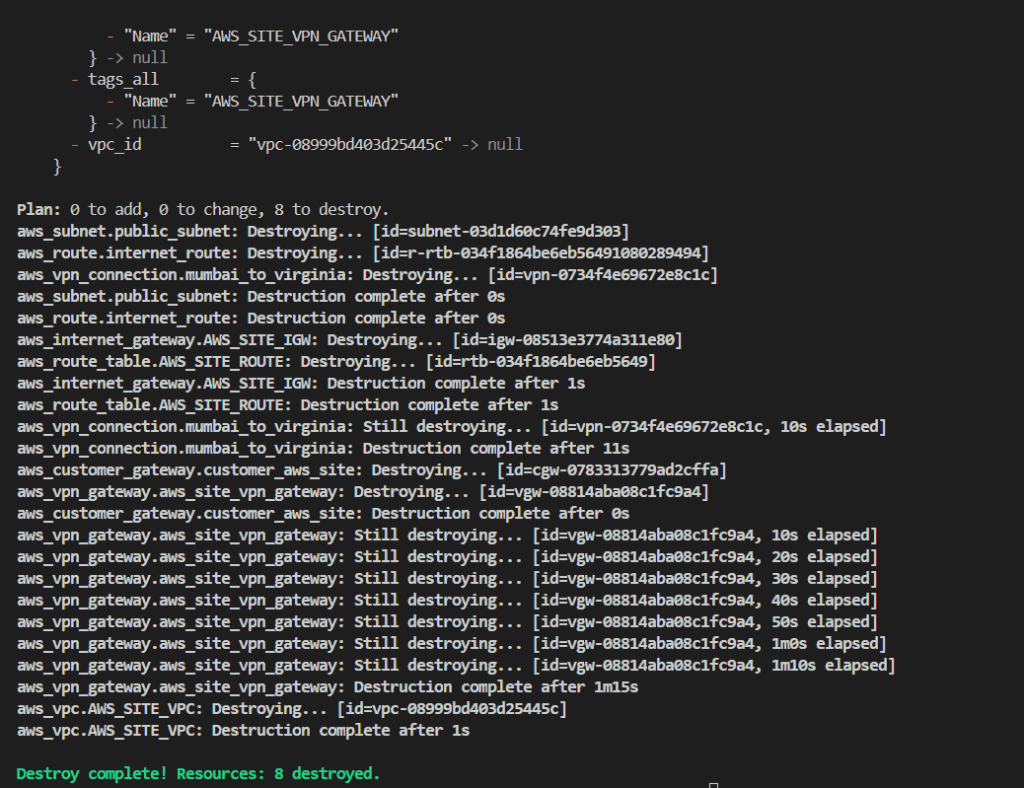
Step#13:Delete all the resources created
To delete all resources created just enter the below command in both terminal:
terraform destroy -auto-approve
Conclusion:
In conclusion, utilizing Terraform for AWS Site-to-Site VPN setup streamlines network security and connectivity, ensuring seamless encrypted data transfer between on-premises and AWS environments with ease and scalability.
Reference:-
For reference visit the official website .
Any queries pls contact us @Fosstechnix.com.
Related Articles: