In this Article we are going to cover How to Install EFK on Ubuntu 20.04 LTS
Prerequisites
- Ubuntu Server with 20.04/18.04/16.04 LTS
- Java 8 or higher version
- 2 CPU and 4 GB RAM
Update the system packages
sudo apt update
Install the apt-transport-https package to access repository over HTTPS
sudo apt install apt-transport-https
Table of Contents
Install Java on Ubuntu
Lets install OpenJDK 11 on ubuntu using the commands below.
sudo apt install openjdk-11-jdk
Lets verify java version
java -version
Output:
openjdk 11.0.14.1 2022-02-08
OpenJDK Runtime Environment (build 11.0.14.1+1-Ubuntu-0ubuntu1.20.04)
OpenJDK 64-Bit Server VM (build 11.0.14.1+1-Ubuntu-0ubuntu1.20.04, mixed mode, sharing)
Setting the JAVA_HOME Environment Variables
To define the environment variable open the below file:
sudo nano /etc/environment
Paste the below variable into the file:
JAVA_HOME="/usr/lib/jvm/java-11-openjdk-amd64"
Load the environment variable using below command
source /etc/environment
Lets verify JAVA_HOME variable
echo $JAVA_HOME
Output:
/usr/lib/jvm/java-11-openjdk-amd64
How to Install EFK on Ubuntu 20.04 LTS
Install ElasticSearch on Ubuntu
Download and install the public signing key:
wget -qO - https://artifacts.elastic.co/GPG-KEY-elasticsearch | sudo gpg --dearmor -o /usr/share/keyrings/elasticsearch-keyring.gpg
Save the repository definition to /etc/apt/sources.list.d/elastic-8.x.list:
echo "deb [signed-by=/usr/share/keyrings/elasticsearch-keyring.gpg] https://artifacts.elastic.co/packages/8.x/apt stable main" | sudo tee /etc/apt/sources.list.d/elastic-8.x.list
You can install the Elasticsearch using below command:
sudo apt-get update
sudo apt-get install elasticsearch
Start elacticsearch services
sudo systemctl start elasticsearch
Enable elacticsearch at system startup
sudo systemctl enable elasticsearch
To check the status of elasticsearch
sudo systemctl status elasticsearch
Output:
● elasticsearch.service - Elasticsearch
     Loaded: loaded (/lib/systemd/system/elasticsearch.service; enabled; vendor preset: enabled)
     Active: active (running) since Thu 2022-04-21 06:57:31 UTC; 9s ago
       Docs: https://www.elastic.co
   Main PID: 17266 (java)
      Tasks: 68 (limit: 4693)
     Memory: 2.3G
     CGroup: /system.slice/elasticsearch.service
             ├─17266 /usr/share/elasticsearch/jdk/bin/java -Xshare:auto -Des.networkaddress.cache.ttl=60 -Des.networkaddress.cache.neg>
             └─17539 /usr/share/elasticsearch/modules/x-pack-ml/platform/linux-x86_64/bin/controller

Apr 21 06:57:12 ip-172-31-4-2 systemd[1]: Starting Elasticsearch...
Apr 21 06:57:31 ip-172-31-4-2 systemd[1]: Started Elasticsearch.
Configure Elasticsearch on Ubuntu
Let’s make changes in below configuration file
sudo nano /etc/elasticsearch/elasticsearch.yml
Go to Network section and uncomment network.host and replace your system IP with
network.host: 0.0.0.0
And you need to add this line discovery.seed_hosts: [ ] in discovery section as shown in below:
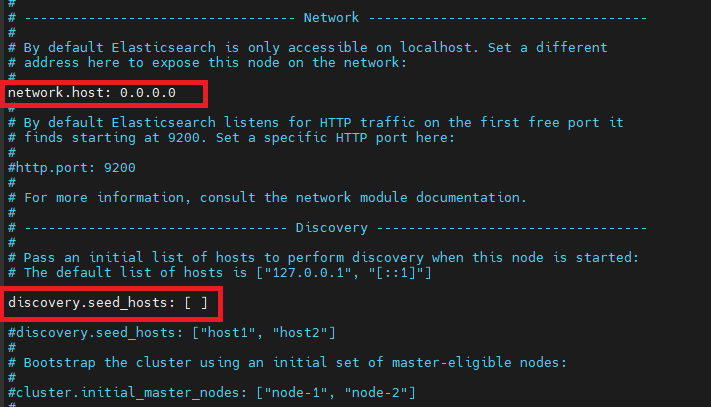
Then second step is go to the BEGIN SECURITY AUTO CONFIGURATION and here you need to replace this true with false as shown in below:
xpack.security.enabled: false

After changing in configuration file you need to restart so run the below command:
sudo systemctl restart elasticsearch
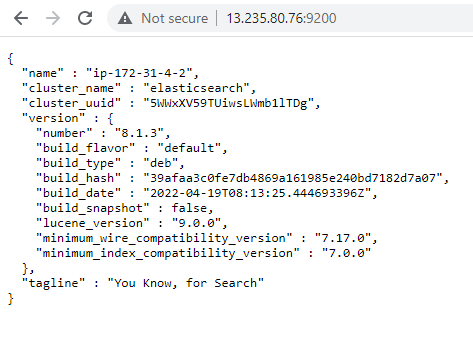
Testing Elasticsearch
Lets test Elasticsearch using curl command by sending HTTP request
curl -X GET "localhost:9200"
Output:
{
  "name" : "ip-172-31-4-2",
  "cluster_name" : "elasticsearch",
  "cluster_uuid" : "5WWxXV59TUiwsLWmb1lTDg",
  "version" : {
    "number" : "8.1.3",
    "build_flavor" : "default",
    "build_type" : "deb",
    "build_hash" : "39afaa3c0fe7db4869a161985e240bd7182d7a07",
    "build_date" : "2022-04-19T08:13:25.444693396Z",
    "build_snapshot" : false,
    "lucene_version" : "9.0.0",
    "minimum_wire_compatibility_version" : "7.17.0",
    "minimum_index_compatibility_version" : "7.0.0"
  },
  "tagline" : "You Know, for Search"
}
You can access using browser
http://systemIP:9200
Uninstall Elasticsearch on Ubuntu
If you wants to uninstall elasticsearch then you run the below commands:
sudo apt-get --purge autoremove elasticsearch
sudo apt-get remove --purge elasticsearch
sudo rm -rf /etc/elasticsearch
Install Fluentd on Ubuntu
Update your system packages:
apt update
Now run the below command:
curl -L https://toolbelt.treasuredata.com/sh/install-ubuntu-bionic-td-agent3.sh | sh
Install fluent plugins:
td-agent-gem install fluent-plugin-elasticsearch
Give permission using chown:
chown -R td-agent: /var/log/td-agent/
Now restart the service:
sudo systemctl restart td-agent.service
Let’s check the status using below command:
sudo systemctl status td-agent.service
sudo update-rc.d td-agent defaults 95 10
sudo /bin/systemctl daemon-reload
Furthermore, you can repeat the td-agent installation steps, mentioned above, on the Client server in the same way.
Now adding configuration in server side td-agent to listen on port 24224 from everywhere.
cd /etc/td-agent/
mv td-agent.conf td-agent.conf-default
nano td-agent.conf
Add following lines in the td-agent file, save it and restart the td-agent server.
<source>
 @type forward
 port 24224
 bind 0.0.0.0
</source>
@include /etc/td-agent/conf.d/*.conf
After changes you need to restart the service:
mkdir /etc/td-agent/conf.d
/etc/init.d/td-agent restart
Install Kibana on Ubuntu 20.04 LTS
It is recommended to install Kibana next. Kibana is a graphical user interface for parsing and interpreting collected log files.
Run the following command to install Kibana:
sudo apt-get install kibana
Start the Kibana service:
sudo systemctl start kibana
Enable the Kibana service:
sudo systemctl enable kibana
Let’s check the status of kibana:
sudo systemctl status kibana
Output:
● kibana.service - Kibana
     Loaded: loaded (/lib/systemd/system/kibana.service; enabled; vendor preset: enabled)
     Active: active (running) since Fri 2022-04-22 10:12:06 UTC; 17min ago
       Docs: https://www.elastic.co
   Main PID: 442 (node)
      Tasks: 11 (limit: 4693)
     Memory: 553.3M
     CGroup: /system.slice/kibana.service
             └─442 /usr/share/kibana/bin/../node/bin/node /usr/share/kibana/bin/../src/cli/dist

Apr 22 10:13:15 ip-172-31-3-46 kibana[442]: [2022-04-22T10:13:15.240+00:00][INFO ][plugins.ruleRegistry] Installed resources for index>
Apr 22 10:13:15 ip-172-31-3-46 kibana[442]: [2022-04-22T10:13:15.254+00:00][INFO ][plugins.ruleRegistry] Installed resources for index>
Apr 22 10:13:15 ip-172-31-3-46 kibana[442]: [2022-04-22T10:13:15.271+00:00][INFO ][plugins.ruleRegistry] Installed resources for index>
Apr 22 10:13:15 ip-172-31-3-46 kibana[442]: [2022-04-22T10:13:15.272+00:00][INFO ][plugins.ruleRegistry] Installed resources for index>
lines 1-20/20 (END)
Configure Kibana on Ubuntu 20.04 LTS
open the kibana.yml configuration file for editing:
sudo nano /etc/kibana/kibana.yml
Uncomment this below lines and localhost replace with 0.0.0.0 (means any ip_address):
server.port: 5601
server.host: "localhost"
elasticsearch.hosts: ["http://localhost:9200"]
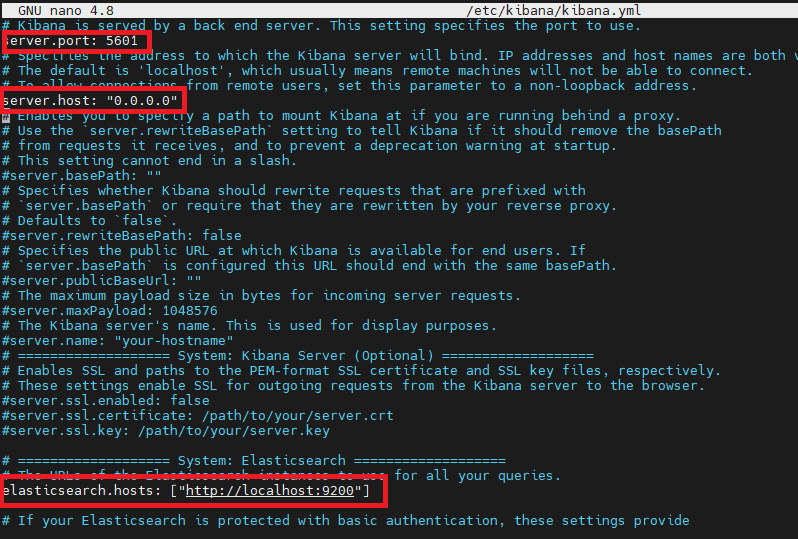
After changing configuration file you need to restart kibana
sudo systemctl restart kibana
Test Kibana
To access Kibana, open a web browser and browse to the following address:
http://ip_address:5601
Kibana dashboard:

Conclusion:
We have covered Install EFK on Ubuntu 20.04 LTS.
Related Articles:
- How to Install Elastic Stack on CentOS 7
- How to Install ELK Stack on Ubuntu 18.04/16.04 LTS
- How to Install Elastic Stack on Ubuntu 20.04 LTS
- How to Install Elasticsearch 8 on Ubuntu 20.04 LTS
- How to Install Elastic Stack 8 on Ubuntu 20.04 LTS
Reference:
It’s awesome 👍
Thanks